… for Apple Final Cut Pro X

Tip #095: Apply Keywords Faster!

Larry Jordan – https://LarryJordan.com

Adding Keywords doesn’t have to be a drag…

Tip Screen Shot

Topic $TipTopic

A faster way to apply an existing keyword to multiple clips in the Browser is to select all the clips to which you want to apply the keyword, then, drag them on top of the keyword in the Library List.

Poof! Instant keywords.

EXTRA CREDIT

This also adds those clips to any relevant Keyword Collections.


Please rate the helpfulness of this tip.

Click on a star to rate it!

… for Random Weirdness

Tip #118: Walkie-Talkie Radio Codes

Larry Jordan – https://LarryJordan.com

PremiumBeat decodes common on-set radio chatter.

Tip Screen Shot

Topic $TipTopic

The folks at PremiumBeat recently published the basics of on-set walkie-talkie etiquette. (Smile… back “in the day” we used megaphones. Walkie-talkies are MUCH cooler.)

Here are some common radio codes you may hear during production:

  • Go to. This is a request to switch from the general communication frequency to a specific frequency for a longer conversation.
  • What’s your 20? What’s your location.
  • Copy and 10-4. Yes, I understand.
  • 10-1 and 10-2. Um, bathroom break.
  • Go again. Tells the other party to please repeat themselves.
  • Flying in/out. Bringing someone or something to or from the set.
  • Keying or Hot-micing. You are pressing the mic button and not talking. This will not make you any friends.

Share your own favorite codes in the comments below.


Please rate the helpfulness of this tip.

Click on a star to rate it!

… for Adobe Premiere Pro CC

Tip #041: Optimizing Premiere Transition Preferences

Larry Jordan – https://LarryJordan.com

Premiere’s defaults aren’t bad. But they aren’t very good, either.

Tip Screen Shot

Topic $TipTopic

Preferences are exactly that – YOUR preferences on how the software should work. This means that you can set your preferences however you want. But, as a starting point to your own modifications, let me share some of my preferences with you. Use or modify these in whatever ways seem good to you.

Preferences > Timeline

The hidden “gotcha” with the transition settings are that they use frames to determine durations. Which is fine – until your frame rates change. At which point, all these durations need to change as well.

  • Video. I prefer transitional dissolves that last 2/3 of a second; a one-second transition just hangs on screen for too long. However, I also shoot mostly 60 fps material. So I change this to 40 frames (40/60 = 2/3).
  • Audio Transition. Most of the time, I like a 1/4 second fade-up, while for fade-outs, I prefer about one second.  Sadly, Premiere only allows me to pick one so I generally leave this at the default.
  • Still image. Here’s a cool tip. If you are building a still image montage set to music, figure out the duration between beats, then import all your stills to match that duration. This means you can edit stills into the timeline without setting an In or an Out.
  • Timeline Playback Auto-Scrolling. It takes more CPU power, but Smooth Scroll looks nicer. Use Page Scroll on slower systems, as it uses less CPU overhead.
  • Timeline mouse scrolling. Vertical allows you to quickly scroll up in projects that use many stacked clips. Most of my edits are five tracks or less, so I change this to Horizontal, so I can quickly move around the timeline.

Please rate the helpfulness of this tip.

Click on a star to rate it!

… for Apple Final Cut Pro X

Tip #018: Export Multiple Segments or Clips at Once

Larry Jordan – https://LarryJordan.com

A hidden trick that makes exporting multiple segments even faster.

Tip Screen Shot

Topic $TipTopic

While it’s true that you can only have one In and Out in the timeline, that is NOT true for the Browser. Clips in the Browser support selecting and exporting as many segments as you want.

To select more than one section in a clip, drag to set the In and Out for the first section, then press the Command key and drag to set as many additional sections as you want!

NOTE: To delete a selected range in the Browser, select it, then type Option + X.

With the ranges you want to export selected, choose File > Share and note that this menu now displays the number of segments you have selected.

BONUS

You can also use this technique to select and export multiple clips in the Browser, not just segments inside a single clip. As well, you can use this technique to select and edit multiple clips or segments into the timeline at once.


Please rate the helpfulness of this tip.

Click on a star to rate it!

… for Apple Final Cut Pro X

Tip #076: Save A Custom Search (Part 4)

Larry Jordan – https://LarryJordan.com

Smart Collections are simply “saved searches.”

Tip Screen Shot

Topic $TipTopic

A Smart Collection is Apple’s way of saying “saved search.” In other words, you are saving the search criteria to use again in the future. Saving a search has two big benefits:

  • It is dynamic. As additional clips are added to the the library, the results of this search will update include those clips as well.
  • It is reusable. Smart Collections show up at the top of the Library window for each project. Once you create a Smart Collection, all you need to run it again is to click it.

To create a Smart Collection, open the Custom Search window, enter your search criteria, then click New Library Smart Collection.

Final Cut will save the search criteria, then, over in the Library List, prompt you to name it. Give it a name that makes sense to you.

Poof! Instant, reusable and highly-complex searches at your fingertips.


Please rate the helpfulness of this tip.

Click on a star to rate it!

… for Apple Final Cut Pro X

Tip #065: Faster Ways to Apply an Effect

Larry Jordan – https://LarryJordan.com

Dragging is easy, but these tricks are quicker.

Tip Screen Shot

Topic $TipTopic

Normally, to apply an effect, you open the Effects Browser (shortcut: Cmd + 5), then drag the effect on top of the clip you want to add it to in the Timeline.

Works great. Takes forever.

Here are two variations that are faster.

OPTION 1

  • Select one or more clips in the Timeline. (The real time-savings with this technique come when need to apply the same effect to multiple clips.) The clips can be located anywhere in the Timeline.
  • Open the Effects Browser and find the effect you want to apply to ALL the selected clips.
  • Double-click the effect to instantly apply it to all selected clips.

OPTION 2

  • Select a Timeline clip that has the effect you want to apply to other clips.
  • Choose Edit > Copy.
  • Select all the other clips in the Timeline to which you want to apply this effect.
  • Choose Edit > Paste Effects. This pastes ALL the effects attached to the first clip into the selected clips

VARIATION

  • Choose Edit > Paste Attributes. This allows you to select which of the effects applied to the first clip are applied to the selected clips.

Please rate the helpfulness of this tip.

Click on a star to rate it!

… for Apple Final Cut Pro X

Tip #096: A Faster Way to Rename Keywords

Larry Jordan – https://LarryJordan.com

Renaming a keyword is easy – if you know where to make the change.

Tip Screen Shot

Topic $TipTopic

What happens if you’ve applied keywords to a lot of clips, only to discover that you misspelled one of the keywords. Or want to change a keyword for a different word?

Relax! This is easy.

  • Select the Keyword in the Library List
  • Press Enter to open the name for editing
  • Rename it
  • Press Enter to apply the name

Instantly, every clip with this keyword is updated to the new name.


Please rate the helpfulness of this tip.

Click on a star to rate it!

… for Adobe Premiere Pro CC

Tip #043: Optimize Premiere Preferences for Performance

Larry Jordan – https://LarryJordan.com

Five Settings That Can Speed Your System

Tip Screen Shot

Topic $TipTopic

Most of the time, you alter Premiere’s preference settings to suit your, ah, preferences. However, there are five preferences that also affect performance.

Preferences > Media

  • Growing Files. A growing file is a special media file that can be edited while it is still being recorded; think sports highlights. When checked, every 60 seconds Premiere will check your hard disk for changes. If nothing is changing, all you are doing is slowing down your system. My recommendation is to uncheck this.

Preferences > Memoryy

  • RAM reserved for… Keep this low. On my system, I set this to 4 GB. The remaining RAM is reserved and shared between Adobe apps. Once you quit, this RAM is released back to the OS.
  • Optimize rendering for…. If you have 32 GB RAM or more, change this to Performance.

Preferences > Playback

  • Enable Mercury Transmit. Uncheck this UNLESS you are driving a video, not computer, monitor (say via HTML or 3rd-party interface box). Mercury Transmit is how Premiere outputs video to a video monitor. If all you are using are computer monitors, you can turn this off.

File > New Project Settings

  • Renderer. This determines how Premiere generates render files. On recent Macs set this to Metal; and, shortly, Metal 2. On Windows set this to OpenCL. This enables hardware acceleration for effects, rendering and export.

Please rate the helpfulness of this tip.

Click on a star to rate it!

… for Random Weirdness

Tip #038: Magic Maintenance: Do a Safe Boot

Larry Jordan – https://LarryJordan.com

Three steps for smooth operations.

Tip Screen Shot

Topic $TipTopic

Keeping our systems running their best requires periodic maintenance. A Safe Boot is something you can do yourself and, for best results, I recommend you do this every couple of weeks. This will not affect the data or applications stored on your system.

  • Start, or restart, your computer while holding the Shift key down. Continue holding the Shift key for 30 seconds after you see the start-up thermometer appear.
  • Log into your computer. You know you held the Shift key down long enough if the words “Safe Boot” appear in the upper right corner of your screen. If they don’t, restart your system and press the Shift key until the log-in screen appears.
  • After login, go to Utilities > Disk Utility, select the name of your boot drive (generally, “Macintosh HD”) from the sidebar on the left then choose First Aid.
  • When repair is complete, restart your Mac and, this time, don’t hold any keys down.

BONUS

Sometimes, your system will act strange and Safe Boot won’t fix it. Here’s a more thorough repair process:

  • Restart your computer and press Cmd + R during restart. This will take a LOT longer than normal. This launches your computer from a hidden partition with a “recovery version” of macOS on it. This allows much deeper repair of the boot disk.
  • After a bit, a menu will appear allowing you to choose between four options. Choose Disk Utility.
  • Again, select your boot drive and click First Aid. When repair is complete, restart your computer.

Following these procedures should minimize the amount of time you spend trying to fix problems with your system.


Please rate the helpfulness of this tip.

Click on a star to rate it!

… for Adobe Premiere Pro CC

Tip #044: Optimize Premiere Preferences for Cache Files

Larry Jordan – https://LarryJordan.com

Cache files help Premiere work faster.

Tip Screen Shot

Topic $TipTopic

The Media Cache preferences have a significant impact on overall system performance because this determines where all your media work files will be stored.

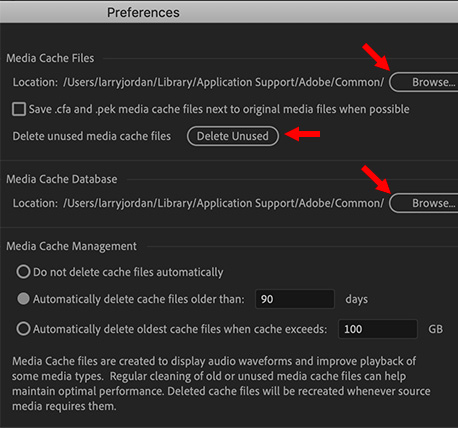
Media Cache files and databases are work and temporary files that Premiere uses during editing – for example, audio waveforms and thumbnails – and when sharing media between applications. For best results, these should be stored somewhere other than where media files are stored, though that is not required.

The default settings store these on the boot drive in the Library inside your Home directory, but you can re-point these to any folder on any drive – provided the storage is fast enough. Cache files need to be on fast drive.

  • Media Cache Files. These are the data files themselves. Click the Browse button to store these to a different location. However, changing the location does not move any files that are already stored in the original location.
  • Delete unused media cache files. It is a good idea to delete these if your drive starts to fill up, just regain storage space. This option only deletes cache file that are not being used. Media and project files are not affected.
  • Media Cache Management. This allows you to schedule to automatically delete older cache files. I tend to delete files based upon age, rather than size.

If, by accident, you delete cache files that are being used, or new cache files are needed, Premiere will re-create them automatically.


Please rate the helpfulness of this tip.

Click on a star to rate it!