… for Random Weirdness

Tip #861: NewTek Launches Training Site

Larry Jordan – LarryJordan.com

new classes provide training and, if needed, certification.

NewTek University logo.

Topic $TipTopic

Last week, NewTek announced exclusive learning and certification opportunities through NewTek University. NewTek University courses range from operating guides to classes on selling NewTek solutions.

All learning materials are available online and on-demand, connecting users with an unparalleled learning opportunity no matter their location or time zone. New team members can be brought right up to speed in no time with new content being added to the existing library throughout the rest of 2020.

Class fees start at $895 and exams at $249. Free sample classes are avaliable. All courses are available 24/7 online on-demand.

For more information visit: here.


Please rate the helpfulness of this tip.

Click on a star to rate it!

… for Random Weirdness

Tip #864: 5 Things to Build Trust with Clients

Larry Jordan – LarryJordan.com

Success as an editor requires two key things: Trust and Comfort.

Zack Arnold. (Image courtesy of Frame.io.)

Topic $TipTopic

Award-winning editor, Zack Arnold, writes in a blog published by Frame.io on how to have a long-standing career in media. Here’s an excerpt.

It isn’t the software. We are not keyboard monkeys, we are storytellers. Our ability to tell compelling and engaging stories and make an audience feel something supersedes our knowledge of any specific piece of software.

Clients care if you can tell compelling stories, move people emotionally, and deliver on deadline. And most importantly, they care whether or not they can work with you in a dark room for 60 hours a week (without you murdering each other).

If you’re interested in becoming an editor who is considered great in the room, there are only two things you have to focus on: Trust and comfort. To get there, consider these five points.

  1. Create a safe environment, i.e. a “No Chaos Zone”
  2. Accept that everyone has their own process, and set clear expectations on Day 1
  3. Embrace and experiment with new ideas (no matter how stupid)
  4. Become a ninja at finding “The note behind the note”
  5. Become so fast you can finish people’s sentences (and find any shot instantly)

Zack’s entire blog is an outstanding read. Read it all here.


Please rate the helpfulness of this tip.

Click on a star to rate it!

… for Visual Effects

Tip #867: Four Tips to Improve VFX Compositing

Larry Jordan – LarryJordan.com

The trick with any composite is to make all elements look related.

(Image courtesy of pexels.com.)

Topic $TipTopic In his YouTube video, Javert Valbarr provides tips to improve compositing for visual effects. Here’s a summary.

  1. Look out for your black and white levels when adding elements. You want the elements you’re bringing in to look like a part of the scene and to belong to the same world. Keep composted elements within the range of lightest and darkest values of the original footage, or change them to meet in the middle. This can be fixed by applying LUTs and changing the color space of video elements.
  2. Use selective blurring to draw attention to the most important areas of your shot. This can be done using color gradient effects.
  3. Match the grain/quality of your footage and composited elements. You may need to add grain to composited elements to create the illusion that they belong to the story world. When adding grain or noise, make sure to match the color of the added grain to the color of the original grain. Conversely, you may need to sharpen composited elements to match your footage.
  4. Don’t forget that color grading has a large impact on the final look of the composited image. The final step can and will change your image! 

Here’s the link to his video.


Please rate the helpfulness of this tip.

Click on a star to rate it!

… for Adobe Premiere Pro CC

Tip #857: Customize Your Playback Controls

Larry Jordan – LarryJordan.com

Customizing playback controls simplifies proxy workflows, creating still frames and other tasks.

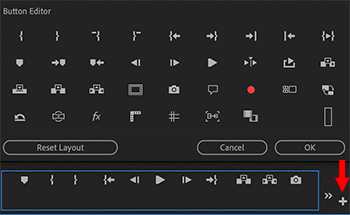
The Button Editor panel for the Program Monitor in Premiere Pro.

Topic $TipTopic

One of Adobe’s goals over the last several releases was to simplify the Premiere interface. (Because, truthfully, it was getting pretty darn crowded…) This simplification took the form of removing buttons. But… what if you need one of those buttons back? Not to worry – here’s how.

  • In the Program Monitor or Source Monitor, click the small plus sign in the lower-right corner.
  • This displays the Button Editor. (See screen shot.)
  • Hover over a button to read a description of what the button does.
  • To add a button to the control panel, drag it from the upper section into the blue controls box. For example, I added the Proxy button to the controls box to make it easy to toggle between Proxy and High-quality view.
  • To remove a controls button, drag it out of the blue box.
  • To reset the controls box back to factory defaults, click the Reset Layout button.
  • Then, when you are done, click OK.

Please rate the helpfulness of this tip.

Click on a star to rate it!

… for Apple Motion

Tip #842: How to Improve Apparent Focus

Larry Jordan – LarryJordan.com

The Unsharp mask is applied (left) with a Radius of 2.2. The right side is the original image.

Topic $TipTopic

Given the state of today’s technology you can’t refocus an image after it’s been shot. (Well, not in any tool that I have access to…)

However, you can create the illusion of focus, which may bail you out when an image is “just a bit soft.” Here’s how.

Select the layer containing the soft image, then apply Filters > Sharpen > Unsharp mask.

NOTE: Don’t use Sharpen, Unsharp mask does a better job.

What sharpening does is emphasize the edges between objects by boosting the contrast at the edge itself. Taken to extremes this will put a harsh border around every edge. Don’t do that.

Instead, change the default Radius settings for Unsharp Mask so they are between 1.0 and 2.2. As you can see in the screen shot, the left side of her hair has sharpening and has a more apparent focus than the right side. The difference is a Radius of 2.2.

The effect is most noticeable in her hair, as the screen shot illustrates.

With this filter, less is definitely more because the default settings are excessively out of whack.

EXTRA CREDIT

Remember, this filter only affects edges. So, it won’t modify skin or other areas which have no significant texture.


Please rate the helpfulness of this tip.

Click on a star to rate it!

… for Apple Motion

Tip #819: Use Motion’s Motion Tracker

Larry Jordan – LarryJordan.com

Motion track is a great way to move text or pointing arrows in sync with something else in the frame.

(Footage courtesy of Jim Walker and Lobsters Gone Wild Productions.)
The key to tracking success is finding a clearly defined and not obscured tracking point.

Topic $TipTopic

Motion has an OK motion tracker built into it. It’s much better than Final Cut, which has none, but not as good as Mocha Pro. Here’s how to use it.

  • Import a video clip containing the movement you want to track; the shark in the screen shot.
  • Create a new layer with the object you want to move in sync with the first object; the text “Shark” in my example.
  • Select the text track and apply Behaviors > Motion Track > Match Move.
  • In Inspector > Behaviors, make sure the background clip (Shark) appears in the top image box. If not, drag it in.
  • Position the playhead where you want the track to start.
  • Drag the yellow dot from the center of the text clip and drag it onto a clearly identifiable point in the background clip.

NOTE: This is the critically important step. The tracking point on the “shark” video needs to be visible for the entire track, sharply defined and different from elements in the image behind it. Motion’s motion tracker gets easily confused. If you don’t get a good track, try a different position for the tracking point.

  • Then, in Inspector > Behaviors click Analyze.

The motion tracker will track the moving object – the dorsal fin point in my example – moving the text in sync with the shark.

EXTRA CREDIT

There are many configuration options with this behavior. Read the help files to learn more.


Please rate the helpfulness of this tip.

Click on a star to rate it!

… for Adobe Premiere Pro CC

Tip #821: Export a Sequence Range

Larry Jordan – LarryJordan.com

Premiere makes it easy to export full sequences – or just segements.

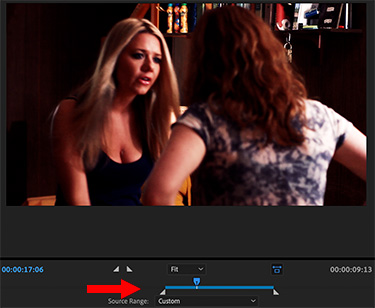
The blue line at the bottom of the Export Media window supports setting an In or Out.

Topic $TipTopic

When you need to export just a portion of a sequence, Premiere makes it easy – but not obvious. Here’s how.

  • Open the sequence you need to export.
  • Set an In and Out in the timeline to mark the section you want to export.
  • Choose File > Export > Media (Shortcut: Cmd + M).
  • In the export window, on the left, the In and Out are shown in the blue timeline at the bottom (screen shot, red arrow).

EXTRA CREDIT

If you select Export Media, and forget to set an In or Out, no problem. In the timeline on the left of the Export Media window you can set the In or Out by dragging a white triangle or typing “I” and/or “O”.

To alter or remove an In or Out, regardless of how it was set, drag the white triangle left or right. There is no “instant reset button.”


Please rate the helpfulness of this tip.

Click on a star to rate it!

… for Apple Motion

Tip #805: Control the Shape of Path Curves

Larry Jordan – LarryJordan.com

Curves are shaped by the white Bezier control handles revealed by the Edit Points tool.

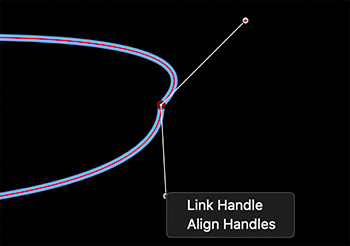
Unlinked Bezier control handles changing the shape and smoothness of a curve.

Topic $TipTopic

Using either the Pen or Paint Brush tools, we can create paths in Motion. The Pen tool creates a path, while the Paint Brush tool creates a path then decorates it with a shape style.

The trick, as with all path tools, is in how you create corners. When using the Pen tool to create a path, click to create a corner, or click and drag to create a curve. However, what happens if you don’t like the shape of the curve? Change to the Edit Points tool, then Control-click on a corner dot in the path.

This displays a menu allowing you to convert a corner to a smooth curve, or a smooth curve back to a corner.

When a corner is converted to a smooth curve, two white lines appear with a dot at each end. These are called “Bezier control handles.”

Drag the dots closer together to change the smoothness of the curve. Change the angle to change the shape of the curve.

EXTRA CREDIT

  • Press Option and drag to just change one dot. This also disconnects (“Breaks”) the two dots even when you no longer press the Option key.
  • Press Shift to constrain the movement of a dot.
  • Control-click a white dot to Link or break a dot, as well as align the two dots back into a straight line.

Watch how the curve changes as you adjust each dot by itself.


Please rate the helpfulness of this tip.

Click on a star to rate it!

… for Visual Effects

Tip #810: Quickly Transfer iPhone Media

Larry Jordan – LarryJordan.com

Image Capture is fast, secure, flexible… and free!

Topic $TipTopic

In my weekly newsletter, last week, I illustrated a process to quickly and securely transfer photos or video from an iPhone to a Mac using Image Capture.

While many of us use AirDrop, Apple’s free utility, Image Capture, provides the following benefits:

  • Faster file transfers due to a direct, wired connection
  • More secure transfers. There is no risk you’ll send the wrong image to the wrong person.
  • Easier selection of multiple images
  • Directly transfer files to a specific folder, without transferring images to the Downloads folder first
  • Immediately delete media from your iPhone once it has transferred to your computer

I’ve used AirDrop, Preview and 3rd-party utilities. Image Capture beats all of them.

Here’s the link to my article.


Please rate the helpfulness of this tip.

Click on a star to rate it!

… for Adobe Premiere Pro CC

Tip #801: Change the Default Video Transition

Larry Jordan – LarryJordan.com

Any video transition can be set as the default.

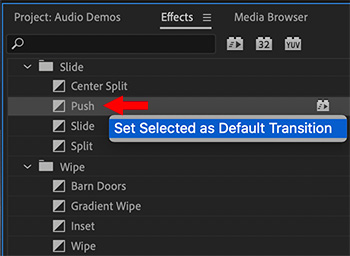
Control-click any video transition to set it as the default transition.

Topic $TipTopic

I re-discovered this tip while researching a recent webinar covering the basics of editing in Premiere.

The default video transition is a standard cross-dissolve, but you can change this setting at any time. Here’s how.

  • In the Effects panel, find the video transition you want to use as a default.
  • Control-click the name of the transition, then select Set Selected to Default Transition.

That’s it.

NOTE: To quickly apply the default video transition, select the edit point, clip, or clips you want to apply it to, then type Cmd + D. (Windows type Cntrl + D).

EXTRA CREDIT

The default audio transition is a cross-fade. You can change the default duration for both audio and video transitions in Preferences > Timeline.


Please rate the helpfulness of this tip.

Click on a star to rate it!