Render files save time – but take space. Delete them whenever you need more space.
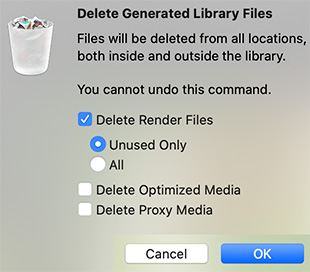
The “Delete Generated Media” dialog.
Final Cut Pro X creates render files whenever you apply an effect to a clip, or change a setting in the Inspector. This is not bad, in fact, its a good thing – because it allows FCP X to play even the most complex effects at full speed and resolution. However, these render files take space. They are as big as a “normal” video file – in fact, they use the same codec, frame size and frame rate as your project.
While you need them for any clips in your project, FCP X does not erase them when you remove a clip. Why? Because it assumes you may want to use that same clip and effect somewhere else in your project. So it saves the render files to save you time later.
This means that render files accumulate, taking up a lot of extra storage space. Fortunately, it is easy to get rid of them, here’s how.
Select the Library, if you want to make a global change.
Select an Event, if you want to delete render files only for the elements in an event.
Select a Project, if you only want to delete render files for a specific project.
Choose File > Delete Generated Media.
Choose Delete Render Files > Unused Only.
All unused render files will be deleted.
EXTRA CREDIT
You can delete “All” render files, but as soon as you reopen a project, any needed render files for that project will be re-created; this means you don’t really save much space by deleting all renders. A better choice for active projects is “Unused only.”
When a project is done, though, feel free to delete all render files to save space. In the event you delete render files that Final Cut needs, no problem. FCP X will simply re-create them. No problem.
Please rate the helpfulness of this tip.
Click on a star to rate it!
https://www.theinsidetips.com/wp-content/uploads/2019/09/Tips-Logo-700x150.jpg00Larry Jordanhttps://www.theinsidetips.com/wp-content/uploads/2019/09/Tips-Logo-700x150.jpgLarry Jordan2020-06-22 01:30:002020-06-22 01:30:00Tip #778: Delete Render Files to Save Space
Pricing is hard – but it isn’t cookie-cutter either.
This article first appeared in MotionArray.com. This is an excerpt.
Ask any freelancer what part of their job they hate the most and chances are a good chunk of them will point to the inescapable chore that is pricing. Pricing your own services is awkward, confronting, and much like breaking up with a partner, you just wish someone else could just step in and do the dirty work for you.
But luckily for all you free agents out there, we have a quick little formula that’ll help you tackle this supremely uncomfortable task so you can quit stressing and get back to doing what you love most—making video magic!
As you’ve probably realized by now, no two video productions are the same, which means the fees you charge for them shouldn’t be either. Tailoring your prices to each project is key.
Calculate Your Outgoing Expenses. The first thing you’re going to want to do is make a list of all the expenses you’re going to incur throughout the course of your project. This includes everything from the planning phase all the way through to post-production. We’re talking equipment rental, location hire, set props, actors and crew personnel, transportation costs, stock music licenses, the whole kit and kaboodle.
Now repeat after me: All of these expenses are things that my client and, not me—repeat: NOT ME—will be covering.
Calculate Your Time and Effort. Next, you’ll need to make a list of all the tasks you personally will need to undertake to see the project through to completion and how long you estimate each one to take.
This will include any client meetings and phone calls, scripting or storyboarding, logistical planning, the total number of hours spent on set, as well as any post-production work you’ll be required to do or oversee.
Decide How Much Profit You Want to Make. Lastly, you’ll need to decide how much money you’d like to walk away from the project with. To help you do this, go back to step two and take into account all of the time and effort you estimate you’ll be putting into the project and try and place a figure on what you think it’s worth.
Once you’ve decided what you’d like your profit to be, add it to your total sum of project expenses and voilà: there you have your complete project fee!
Please rate the helpfulness of this tip.
Click on a star to rate it!
https://www.theinsidetips.com/wp-content/uploads/2019/09/Tips-Logo-700x150.jpg00Larry Jordanhttps://www.theinsidetips.com/wp-content/uploads/2019/09/Tips-Logo-700x150.jpgLarry Jordan2020-06-05 01:30:002020-05-29 17:27:30Tip #743: 3-Step Pricing Formula for Videographers
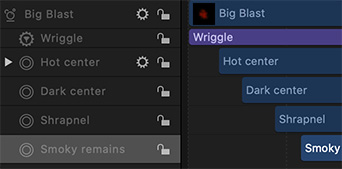
A particle system in the Apple Motion timeline, with elements offset.
This tip originally appeared as an Apple KnowledgeBase article. This is an excerpt.
When you create a particle system, its duration can be as long or short as necessary, regardless of the duration of the original source layers used to create the particle system. The duration of a particle system is defined by the duration of the emitter object. Changing the In or Out point of an emitter in the Properties Inspector, Timeline, or mini-Timeline changes the duration of the entire particle system.
By default, particles are generated by every cell in a system for the duration of the emitter. The duration of each generated particle is defined by the Life parameter of the cell that generated it, and not by the duration of the cell itself.
The duration of the cell governs the time span over which new particles are generated. You can change a cell’s duration by dragging its position or its In and Out points in the Timeline. In this way, you can adjust the timing that defines when each cell’s particles emerge.
For example, you can create a particle system that simulates an explosion by offsetting the appearance of different types of particles. First, dense white sparks emerge from the center. Half a second later, more diffuse orange blast particles appear around a larger area. One second after that, hot smoke emerges from underneath both of these layers, and smoky remains are left as the particles fade away.
You can offset a cell in the Timeline or mini-Timeline so that the cell starts before the emitter. This creates a “pre-roll” in which the particle simulation begins before the particles are drawn.
Please rate the helpfulness of this tip.
Click on a star to rate it!
https://www.theinsidetips.com/wp-content/uploads/2019/09/Tips-Logo-700x150.jpg00Larry Jordanhttps://www.theinsidetips.com/wp-content/uploads/2019/09/Tips-Logo-700x150.jpgLarry Jordan2020-05-28 01:30:002020-05-28 01:30:00Tip #717: Particle System Timing in Motion
Slipping adjusts content without affecting duration.
Press the Option key, while dragging in the mini-timeline, to slip a clip.
This tip originally appeared as an Apple KnowledgeBase article. This is an excerpt.
Slipping adjusts a clip so that, while the duration remains the same, the in and out points shift to different positions in the clip.
NOTE: You can’t slip a clip if it hasn’t been trimmed first. You need handles at each end to slip a clip.
The mini-Timeline lies just above the canvas toolbar and below the canvas, providing an at-a-glance look at where selected objects fit into your overall project. To slip a clip:
In Motion, select the clip you want to modify so that it appears in the mini-Timeline.
Position the pointer over the body of the clip in the mini-Timeline, then press and hold the Option key. The pointer changes to a slip pointer.
Continue to press and hold the Option key, drag left or right in the mini-Timeline to use a later or earlier part of the clip.
A tooltip appears, indicating the new In and Out points.
Please rate the helpfulness of this tip.
Click on a star to rate it!
https://www.theinsidetips.com/wp-content/uploads/2019/09/Tips-Logo-700x150.jpg00Larry Jordanhttps://www.theinsidetips.com/wp-content/uploads/2019/09/Tips-Logo-700x150.jpgLarry Jordan2020-05-28 01:30:002020-05-22 20:45:18Tip #718: Use Slip to Change Shot Content in Motion
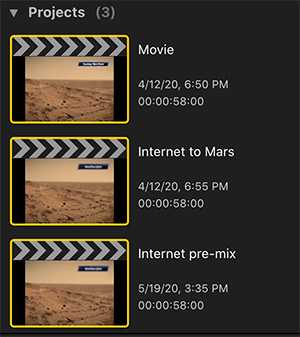
Final Cut now supports exporting multiple projects at the same time.
Select all the projects to export, then choose File > Share.
One of the new features in the 10.4 update to Final Cut Pro X is the ability to export multiple projects at the same time. This is a feature I use regularly as I create excerpts from my weekly webinars. The process is simple:
In the Browser, select all the projects you want to export.
Choose File > Share X Projects (“X” will be replaced by the number of projects you are exporting.
At which point, the export process remains the same.
NOTE: All projects must export using the same settings. If you need to vary settings by project, you’ll need to export each project individually.
EXTRA CREDIT
Use the Background Task window (Window > Background Tasks) to monitor the export process.
Please rate the helpfulness of this tip.
Click on a star to rate it!
https://www.theinsidetips.com/wp-content/uploads/2019/09/Tips-Logo-700x150.jpg00Larry Jordanhttps://www.theinsidetips.com/wp-content/uploads/2019/09/Tips-Logo-700x150.jpgLarry Jordan2020-05-25 01:30:002020-05-22 20:07:28Tip #712: How to Export Multiple Projects at Once
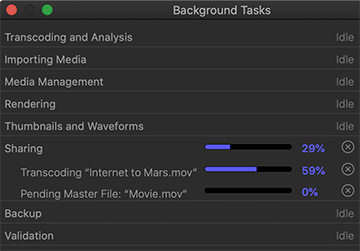
This window monitors everything FCP X is doing in the background.
The Background Tasks window, showing a Share operation in process.
The Background Tasks window is a great way to monitor what Final Cut Pro X is doing behind the scenes. Here’s how to access it.
Final Cut Pro X is designed to do a lot of its work in the background, so you can keep editing in the foreground without slowing down.
To see what’s happening behind the scenes, open the Background Tasks window by choosing Window > Background Tasks (Shortcut: Cmd + 9).
In this screen shot, I’m exporting two projects at the same time. To maximize system resources, Final Cut exports these sequentially; though from my perspective, I only executed one menu command.
If you need to cancel an operation, click the “Circle X.”
I most often use this to check on projects that can take a while:
Transcoding
Rendering
Sharing
Because this is a floating window, you can open it and move it wherever is convenient.
The 3D Transform tool is the fastest and easiest way to rotate an element in 3D.
The on-screen controls in the Viewer when 3D Transform is active.
The 3D Transform tool controls element position and rotation in 3D space.
To select it, either click the “World” icon in the tool bar, or type the shortcut Q. Dragging an arrow changes position, dragging a white circle changes rotation.
3D uses the mnemonic: RGB = XYZ. Arrows and circles are color-coded so you know when way an object will move:
Red. Horizontal movement and rotation on the X-axis.
Green. Vertical movement and rotation on the Y-axis.
Blue. Movement to or from the camera and rotation on the Z-axis.
You don’t need to switch a group into 3D space to take advantage of 3D perspective.
EXTRA CREDIT
When working with Z-space:
If the group is set for 2D, the stacking order in the Layers panel determines foreground and background.
If the group is set to 3D, an element’s position in Z space determines foreground and background.
Please rate the helpfulness of this tip.
Click on a star to rate it!
https://www.theinsidetips.com/wp-content/uploads/2019/09/Tips-Logo-700x150.jpg00Larry Jordanhttps://www.theinsidetips.com/wp-content/uploads/2019/09/Tips-Logo-700x150.jpgLarry Jordan2020-05-21 01:30:002020-05-15 16:21:45Tip #704: What Does 3D Transform Do?
Time spent prepping your photos before editing, speeds the editing process.
The Effect Control > Motion panel in Premiere.
This article, written by Jason Boone, first appeared in PremiumBeat.com. This is an excerpt.
Working with stills in Adobe Premiere Pro is a little bit of a different workflow than when you’re editing video. With images, you’re often dealing with a variety of resolutions and framing, you may event want to add some movement. Here are some tips.
Check the Resolution. Photographs come in all different shapes and sizes. Many have a vertical aspect ratio, while others are square or rectangular. If you plan to scale up a photo, you’ll want to make sure you have a high enough resolution to keep the image sharp, once it’s scaled.
Fit to the Frame. If you’re just looking to match an image to the sequence frame size, there’s a quick, easy way to do this. Once you have an image in your sequence, simply right-click, and select either Scale to Frame Size or Set to Frame Size.
Scale to Frame Size will actually resample your image, removing pixels and setting the scale to 100 percent. That means if you scale this image back up at a later time, you’ll be losing quality.
Set to Frame Size, on the other hand, will simply adjust the scale attribute so that the image fits perfectly in the sequence frame.
To change how Premiere Pro handles your photos by default, go to the Edit > Preferences > Default Media Scaling drop-down menu.
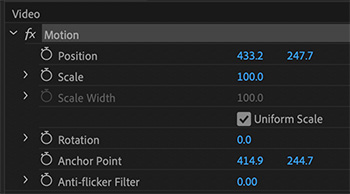
Position the Anchor Point. To reposition the anchor point, select the word “Motion” in Window > Effect Controls panel. This reveals the cross-hairs of the anchor point within the Program panel. With the cross-hairs visible, I can now easily move the anchor point.
Animate the Photo. Use keyframes in Effect Controls > Motion to add movement to your images.
EXTRA CREDIT
The PremiumBeat article, linked above, has more photo tips and a video demo.
Please rate the helpfulness of this tip.
Click on a star to rate it!
https://www.theinsidetips.com/wp-content/uploads/2019/09/Tips-Logo-700x150.jpg00Larry Jordanhttps://www.theinsidetips.com/wp-content/uploads/2019/09/Tips-Logo-700x150.jpgLarry Jordan2020-05-19 01:30:002020-05-19 01:30:00Tip #658: Tips for Working with Photos
The best way to add captions to YouTube is to create the SRT caption file first.
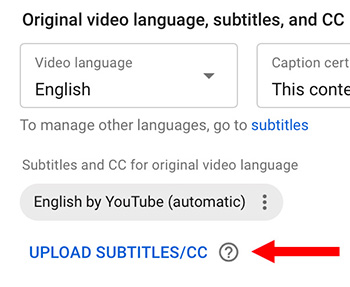
The Upload captions button in YouTube Studio.
Adding subtitles to your clips on YouTube expands the number of people that can benefit from watching your projects. Here’s how to add subtitles and closed captions.
YouTube wants all subtitles in SRT format. The easiest way to do this is to use automatic speech-to-text transcription software. The highest quality is to get a human transcription service to do this for you. You can also do this yourself, but after you transcribe one project, you’ll want to find another way to do this. Transcription is slow, laborious and painstaking to get right.
NOTE: You don’t have to know every language to add subtitles. YouTube sends all subtitles out to Google Translate for other languages.
Here are the steps:
Go to YouTube Studio and select your video.
In the middle of the More Options page you’ll see a link to upload subtitles.
NOTE: Be sure to select the correct language for your subtitles.
Click the Download button.
NOTE: If you need to create or edit your subtitles, click the Edit on Classic Studio button.
Done. After a few minutes, ,your captions will appear for your video on YouTube.
EXTRA CREDIT
Here’s an article I wrote that covers process this in more detail for Adobe Premiere Pro.
Here’s an article I wrote that covers process this in more detail for Apple Final Cut Pro X.
Please rate the helpfulness of this tip.
Click on a star to rate it!
https://www.theinsidetips.com/wp-content/uploads/2019/09/Tips-Logo-700x150.jpg00Larry Jordanhttps://www.theinsidetips.com/wp-content/uploads/2019/09/Tips-Logo-700x150.jpgLarry Jordan2020-05-15 01:30:002020-05-15 01:30:00Tip #669: Add Subtitles to YouTube
We may request cookies to be set on your device. We use cookies to let us know when you visit our websites, how you interact with us, to enrich your user experience, and to customize your relationship with our website.
Click on the different category headings to find out more. You can also change some of your preferences. Note that blocking some types of cookies may impact your experience on our websites and the services we are able to offer.
Essential Website Cookies
These cookies are strictly necessary to provide you with services available through our website and to use some of its features.
Because these cookies are strictly necessary to deliver the website, refuseing them will have impact how our site functions. You always can block or delete cookies by changing your browser settings and force blocking all cookies on this website. But this will always prompt you to accept/refuse cookies when revisiting our site.
We fully respect if you want to refuse cookies but to avoid asking you again and again kindly allow us to store a cookie for that. You are free to opt out any time or opt in for other cookies to get a better experience. If you refuse cookies we will remove all set cookies in our domain.
We provide you with a list of stored cookies on your computer in our domain so you can check what we stored. Due to security reasons we are not able to show or modify cookies from other domains. You can check these in your browser security settings.
Google Analytics Cookies
These cookies collect information that is used either in aggregate form to help us understand how our website is being used or how effective our marketing campaigns are, or to help us customize our website and application for you in order to enhance your experience.
If you do not want that we track your visit to our site you can disable tracking in your browser here:
Other external services
We also use different external services like Google Webfonts, Google Maps, and external Video providers. Since these providers may collect personal data like your IP address we allow you to block them here. Please be aware that this might heavily reduce the functionality and appearance of our site. Changes will take effect once you reload the page.
Google Webfont Settings:
Google Map Settings:
Google reCaptcha Settings:
Vimeo and Youtube video embeds:
Other cookies
The following cookies are also needed - You can choose if you want to allow them:
Privacy Policy
You can read about our cookies and privacy settings in detail on our Privacy Policy Page.