You can convert a Motion project for Final Cut at any time.
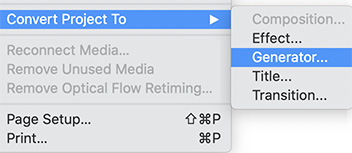
The File > Convert Project menu in Apple Motion.
Normally, you need to decide when you first create a Motion project whether you want to save it as a template for Final Cut Pro X. However, there’s a hidden menu that gives you other options.
The File > Convert Project To menu converts any Motion project into an FCP X effect, generator, title or transition – even after you’ve already created the project. The next time you save the project, even if you’ve already saved it, Motion displays a dialog where you can name the template and determine which effect category to store it in.
This means that if you find yourself with a project you really like, creating a template from it is easy.
Please rate the helpfulness of this tip.
Click on a star to rate it!
https://www.theinsidetips.com/wp-content/uploads/2019/09/Tips-Logo-700x150.jpg00Larry Jordanhttps://www.theinsidetips.com/wp-content/uploads/2019/09/Tips-Logo-700x150.jpgLarry Jordan2020-05-14 01:30:002020-05-14 01:30:00Tip #649: Convert a Motion Project for Final Cut
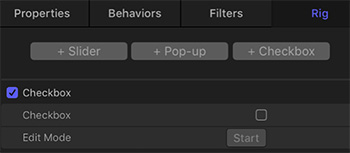
Checkboxes provide an easy way to enable or disable a setting in a Final Cut Pro X template.
The Checkbox rigging control panel.
This tip originally appeared as an Apple KnowledgeBase article. This is an excerpt.
Checkboxes are a control structure, created in Motion, that allow an editor in Final Cut to toggle something on or off.
Checkbox widgets allow you to switch between two snapshots—that is, between two sets of parameter states. Typically, checkbox widgets are used to create an on/off type of effect, although you can store any parameter states in either snapshot, creating more of a toggle effect.
The activation checkboxes in the Rig Inspector and in the Layers list (beside the checkbox widget) have no effect on the constituent parameters of the checkbox.
Checkbox widgets contain the following controls in the Rig Inspector and Widget Inspector:
Checkbox: Use this widget control to switch between two snapshots (parameter states).
Edit Mode: Click the Start button to enable snapshot recording.
Checkboxes provide an easy way to enable or disable a setting in a Final Cut Pro X template.
Please rate the helpfulness of this tip.
Click on a star to rate it!
https://www.theinsidetips.com/wp-content/uploads/2019/09/Tips-Logo-700x150.jpg00Larry Jordanhttps://www.theinsidetips.com/wp-content/uploads/2019/09/Tips-Logo-700x150.jpgLarry Jordan2020-05-14 01:30:002020-05-14 01:30:00Tip #672: Checkbox Widget in Motion
Connection Override allows you to move a Primary Storyline clip without moving any connected clips attached to it. Pressing the tilde key (~) while dragging a Primary Storyline clip enables Connection Override.
NOTE: The tilde key is located just below the ESC key, to the left of the number 1.
Pressing Command then tilde turns on Connection Override until you press tilde to turn it off.
With that as background, Don Smith writes:
I wanted to find a way to ‘lock on’ the Connection Override to have both hands free to make adjustments. By default, you have to press and hold the tilde key.
So, I started experimenting. At first, I found that if you press and hold the tilde key, press and hold the Command key, release the tilde key first, then release the Command key last, the Connection Override would stay enabled hands-free.
Then, the OS was updated and my method broke. But, with a modification, it still works.
Use the Option key in place of the Command key. So, for newer Mac OSs, do what I call my ‘Rocking Horse’ move (because your fingers are rocking back and forth on the keys) and hold the tilde key, press and hold the Option key, release the tilde key, then release the Option key.
In both versions, you only have to tap the tilde key when finished to release the Connection Override lock.
Larry adds: I was just testing this and, in Catalina with FCP X 10.4.8, tapping Tilde then Command locks this setting on, then tapping Tilde turns it off.
Thanks, Don, for writing this up. I had forgotten this feature was there.
Please rate the helpfulness of this tip.
Click on a star to rate it!
https://www.theinsidetips.com/wp-content/uploads/2019/09/Tips-Logo-700x150.jpg00Larry Jordanhttps://www.theinsidetips.com/wp-content/uploads/2019/09/Tips-Logo-700x150.jpgLarry Jordan2020-05-11 01:30:002020-05-11 01:30:00Tip #682: My Rocking Horse Move
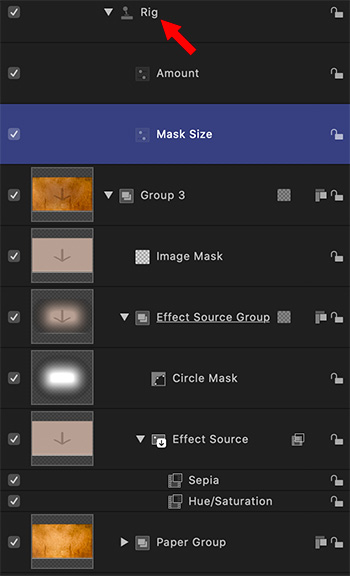
The rigging, elements and effects in the Aged Paper effect, displayed in Motion.
Virtually all the effects in Final Cut Pro X were first created in Motion and saved as a template for Final Cut Pro X. This means that, in many cases, if you don’t like the default settings, they are easy to change.
For example, these are the settings for Aged Paper. You can change the look itself by adjusting elements on each layer.
However, if all you need is to adjust a default setting:
Twirl down Rig.
Select one of the widgets, like Mask Size.
Go to Inspector > Widget and adjust the settings to suit.
Save the file, give it a name that reflects your changes and save it in a category that makes sense to you.
Done.
Please rate the helpfulness of this tip.
Click on a star to rate it!
https://www.theinsidetips.com/wp-content/uploads/2019/09/Tips-Logo-700x150.jpg00Larry Jordanhttps://www.theinsidetips.com/wp-content/uploads/2019/09/Tips-Logo-700x150.jpgLarry Jordan2020-04-30 01:30:002020-04-30 01:30:00Tip #643: Change the Default Settings of an Effect
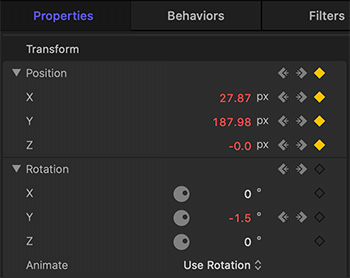
Once you set a keyframe, whenever you change a parameter, a new keyframe is set.
Position and rotation keyframes are set in Inspector > Properties for the selected element.
Behaviors make it easy to animate text. But, many times, the behavior is just too manic – especially for 3D text. In those situations, keyframes are a better choice. Here’s a quick technique.
Keyframes are set in the Inspector. You can use the Record Keyframe control (the big red circle below the Viewer) but, I find that sets too many keyframes which makes editing harder.
Instead, to animate position or rotation:
Position and rotate the element to its starting position.
Position the playhead in the mini-timeline where you want to set the first keyframe.
Go to Inspector > Properties.
Twirl down Position and Rotation to review additional X, Y, and Z axis controls.
NOTE: I find Y-axis rotation to be the most effective way to display 3D text.
Click one of the gray gray diamonds. Gray diamonds indicate frames without a keyframe. Gold diamonds indlcate a rame with keyframes.
Change the position of the playhead (FIRST!) then reposition the element. New keyframes are created automatically.
Repeat until the move is complete.
EXTRA CREDIT
Move between keyframes by clicking the left / right arrows in the Properties panel.
To change a keyframe, position the playhead on the frame you want to change, then reposition the element. Keyframes are modified automatically.
Please rate the helpfulness of this tip.
Click on a star to rate it!
https://www.theinsidetips.com/wp-content/uploads/2019/09/Tips-Logo-700x150.jpg00Larry Jordanhttps://www.theinsidetips.com/wp-content/uploads/2019/09/Tips-Logo-700x150.jpgLarry Jordan2020-04-30 01:30:002020-04-30 01:30:00Tip #648: Keyframe a 3D Move
Find work in tough times using a video marketplace.
This article first appeared in MotionArray.com. This is an excerpt.
We are living in an on-demand video economy during very challenging times. Here are four companies that can help you find work.
Veed.me. At Veed.me, clients set up project pages outlining their needs including a timeline, budget, description, and references. Budgets can range from hundreds to several thousand dollars. As a video producer, you set up an account and sort through the various project options. Once you find one you like, you can submit a pitch, add files, and discuss with the prospective client.
Videopixie. Videopixie is another marketplace arranging clients with producers, but they expand the offering to include animators, editors, and colorists.
Video Brewery. Another marketplace highlighting both live-action creators and animators is Video Brewery. Using a slick interface with lots of details for clients, Video Brewery helps walk potential customers through the project-building process. From the creator side, it’s important to note that Video Brewery isn’t an open marketplace where anyone can sign up. They are trying to moderate who is in their catalog, so you must submit an application with relevant work to be invited in. This makes it a little harder initially, but once chosen, you can rest assured knowing there will be less clutter for potential clients to sort through when choosing a partner.
Tongal. Tongal takes a slightly different approach to the above marketplaces by incorporating a contest model with their projects. With Tongal, all of the community has a chance to make money on any given project, but they are competing against the rest of the community.
These are just a few of the many video marketplaces popping up on the web for freelancers. It doesn’t hurt to create profiles on all of them as a way to expand your network and reach new potential clients. There is work to be had, you just have to be ready when the client wants your help!
Please rate the helpfulness of this tip.
Click on a star to rate it!
https://www.theinsidetips.com/wp-content/uploads/2019/09/Tips-Logo-700x150.jpg00Larry Jordanhttps://www.theinsidetips.com/wp-content/uploads/2019/09/Tips-Logo-700x150.jpgLarry Jordan2020-04-24 01:30:002020-04-24 01:30:00Tip #631: Get Freelance Work From Video Marketplaces
It is easy to make minor corrections to SRT caption files.
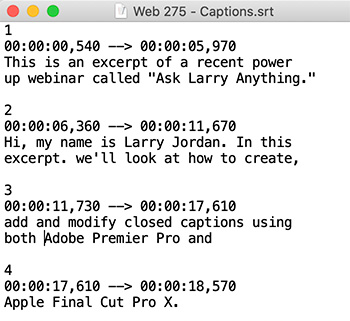
This is what an SRT caption text file looks like, viewed in Text Edit.
SRT captions are text files which are both easy to read and easy to edit. These text files can be opened in any text editor, such as Text Edit or BBEdit.
The format of the text inside the file is very specific:
Caption number. This must be on the top line and a unique, sequential number.
Timecode. This indicates the start and end of the caption, with the last set of numbers set off by a comma and representing milliseconds.
Caption text. This is one or two lines of text. Notice that this text file does not support significant text formatting.
As long as your text lines don’t run too long, you can easily correct spelling or punctuation errors.
EXTRA CREDIT
While you can correct timing in this file, Premiere makes timing adjustments easier within their respective programs.
Please rate the helpfulness of this tip.
Click on a star to rate it!
https://www.theinsidetips.com/wp-content/uploads/2019/09/Tips-Logo-700x150.jpg00Larry Jordanhttps://www.theinsidetips.com/wp-content/uploads/2019/09/Tips-Logo-700x150.jpgLarry Jordan2020-04-21 01:30:002020-04-21 01:30:00Tip #626: How to Easily Edit SRT Captions
It is easy to make minor corrections to SRT caption files.
This is what an SRT caption text file looks like, viewed in Text Edit.
SRT captions are text files which are both easy to read and easy to edit. These text files can be opened in any text editor, such as Text Edit or BBEdit.
The format of the text inside the file is very specific:
Caption number. This must be on the top line and a unique, sequential number.
Timecode. This indicates the start and end of the caption, with the last set of numbers set off by a comma and representing milliseconds.
Caption text. This is one or two lines of text. Notice that this text file does not support significant text formatting.
As long as your text lines don’t run too long, you can easily correct spelling or punctuation errors.
EXTRA CREDIT
While you can correct timing in this file, Final Cut makes timing adjustments easier within their respective programs.
Please rate the helpfulness of this tip.
Click on a star to rate it!
https://www.theinsidetips.com/wp-content/uploads/2019/09/Tips-Logo-700x150.jpg00Larry Jordanhttps://www.theinsidetips.com/wp-content/uploads/2019/09/Tips-Logo-700x150.jpgLarry Jordan2020-04-20 01:30:002020-04-20 01:30:00Tip #625: How to Easily Edit SRT Captions
Lower highlights to “dim” a background, rather than opacity.
The problem with lowering opacity (left)to dim an image is that the background will show through. Instead adjust levels (right).
Backgrounds are wonderful, especially for info-graphics. But, all too often, they are too bright. (Especially backgrounds from Apple.) We can “dim” them using opacity – but that isn’t a good idea.
What opacity does is “darken” an image by making it translucent. Since the default background in most NLEs is black, lowering opacity gives the illusion of darkening. However, as you can see from the left side of the screen shot, if there is anything in the background, it will show through. Which kinda spoils the dimming effect.
Instead, use the color grading controls in your NLE and lower highlights about 50% (right image). This darkens a background without creating translucency, or altering colors.
EXTRA CREDIT
In Photoshop, use Image > Adjustments >Levels to achieve similar results.
Please rate the helpfulness of this tip.
Click on a star to rate it!
https://www.theinsidetips.com/wp-content/uploads/2019/09/Tips-Logo-700x150.jpg00Larry Jordanhttps://www.theinsidetips.com/wp-content/uploads/2019/09/Tips-Logo-700x150.jpgLarry Jordan2020-04-08 01:30:002020-04-04 10:39:28Tip #593: Opacity vs. Levels to Darken
We may request cookies to be set on your device. We use cookies to let us know when you visit our websites, how you interact with us, to enrich your user experience, and to customize your relationship with our website.
Click on the different category headings to find out more. You can also change some of your preferences. Note that blocking some types of cookies may impact your experience on our websites and the services we are able to offer.
Essential Website Cookies
These cookies are strictly necessary to provide you with services available through our website and to use some of its features.
Because these cookies are strictly necessary to deliver the website, refuseing them will have impact how our site functions. You always can block or delete cookies by changing your browser settings and force blocking all cookies on this website. But this will always prompt you to accept/refuse cookies when revisiting our site.
We fully respect if you want to refuse cookies but to avoid asking you again and again kindly allow us to store a cookie for that. You are free to opt out any time or opt in for other cookies to get a better experience. If you refuse cookies we will remove all set cookies in our domain.
We provide you with a list of stored cookies on your computer in our domain so you can check what we stored. Due to security reasons we are not able to show or modify cookies from other domains. You can check these in your browser security settings.
Google Analytics Cookies
These cookies collect information that is used either in aggregate form to help us understand how our website is being used or how effective our marketing campaigns are, or to help us customize our website and application for you in order to enhance your experience.
If you do not want that we track your visit to our site you can disable tracking in your browser here:
Other external services
We also use different external services like Google Webfonts, Google Maps, and external Video providers. Since these providers may collect personal data like your IP address we allow you to block them here. Please be aware that this might heavily reduce the functionality and appearance of our site. Changes will take effect once you reload the page.
Google Webfont Settings:
Google Map Settings:
Google reCaptcha Settings:
Vimeo and Youtube video embeds:
Other cookies
The following cookies are also needed - You can choose if you want to allow them:
Privacy Policy
You can read about our cookies and privacy settings in detail on our Privacy Policy Page.