… for Adobe Premiere Pro CC

Tip #296: Reveal the Clips Inside a Multicam Clip

Larry Jordan – LarryJordan.com

Multicam clips are sequences and editable.

A multicam clip expanded to show it’s component clips in the Timeline.

Topic $TipTopic

This article first appeared in PremiereBro.com. This is an excerpt.

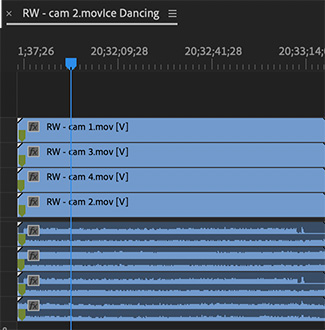
A multicam clip in Premiere isn’t a “clip,” it’s a sequence. And, like all sequences, you can see the clips inside – if you know how.

In the past, there was a menu choice that allowed you to open a clip in the Timeline. Now, it’s a special mouse-click.

  • Cmd-double-click the multicam clip in the Timeline to open it as a new sequence in the Timeline. (Illustrated in the screen shot)

EXTRA CREDIT

Double-click the multicam clip in the Timeline to open it in the Source Monitor.

While this doesn’t let you adjust individual clips, it does give you a different way to view the contents of the multicam clip itself.


Please rate the helpfulness of this tip.

Click on a star to rate it!

… for Apple Final Cut Pro X

Tip #367: How to Render a Portion of the Timeline

Larry Jordan – LarryJordan.com

Rendering creates temporary files that smooth playback.

The two render options in Final Cut Pro X.

Topic $TipTopic

This article first appeared as an Apple KnowledgeBase article. This is an excerpt.

Rendering is the process of creating temporary video and audio files for segments of your project that Final Cut Pro cannot play in real time. When you add effects, transitions, generators, titles, and other items, they require rendering before you can play them back at high quality.

By default, background rendering begins 5 seconds after you stop moving the pointer in Final Cut Pro, and it even continues while you work in a different app. Rendering only affects the clips that need it.

To render your project in Final Cut Pro, do one of the following:

  • Render a portion of your project: In the timeline, select the clip or clips that you want to render, then choose Modify > Render Selection (or press Control-R).
    Note: The selection must be a clip selection, not a range selection.
  • Render all portions of your project that need rendering: Choose Modify > Render All (or press Control-Shift-R).

Please rate the helpfulness of this tip.

Click on a star to rate it!

… for Apple Final Cut Pro X

Tip #378: Rename Clips in Batches

Larry Jordan – LarryJordan.com

Batch renaming converts clip names into something more understandable.

The Info inspector, illustrating where to apply custom file names using a batch.

Topic $TipTopic

This article first appeared as an Apple KnowledgeBase article. This is an excerpt.

When you import media into Final Cut Pro, the clips often contain meaningless names, such as those assigned by the camera. Although you can rename clips individually, you can also rename a selection of clips as a batch in the browser, after the media has been imported. Final Cut Pro provides customizable naming presets that make renaming large numbers of clips efficient and easy.

To rename a batch of clips, using a naming preset:

  1. In the Final Cut Pro Browser, select the clips you want to rename.
  2. If the inspector isn’t already shown, do one of the following:
    • Choose Window > Show in Workspace > Inspector (or press Command-4).
    • Click the Inspector button in the toolbar.
  3. Click the Info button at the top of the inspector.
  4. In the Info inspector, click the Apply Custom Name pop-up menu and choose a naming preset.

The clips selected in the browser are renamed.


Please rate the helpfulness of this tip.

Click on a star to rate it!

… for Random Weirdness

Tip #368: 12 Tips for Better Locations

Larry Jordan – LarryJordan.com

Think About Your Location Before You Start Shooting

Image Courtesy of www.pexels.com.

Topic $TipTopic

This article, written by Lewis McGregor, first appeared in PremiumBeat. This is an excerpt.

Picking the right location can make all the difference for your film. Here is a list of 12 tips to consider, from The Guerrilla Film Makers Pocketbook, when trying to find the right location on a budget.

  1. Shooting on location can be a significant advantage, as you will have to do minimal set work, merely dressing.
  2. Space can be a major problem, as even the biggest of rooms will become sardine-like with a full crew.
  3. Shooting outdoors can be a problem, as there is no way to control the weather.
  4. Always try and get permission to shoot wherever you intend to be. Sometimes, if you do foresee problems, it is best to dash in, shoot, and get out as quick as possible. If someone turns up to find out what is happening, try and get them interested and involved, and claim complete ignorance.
  5. Getting to and from difficult locations can be very costly in terms of time. One-hour traveling is one hour less shooting.
  6. Use movement orders. This is a piece of paper with a photocopied map (the route picked out with highlighter pen), explicit directions, and mobile phone numbers for those who get lost.
  7. Facilities for the crew on location can be a problem. Your crew needs a place to eat and sit, as well as a toilet. You can’t ask your star to squat in the bushes.
  8. Closing down streets is difficult. The police will be as helpful as they can, but they have crimes to stop and don’t relish the thought of holding the hand of a new producer.
  9. When choosing a location, don’t forget the sound.
  10. Film crews trash locations. Clean up after yourself, leave muddy boots outside, ban smoking inside, etc.. Remember, you may need to return to the location if there is a problem.
  11. Think creatively. Many locations can double for several different parts of your story. This will minimize the time you waste moving between places.
  12. Beware of the cool location that is impossible to either light or get cameras into. Buildings with big windows cause lighting problems, turrets with narrow stairwells are tough for carrying kits, and anywhere in big cities will cost you in simply parking alone.

Please rate the helpfulness of this tip.

Click on a star to rate it!

… for Random Weirdness

Tip #372: 5 Prep Tips for Directing Commercials

Larry Jordan – LarryJordan.com

The Better Your Prep, the Better the Shoot

Image courtesy of www.pexels.com.

Topic $TipTopic

This article, written by Tanner Shinnick, first appeared in PremiumBeat. This is an excerpt.

Acquaint Yourself with the Client’s Business

One of the first and most important things you can do as a director is to understand how your client makes money. As important as how they make money is also who they make money from — their target demographic.

Visit Their Social Media Accounts

These resource gives you a quick overview of what their previous advertising efforts were and the general tone they’re trying to achieve for their brand.

Make a Music Playlist

For any spot I do, I make a playlist that reflects the mood and tone we’re trying to achieve for that spot. Then, I listen to that playlist while I’m doing any sort of prep for that shoot.

Reference Commercials

I love to pull from and watch as many reference commercials as possible. The best part is that these reference commercials can really help illustrate to your client the tone you’re trying to achieve.

Find Inspiration in Photography

Photography has only one frame, while we (as filmmakers) have twenty-four frames per second. Photography typically motivates my mood, wardrobe, and locations for any spot I do.


Please rate the helpfulness of this tip.

Click on a star to rate it!

… for Visual Effects

Tip #390: Super-slow Motion in DaVinci Resolve

Larry Jordan – LarryJordan.com

Super-slo-mo, without requiring a special camera.

Topic $TipTopic

This article, written by Rubidium Wu, first appeared in PremiumBeat. This is an excerpt.

Using some fancy new AI, DaVinci Resolve 16 can take your 60p footage and slow it down significantly by guessing what would be in-between the missing frames.

You need to first import for 60p footage into a 24p project. Before you drop it on the timeline, select Interpret Footage and tell Resolve to use it as 24p footage. Once you drop that part of your clip, you want to slow further. Select Change Speed from the contextual menu, and experiment with the settings. To get a 120 fps effect, reduce the speed by fifty percent.

The next step is to stay in the edit page and select the Speed and Timing tab. Instead of the default Project setting, set the retime process to Optical Flow and the Motion Estimation to Speed Warp.

You’ll need to reselect the part of the clip you want to slow down, since the retiming will tamper with the part that appears in the timeline. Once you’re happy with the selected area, render it out before doing any kind of color grade or editing. Unless you have a monster spec computer, it won’t play back in anything close to real time.

Once you’ve rendered the clip, import it back into Resolve, and you’ll have super-slow, smooth, 120p footage. This method works best when the movement itself isn’t too dramatic. If the object moves too fast, the optical flow will have a hard time guessing the missing pixels.


Please rate the helpfulness of this tip.

Click on a star to rate it!

… for Visual Effects

Tip #391: Simulate Poor Streaming Connections

Larry Jordan – LarryJordan.com

Glitches make pristine video look, ah, less so…

Image courtesy: Red Giant.

Topic $TipTopic

This is an excerpt from a recent YouTube video posted by Red Giant. This features an effect called: Glitch, which is part of Red Giant Universe. This plug-in runs on all major NLEs.

  • Search “RG Universe Stylize” in the effects panel/browser
  • Apply the “uni.glitch” effect onto the desired clip in the timeline
  • In the effects panel or Inspector, in the uni.glitch effect, click “select preset” to browse a variety of preset glitch effects, both for video and text
  • If you’d like the effect to begin at a certain point, turn the “glitch frequency” to 0, turn on keyframe recording, and then move to the desired beginning glitch point, and type 100 for glitch frequency.
  • The same can be done with the compression, small glitch, and large glitch parameters in the effects panel

Please rate the helpfulness of this tip.

Click on a star to rate it!

… for Visual Effects

Tip #396: Mask Your Microphone

Larry Jordan – LarryJordan.com

This is also called “clean-plate masking.”

Image courtesy of www.pexels.com.

Topic $TipTopic

This article first appeared in MotionArray. This is an excerpt.

You might know that one thing that’s essential to getting high-quality audio is to get your microphone as close to your subject as possible. This is one of the reasons that lavalier mics are such a great tool!

If you’ve only have a standard shotgun mic and you want to get it close to your subject, that can get tricky. What if you want a wide shot of your subject and you can’t get the mic close enough without it being in the picture? What do you do? Bring it into frame anyway and get it close to your subject.

Yes, really! As long as there’s distance at all times between the mic and the subject, and the background isn’t moving like crazy, you can mask out the mic in post-production. Make sure that at some point, you have the same shot minus the microphone to use as your clean plate. This will be important for editing the object out.

  1. Open your shot in your video editor.
  2. Take a sample of the clip without the microphone in it. Place it on the bottom layer of your timeline.
  3. Create a still frame from the clean background.
  4. Place your normal clip (the one with the mic visible) on the layer right above this one.
  5. Mask out your microphone on your main footage layer (this will allow the mic-less bottom layer to show through).
  6. Lastly, feather the edges just a tad.

Please rate the helpfulness of this tip.

Click on a star to rate it!

… for Codecs & Media

Tip #399: Add Metadata to your Movies

Larry Jordan – LarryJordan.com

Annotations add information to the file itself.

The Metadata panel in Apple Compressor.

Topic $TipTopic

You can embed metadata labels into files transcoded using the Apple Devices, Apple ProRes, MP3, MPEG-4, and QuickTime settings in Apple Compressor. Use metadata to annotate a media file with information that’s important for your workflow or for the person viewing your output file. You can add any of the annotation fields provided in Compressor, or import metadata that’s used in another media file (like a QuickTime movie).

Add Metadata Manually

  1. In the Compressor batch area, select the job that contains the media file you want to annotate.
    (Tip: To select the job, rather than an output row under the job, click the source filename at the top of the job area.)
  2. In the Metadata area of the Job inspector, click the Add Job Annotation pop-up menu, choose an annotation type, enter text in the field that appears, then press Return (or click in another metadata text field).
    (Note: If you don’t press Return or click in another metadata text field, your text won’t be saved.)
  3. Repeat step 2 for each annotation type you want to add.
  4. The annotations you added are shown in fields below the pop-up menu.

Import Metadata Automatically

You can import metadata annotations into Compressor from an external QuickTime movie or from an XML dictionary property list, a text file used in macOS, iOS, and iPadOS programming frameworks to store metadata categories and values (keys and strings).

View Annotations After Transcoding

After Compressor transcodes a media file that has metadata, there are several ways to see the annotations:

  • In the Finder, select the transcoded media file, choose File > Get Info, then in the info window click the disclosure triangle next to More Info.
  • Open the media file in QuickTime Player, then choose Window > Show Movie Inspector.
    QuickTime Player displays several (but not all) categories of Compressor metadata at the top of the inspector.
  • After importing the media file into Final Cut Pro, select the clip and open the Info inspector.

EXTRA CREDIT

You’ll find more information in the Compressor User Guide. Search for “metadata.”


Please rate the helpfulness of this tip.

Click on a star to rate it!

… for Random Weirdness

Tip #324: Improve Your Video Interviews

Larry Jordan – LarryJordan.com

Planning and communication are the keys to success.

Topic $TipTopic

These first appeared in an article written by Caleb Ward for PremiumBeat as a list of 15 tips. I’ve selected my top 7 favorites from his list.

Shooting a video interview can be one of the most challenging aspects of the filmmaking process. Here are seven tips to take your interview skills to the next level and avoid nasty surprises on set.

  • Do your research and plan your questions carefully.
  • Scout the location.
  • Coordinate costume and logistics with your talent before the shoot.
  • Use a professional sound recordist.
  • Decide where you want the talent to look (their “eyeline”).
  • If possible, shoot with more than one camera to simplify editing.
  • Record B-roll and room tone before leaving the set.

The whole article is worth reading.


Please rate the helpfulness of this tip.

Click on a star to rate it!