… for Apple Motion

Tip #330: What’s a Parameter Behavior?

Larry Jordan – LarryJordan.com

Animated settings, not just elements.

Settings for the Randomize parameter behavior applied to a color chip.

Topic $TipTopic

Parameter behaviors are a very intriguing part of Motion that allow you to animate a setting, not just an element. For example, rather than oscillate an object so it changes position randomly, you can randomize the colors applied to an element.

These provide unlimited creative potential and the best way to see what they can do is to play with them. While this effect can be applied to anything, including video clips, let’s keep this simple.

  • Create a new Motion project.
  • From Library > Shapes, drag a shape into the Viewer. (I used the Club Suit shape.)
  • Select the shape in the Layers panel.
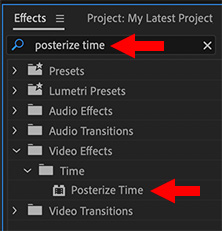
  • Apply Filters > Color > Colorize to the selected shape. This changes the color of the shape based upon the color settings of Remap White to.
  • In Inspector > Filters, hover your mouse over Remap White to and look to the right side of the line. There will be a small downward pointing arrow. Click it.
  • From the pop-up menu, select Add Parameter Behavior > Randomize. This randomizes the colors of this filter.
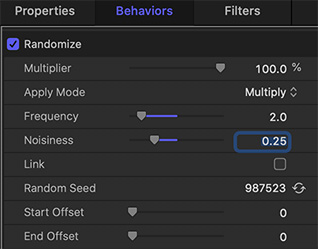
  • Then, using the settings in this screen shot, slow everything down to prevent visual whiplash.

Now that you know how this technique works, experiment with other settings and other parameters.

NOTE: I show how to apply a parameter behavior to a behavior in Tip #326.

EXTRA CREDIT

To remove a setting, simply select it in the Layers panel and delete it.


Please rate the helpfulness of this tip.

Click on a star to rate it!

… for Visual Effects

Tip #327: Red Giant Universe: Create Chromatic Effects

Larry Jordan – LarryJordan.com

Some video looks better distorted.

All effects from Red Giant Universe.
RGB Separate and Chromatic Aberration effects applied to video of a crowd cheering.

Topic $TipTopic

A “chromatic aberration” effect separates an image into it’s three main color components – red, green and blue – then shifts each one horizontally by different amounts. (This is easy to see in the screen shot.)

Most NLEs have some form of color shifting. Here’s how a version from Red Giant Universe works in Premiere.

  • While you can apply this to a single clip, you may want to create an adjustment layer and apply it to several clips at once.
  • Select the adjustment layer in the timeline.
  • In the effects panel, search for “uni.RGB separation” and apply it to the adjustment layer.
  • In the effects controls panel, edit the radius, distortion, angle, and linear to your liking.
  • To add a lens distortion effect, search for “uni.Chromatic Aberration” in the effects panel and apply to the adjustment layer.
  • Adjust the parameters in the effects controls.

EXTRA CREDIT

Here’s a video from Red Giant that show this in operation.


Please rate the helpfulness of this tip.

Click on a star to rate it!

… for Visual Effects

Tip #328: Track & Blur Faces

Larry Jordan – LarryJordan.com

Blurs are a great way to hide faces.

A Gaussian Blur applied to a portion of an image to blur a face.

Topic $TipTopic

When you need to hide a logo or face, a blur is a great way to do so. While no longer a safe way to protect identity (Tip #329), all NLEs provide a way to apply a blur to a portion of the image. Premiere also provides an easy way to motion track it. Here’s how.

  • Select the clip you want to blur in your Premiere timeline.
  • Apply Blur > Gaussian Blur from the Effects panel.
  • In Effect Controls, select the name of the mask – Mask (1) in my case – in the Gaussian Blur effect to make its controls visible in the Program Monitor.
  • Drag the blur in the Program Monitor to reposition it, then using either the on-screen controls or the mask settings in the Effect Controls panel, size and rotate it till it matches the same in your image.
  • Add Feathering to soften the edges. (In this screen shot, Feather = 22.0)
  • Increase the Blurriness till the face loses recognizability. (In this screen shot, Blurriness = 18.0)

EXTRA CREDIT

If the face moves, motion track the effect to automatically move the blur as the face moves. Here’s how:

  • Position the playhead at the start of the clip. (If the object you want to track is not visible, read Premiere’s help files for the best way to create a track.)
  • In the Effect Controls panel, click the right-pointing arrow in Mask Path for the mask you just created.
  • After a few seconds of analysis, Premiere will be able to track the mask as the subject moves.

NOTE: If the track fails to work, read Premiere’s help files for guidance. Explaining the intricacies of motion tracking is too large for a tip.


Please rate the helpfulness of this tip.

Click on a star to rate it!

… for Adobe Premiere Pro CC

Tip #278: How to Burn-in Timecode

Larry Jordan – LarryJordan.com

Burned-in Timecode creates the perfect reference video for clients.

Timecode burned into a video.
Timecode is a label expressed as Hours:Minutes:Seconds:Frames.

Topic $TipTopic

Often, a client needs to review the current state of an edit. The easiest way to provide this is using burned-in timecode. Timecode is a label that uniquely identifies every frame in a video. No two frames in the same clip have the same timecode.

NOTE: Timecode should not be confused with time-of-day. While it can reflect the actual time of a recording, most of the time, it doesn’t.

To display timecode for a clip:

  • Select the clip
  • In the Effects panel, search for “Timecode” (Its located in the Video category.)
  • Drag the timecode effect onto the clip

Poof! Instant timecode.

Adjust size and position in the Effect Controls panel. Remember, your goal is visibility, not tastefulness.

EXTRA CREDIT

A better way to display timecode for an entire project is to add an adjustment layer. We’ll cover that in a later tip.


Please rate the helpfulness of this tip.

Click on a star to rate it!

… for Apple Final Cut Pro X

Tip #317: Working with Chapter Markers

Larry Jordan – LarryJordan.com

Chapter Markers provide fast navigation for editors and viewers.

The Edit Marker dialog in Apple Final Cut Pro X.
An orange chapter marker. Click top right icon to convert, drag pin to change image.

Topic $TipTopic

The following is taken from an Apple KnowledgeBase article.

Chapter markers are a standard feature in DVDs, Blu-ray discs, and podcasts. You can add chapter markers to your project so that when you share your finished movie, viewers can use the markers to quickly jump to those points in the movie. Apps and devices that recognize Final Cut Pro chapter markers during playback include iPod, iPhone, iPad, Apple TV, QuickTime Player, DVD Player, and most standard DVD and Blu-ray players.

Similar to a regular marker, chapter markers enable editors to move around inside a project. Unlike regular markers, the text and location associated with a chapter marker can be exported.

  • To create a chapter marker, put the playhead at the location you want the marker to appear, then type M. (This creates a standard marker.)
  • To change the marker to a chapter marker, double-click the marker and select the chapter marker icon (on the right) from the Edit Marker window.
  • To change the image associated with the chapter marker, click it once in the timeline to select it.
  • Then, drag the orange “pin” to the frame you want. By default, this flag appears 11 frames after a chapter marker.

NOTE: The chapter marker thumbnail image is the composited image from that location in the timeline and includes titles and any other superimposed imagery.

If the chapter marker is in the primary storyline, you can drag the chapter marker thumbnail pin as far as the beginning or the end of the primary storyline. If the chapter marker is in a connected storyline, you can drag the chapter marker thumbnail pin as far as the beginning or the end of the connected storyline.

EXTRA CREDIT

Here’s an Apple KnowledgeBase article that goes into more detail.


Please rate the helpfulness of this tip.

Click on a star to rate it!

… for Random Weirdness

Tip #160: Measure Mac Network Performance

Larry Jordan – LarryJordan.com

Discover what your REAL network speeds are.

Topic $TipTopic

Hidden in Applications > Utilities is a powerful measurement tool called: Activity Monitor.

  • Type Shift + Cmd + U to open the Utilities folder. Double-click Activity Monitor to start the app.

Activity Monitor allows us to measure current activity in five key areas:

  • CPU
  • Memory (RAM)
  • Energy
  • Disk (local storage)
  • Network (both Internet and other network-connected devices)

Click the Network tab at the top. The Network pane shows how much data your Mac is sending or receiving over your network. You can use this information to identify which processes are sending or receiving the most data.

The information at the bottom of the Network pane shows total network activity across all apps. The graph moves from right to left and updates at the intervals set in View > Update Frequency. While the graph also includes a pop-up menu to switch between showing packets or data as a unit of measurement, I tend to display data, because it is the most relevant statistic when working with media. (Database users generally monitor I/O operations.)

Blue shows either the number of packets received per second or the amount of data received per second. Red shows either the number of packets sent per second or the amount of data sent per second.

In this screen shot, the computer is receiving (reading) 131 MB/second of data and sending (writing) 2.95 MB/second.


Please rate the helpfulness of this tip.

Click on a star to rate it!

… for Random Weirdness

Tip #291: 12 Documentary Editing Tips

Larry Jordan – LarryJordan.com

These steps will help you organize and focus your work.

On location with a documentary crew.

Topic $TipTopic

Michael Maher first wrote about this for PremiumBeat. Perhaps the most difficult aspect of editing a documentary is the amount of unscripted responses during interviews. Here are twelve tips to help you focus.

  1. Organize Folder and Label Bins. There is SO MUCH content in a feature that organization is critical. Consider using Post Haste, from Digital Rebellion. This free program instantly creates folder structures from templates, such as video editing, motion graphics, visual effects and more.
  2. Create Sequences for Individual Interviews. Rather than build everything into one master sequence, divide the work. This allows you to quickly build selects from an interview and also simplified later transcription.
  3. Transcribe all footage. New automated speech-to-text transcriptions can often get you close enough for editing. And editing from a transcripts is MUCH faster.
  4. Backup everything. Always. All the time. Like every night.
  5. Edit for a Story Arc. Whether it’s a documentary or work of fiction, every film needs to tell a story. In doing so, you want to make sure you have a beginning, middle, and end. In that series of events, you want to take your audience on an emotional roller-coaster — or story arc. It doesn’t matter if your documentary is two minutes long or two hours, if the story doesn’t progress — don’t expect anyone to watch.
  6. Use Close-up and Medium Shots More Than Wide Shots. Wide shots are great for establishing a scene or as an introduction to a new speaker, but they aren’t enough. By cutting to medium shots and close-ups, you are making the speaker more relatable. The medium shot is most often used for conversational pieces, as the audience feels the subject is right there talking to them. However, documentary films frequently use close-ups of only a speaker’s head. This is common due to the varying sets and backgrounds that can be jarring when cutting between speakers.
  7. Cut on Action. Actions make perfect cutting points that seem natural.
  8. Cut on Dialogue. Cut to words with a strong pronunciation. Also, cut at the beginning of a new sentence/theme.
  9. Avoid Jump Cuts. Hide cuts by switching angles, or covering edits with B-roll.
  10. Use Photos When You Don’t Have Footage. Still photos can help you hide edits or break away from static shots.
  11. Keep Graphics and Lower-Thirds Easy to Read. You don’t need a ton of moving parts or motion graphics. In fact, text with a drop shadow is the most common lower third for a reason. It’s simple and legible. Be sure to also use a font that is easy to read, as well as a nice font color. Don’t go crazy.
  12. Build an Archive of Assets. Keep media you can use across projects in a handy folder.

Please rate the helpfulness of this tip.

Click on a star to rate it!

… for Apple Motion

Tip #301: Stabilize a Shaky Clip in Motion

Larry Jordan – LarryJordan.com

There are multiple options to stabilize – or steady – a clip.

The Stabilize behavior settings in Apple Motion.
These are the parameters you can modify to choose between stabilizing or steadying a clip.

Topic $TipTopic This was first explained in this Apple KnowledgeBase article.

Use the Stabilize tracking behavior to smooth shaky motion in a movie or image sequence. Using the Stabilize behavior, there are three ways to analyze a clip:

  • Use the behavior’s default advanced motion analysis technique that evaluates the entire frame of a clip to extract movement data without using onscreen trackers.
  • Use onscreen trackers that analyze a reference pattern (a small group of pixels) in the canvas. These are the same trackers used by the Match Move and Analyze Motion behaviors.
  • Use a combination of the advanced motion analysis and onscreen trackers.

How to Stabilize a Clip

    • Select the layer containing the clip you want to stabilize.
    • Choose Behaviors > Motion Tracking > Stabilize.
    • Go to Inspector > Behaviors, then use the Direction pop-up menu to choose one of the following options:
      • Horizontal and Vertical: Applies the stabilize transformation to the X and Y dimensions.
      • Horizontal: Applies the stabilize transformation to the X dimension.
      • Vertical: Applies the stabilize transformation to the Y dimension.
    • Enable or disable the Adjust buttons, as follows:
      • Position: Enable this button to apply the analyzed position data to the clip. (The X and Y position changes in the footage are smoothed or stabilized.) To stabilize the X and Y position of the shot and leave scale or rotation changes intact, enable Position and disable Scale and Rotation.
      • Scale: Enable this button to apply any analyzed scale data to the clip. (Scale changes in the footage are smoothed or stabilized.) To stabilize or smooth changes in scale and leave position or rotation changes intact, enable Scale and disable Position and Rotation. (The Scale option is not related to the Zoom option in the Borders pop-up menu.)
      • Rotation: Enable this button to apply analyzed rotation data to the clip. (Changes in the rotation of the footage are smoothed or stabilized.) To stabilize or smooth changes in rotation in the shot and leave position or scale changes intact, enable Rotation and disable Position and Scale.
  • For the smoothest result, enable all three Adjust buttons (Position, Scale, and Rotation).

NOTE: You can change the Method, Borders, Direction, and Adjust parameters before or after the clip is analyzed.


Please rate the helpfulness of this tip.

Click on a star to rate it!

… for Visual Effects

Tip #121: Quickly Create Tracking Masks in Mocha

Larry Jordan – LarryJordan.com

Mocha Pro 2020 makes tracking masks easy.

Topic $TipTopic

A mask isolates something so we can place the masked object over a different background (or hide it altogether.)

A tracking mask does the same thing, but to a moving object; say a car or person. What makes tracking masks tricky is if the moving object changes position or shape during the move; for example, as people do as they walk.

Mocha Pro 2020 has a new feature that makes creating tracking masks easy:

  • Select the Area brush tool in the toolbar
  • Draw over the area you’d like to motion track
  • Scale the brush by selecting the open/close brackets
  • Press Option on Mac (Alt on Windows) to change the Area brush tool to erase

This is a much easier way to create masks to motion track objects, without having to create several shapes to isolate the desired tracking object.

Learn more about Mocha Pro here.


Please rate the helpfulness of this tip.

Click on a star to rate it!

… for Visual Effects

Tip #314: Faking a Stop Motion Effect in Premiere

Larry Jordan – LarryJordan.com

Stop Motion can be faked using Posterize Time.

Search for Posterize Time in the Effects panel.

Topic $TipTopic

A longer version of this article first appeared in RocketStock.com.

As you are probably aware, it takes a bit of time to set up, shoot, and edit a proper stop motion shot. But, what if the video is already shot? Can we create a similar effect in Premiere? Yes, and here’s how.

In Premiere, select the clip you want to work with, then:

  • Open the Effects panel and search for “Posterize Time.”
  • Apply this effect to your clips.
  • Adjust the frame rate to between 8 – 12 fps. Try 10 fps as a starting point.

Done.

EXTRA CREDIT

This effect can be used for much more. For example:

  • Emulate the look of very old film.
  • Apply it to existing motion graphics for a blockier, chunkier look.
  • Create flashbacks, dream sequences, even a “drunken sailor” look.

Please rate the helpfulness of this tip.

Click on a star to rate it!