… for Random Weirdness

Tip #156: Measure CPU Performance on Your Mac

Larry Jordan – LarryJordan.com

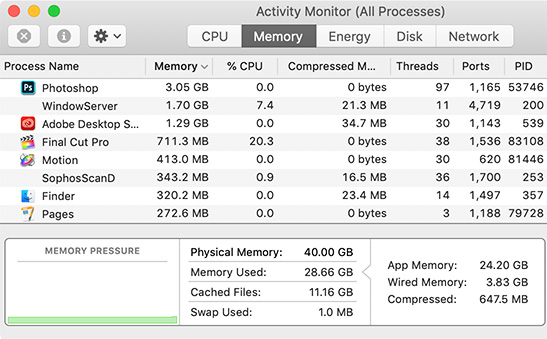
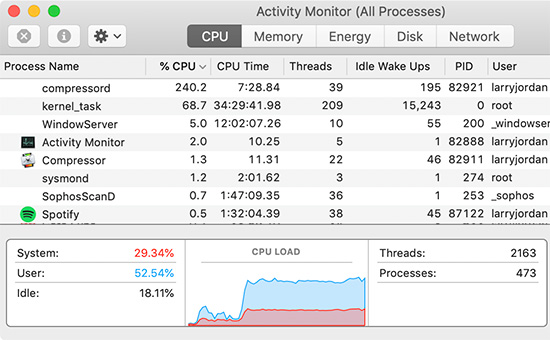
Activity Monitor displays how hard your CPU is working.

Topic $TipTopic

Hidden in Applications > Utilities is a powerful measurement tool called: Activity Monitor.

  • Type Shift + Cmd + U to open the Utilities folder. Double-click Activity Monitor to start the app.

Activity Monitor allows us to measure current activity in five key areas:

  • CPU
  • Memory (RAM)
  • Energy
  • Disk (local storage)
  • Network (both Internet and other network-connected devices)

Click the CPU tab at the top to display all the software currently running on your system. You won’t recognize most of these, because many of the programs your Mac runs are background tasks.

The graph at the bottom (see the screen shot) shows total CPU effort called “CPU Load.” Red indicates tasks running under the control of the operating system. Blue shows tasks that you have started. The maximum CPU % is based on the number of cores in your computer times 100. So a four-core system has a maximum of 400% CPU activity.

I often look at this to see what my CPUs are doing and how hard they are working. This also allows me to cancel any non-critical tasks that are using up too much CPU time.

BONUS

You can also see CPU usage or history in a separate window or in the Dock:

  • To open a window showing current processor activity, choose Window > CPU Usage. To show a graph of this information in your Dock, choose View > Dock Icon > Show CPU Usage.
  • To open a window showing recent processor activity, choose Window > CPU History. To show a graph of this information in your Dock, choose View > Dock Icon > Show CPU History.

Energy usage related to CPU activity is incorporated into the energy-impact measurements in the Energy tab of Activity Monitor.


Please rate the helpfulness of this tip.

Click on a star to rate it!

… for Random Weirdness

Tip #157: See Which Apps Use More Memory

Larry Jordan – LarryJordan.com

How much RAM do you REALLY use – or need?

Topic $TipTopic

Hidden in Applications > Utilities is a powerful measurement tool called: Activity Monitor.

  • Type Shift + Cmd + U to open the Utilities folder. Double-click Activity Monitor to start the app.

Activity Monitor allows us to measure current activity in five key areas:

  • CPU
  • Memory (RAM)
  • Energy
  • Disk (local storage)
  • Network (both Internet and other network-connected devices)

Click the Memory tab at the top to display all the currently-running applications and the amount of memory each is using.

The key section is at the bottom.

The Memory Pressure graph helps illustrate the availability of memory resources. The graph moves from right to left and updates at the intervals set in View > Update Frequency. The current state of memory resources is indicated by the color at the right side of the graph:

  • Green: Memory resources are available.
  • Yellow: Memory resources are still available but are being tasked by memory-management processes, such as compression.
  • Red: Memory resources are depleted, and macOS is using your startup drive for memory. To make more RAM available, you can quit one or more apps or install more RAM. This is the most important indicator that your Mac may need more RAM.

Here are definitions of the other statistics:

  • Physical memory. The amount of RAM currently installed in your system.
  • Memory used. The amount of RAM currently in use.
  • Cached files. Memory that was recently used by apps and is now available for use by other apps. For example, if you’ve been using Mail and then quit Mail, the RAM that Mail was using becomes part of the memory used by cached files, which then becomes available to other apps. If you open Mail again before its cached-files memory is used (overwritten) by another app, Mail opens more quickly because that memory is quickly converted back to app memory without having to load its contents from your startup drive.
  • Swap Used. The space used on your startup drive by macOS memory management. It’s normal to see some activity here. As long as memory pressure is not in the red state, macOS has memory resources available.

Your goal is to have as little red in the graph or Swap as possible. Why? Because while RAM is very fast, swapping files to the hard disk (even an SSD) is very slow and degrades the performance of your system.

If Swap is always a large number, your performance may benefit from using a system with more RAM.

BONUS

Here’s what these three additional categories mean:

  • App Memory. The total amount of memory currently used by apps and their processes.
  • Wired Memory. Wired memory is the part where the OS Kernel and other low level components, as drivers and virtual memory objects are stored. Specifically, information in RAM that can’t be moved to the Mac’s drive. The amount of Wired memory depends on the applications you are using.
  • Compressed. The amount of memory in RAM that is compressed to make more RAM memory available to other processes. This is the last step before swapping RAM out to local storage.

Please rate the helpfulness of this tip.

Click on a star to rate it!

… for Random Weirdness

Tip #165: Turn Old Phones Into Wireless Mics

Larry Jordan – LarryJordan.com

A cool way to repurpose older technology.

Topic $TipTopic

Eric Escobar wrote about this in The Beat:

While old phones don’t work well as multifunctional smart phones anymore, they are capable of doing some amazing things. For example, recording high-quality, high bit-rate audio. With the right microphone attachment, an old iPhone becomes a wireless portable audio source with built-in power and storage.

For example, pair an inexpensive used Movo PM10 lavalier-style mics as a body mic for on camera talent. A setup that’s great for capturing on-set audio for very little money.

Keep in mind that using an older iPhone means that you give up real-time audio monitoring. For some, that’s a deal-breaker. For others, the savings in dollars makes the risk worthwhile. The basic trade-off is inexpensive gear vs. not knowing what you’ve got until after the recording stops.

For recording software, Eric recommends the free TASCAM PCM Recorder. It records 44.1khz audio at 16 bits right off the built-in mic or any external mic plugged into the headphone jack. It is a “two button” operation, meaning you have to click the red record button first, then the green play button to get it to “roll” just like an old DAT recorder. That may be anachronistic, which is fine. There are literally a dozen other free-to-cheap apps that will let you record audio on your phone at 48khz in 16-bit. Find the one that matches your style.

NOTE: Remember, video records audio at a 48k sample rate. It is best to match external audio recorders to that sample rate.

He has more recommendations. Click the link above to read the whole article.


Please rate the helpfulness of this tip.

Click on a star to rate it!

… for Apple Motion

Tip #203: Create Split Screen Animation – Fast

Larry Jordan – LarryJordan.com

Use Motion to speed creating animated split screens.

Three drop-zone placeholders in the Motion Viewer.
Size and animate the drop-zones in the Motion Viewer.

Topic $TipTopic

This technique uses Apple Motion to create an animated split screen template for Final Cut Pro X. If you only need to create split screens once, use Final Cut. If you need to create split screens more than once, it is much easier to create them as a template in Motion. Here’s how.

  • Create a new Generator in Motion. (Set the duration to a few seconds longer than necessary to allow room for transition handles.)
  • Choose Object > New Drop Zone. This adds an image placeholder that you will fill in Final Cut.
  • Size and position the Drop Zone as needed.
  • Add as many different Drop Zones as you have images.
  • To animate, select each layer and apply a Behavior. A good one to experiment with is Throw. Adjust using the HUD.
  • Choose File > Save. Give this new template a name and Category (folder).

Now, when you open Final Cut and go to the Generator browser, you’ll find this new template ready to go. Add images into the drop zones the same as any other Final Cut effect.

EXTRA CREDIT

Each drop zone can have filters applied, as well as much more extensive animation.

Normally, I put this effect over a background created in Final Cut. However, you can add the background in Motion and it will automatically transfer to Final Cut.

Additionally, you can add other elements such as lines, drawings… whatever sparks your imagination.


Please rate the helpfulness of this tip.

Click on a star to rate it!

… for Apple Motion

Tip #204: Fill an Element with a Gradient or Color

Larry Jordan – LarryJordan.com

This technique can be used for elements or groups.

On-screen gradient controls in the Motion Viewer.
Adjust the colors and direction for a gradient using the on-screen Viewer controls.

Topic $TipTopic

This technique allows you to quickly fill an element or all the elements in a group with a gradient or color, the only difference is whether you first select an element or a group.

  • Select an element.
  • Choose Library > Filters > Stylize > Fill
  • Go to Inspector > Filters and select a color or gradient.
  • If you choose a gradient, use the controls in the Viewer to change the direction.

Done.


Please rate the helpfulness of this tip.

Click on a star to rate it!

… for Visual Effects

Tip #170: How to Capture Motion and Moving Subjects

Larry Jordan – LarryJordan.com

Minimize blur by following these tips.

Avoiding blur is the goal of all action photos.
The more subjects move, the more blur in your photos.

Topic $TipTopic

Some of the best and most memorable moments in life are in motion. Unfortunately, digital cameras hate movement. Most of the time, moving subjects register as a blur on photographs. So how do you shoot moving objects? Here are some tips:

1. Shutter Speed

When the subject is moving and you want to take a shot of, say a basketball player getting the ball on a rebound, then you should opt for fast shutter speeds. You should use a shutter speed that is at least 1/500th of a second or higher. Keep in mind that faster shutter speeds require more light for a proper exposure.

2. Increase The Aperture

The aperture is the hole where light comes into your camera into the image sensor. Choose a low f-stop to open up the aperture and allow more light in. This will help you counter the low light you get from the fast shutter speed. Keep in mind that opening the aperture decreases depth of field, that is, the area in a photo that’s in focus.

3. Use a Flash

Using a flash with your motion shots is a good way to counter the low light conditions when using a faster shutter speed. It is extremely easy to correct dark photos by using your flash. Keep in mind that most flashes are very short range, so a single flash won’t light a gym.

4. Use a High ISO

Using a high ISO can help you increase the shutter speed and aperture of your camera without increasing the likelihood of getting blurry or dark photographs. However, using high ISOs usually results in a grainy picture with a lot of digital noise.

An extended version of these tips first appeared in PremiumBeat.


Please rate the helpfulness of this tip.

Click on a star to rate it!

… for Visual Effects

Tip #177: Ten Tips for Better Slow Motion

Larry Jordan – LarryJordan.com

Slow motion often makes scenes more intense.

An example of a slow motion shot.
Action and drama are both enhanced by selectively using slow motion.

Topic $TipTopic

This tip first appeared on Fstoppers.com.

Here are ten tips that can improve how you shoot and use slow-motion.

  1. Understand your subject. Slow motion is all about movement, and certain subjects do not lend themselves to being interesting in slow motion.
  2. Select a frame rate. Shoot at a higher frame rate than the project you’ll put the video into.
  3. Think about light. Faster frame rates require more light. In general, set the shutter speed to twice the frame rate.
  4. Emphasize drama. Slomo adds drama and intensity to intense scenes.
  5. Emphasize action. Cinema today uses slowmo to enhance action scenes.
  6. Emphasize death. in certain instances, the death of a main character or their impending death will be played in slow motion, which adds to the gravity of the situation
  7. Create alternative reality. Use slow motion to convey a sense of detachment from reality that helps your viewers distinguish what is real versus what is perceived based on your storyline
  8. Emphasize fear. Slow motion can emphasize the anxiety and terror of a dramatic moment.
  9. Use sound to match the motion. Use the sound recorded on set, then slow it down in the final mix to emphasize the slower visual motion.
  10. Use slow motion carefully. Like seasoning, use it wisely and food tastes great. Use too much and the food becomes inedible.

Please rate the helpfulness of this tip.

Click on a star to rate it!

… for Codecs & Media

Tip #167: 3 Tips to Picking Stock Footage

Larry Jordan – LarryJordan.com

Three things to consider when looking at stock footage.

Topic $TipTopic

Wipster recently shared these stock footage tips:

1. Go for story-driven footage

Rather than settling for searching on multiple sites for stand alone stock video shots that “kind of” look similar to one another, look for story driven footage. Story-driven shots are ones that show the same subject in action and also provide multiple shot types of similar action.

2. Use high quality, Raw or Log Footage

When searching for stock footage, look for clips that enable high resolution downloads, like Raw, Arri, Red or Phantom. You won’t have to sift through a library full of less-than-stellar quality or overused footage to find what you’re looking for.

3. Don’t pay per clip. Go unlimited

Your film’s budget can easily go through the roof if you pay per clip. This is why we recommend using footage sites that use single umbrella licensing and unlimited subscription models.


Please rate the helpfulness of this tip.

Click on a star to rate it!

… for Apple Motion

Tip #151: Export a Transparent Effect from Motion

Larry Jordan – https://LarryJordan.com

Transparency can be displayed by any NLE.

Unchecked layers in Motion are transparent.
Uncheck a group or layer in Motion to make it transparent.

Topic $TipTopic

You have two options to export an effect from Motion:

  • Export the entire composited movie. This creates a stand-alone movie.
  • Export just a portion of the effect – for example, a motion-tracked object, then composite it in the NLE.

Since exporting only exports visible layers, to export just an animated element, uncheck any layers you don’t want to export to make them invisible.

NOTE: To export the entire composite, make sure all layers are visible (checked) in the Layers panel.

Now, when you choose Share > Export Movie and accept the default settings, Motion creates a ProRes 4444 movie with an alpha channel, which means it includes any transparency.

That ProRes 4444 movie can then be imported into any editing software on Mac or Windows and retain all its transparency.

Very cool.


Please rate the helpfulness of this tip.

Click on a star to rate it!

… for Apple Motion

Tip #153: The Inspector Adds Perspective

Larry Jordan – https://LarryJordan.com

Precise controls for manipulating elements.

The Inspector adds 3D rotation or position changes.
Use the Motion Inspector to add 3D rotation or position changes.

Topic $TipTopic

There are two ways to add perspective to any element in Motion:

  • The Inspector
  • The 3D Transform tool

To use the Inspector:

  • Select an element in the Layers panel.
  • On the left side of the Interface, click Inspector > Properties.
  • Twirl down Position to move the selected element horizontally (X), vertically (Y), or to or from the viewer/camera (Z).
  • Twirl down Rotation to rotate the selected element horizontally (X), vertically (Y), or to or from the viewer/camera (Z).

Personally, I find myself using Y rotation the most of all these settings.


Please rate the helpfulness of this tip.

Click on a star to rate it!