… for Random Weirdness

Tip #1578: Video Production and the Law

Larry Jordan – LarryJordan.com

Every business has legal issues. Production is no different.

(Image courtesy of Sora Shimazaki, via Pexels.com.)

Topic $TipTopic

This article, written by Mark Levy, first appeared in VideoMaker.com. This is a summary.

When you start any business, you should know the legalities of the business. It is difficult enough to set up a business with suitable equipment, personnel, infrastructure, marketing, and customers or clients without having to worry about legal liabilities. The same is true in the video production field. This article describes all of the considerations when it comes to video production and the law.

  • Fair Use. In order to determine whether the use of copyrighted material is a fair use, the court considers four factors: (1) the purpose and character of the use, (2) the nature of the copyrighted work, (3) the amount used in relation to the copyrighted work as a whole, and (4) the effect of the use upon the value of the copyrighted work.
  • Create an LLC Business Structure. While legal liability is probably the most commonly cited benefit of a creating an LLC, taxes comes in a close second. LLC owners can apply for an Employer Identification Number (EIN) from the IRS that would allow them to be taxed as a corporation. Downsides are separating business and personal financial records, more detailed official meeting minutes and increased fees.
  • Production Insurance. This would cover general liability, worker’s compensation and professional liability insurance.
  • Release Forms. Any identifiable people or places will need release forms signed.
  • Contracts. A contract is “an agreement between private parties creating mutual obligations enforceable by law.” Usually, this plays out as a promise that you’ll do some specific work for someone, that someone will pay you for your work, and that both of you are legally bound to uphold your side of the bargain.
  • Copyright. Understand where copyright applies and where it doesn’t. Also consider how patent or trademark law applies to your productions.
  • Licensing and Freebooting. How to protect your work from unauthorized duplication.
  • Errors & Omissions. This insurance protects you in case of mistakes.
  • Public Domain. Everything created before 1926 is in the public domain and can be used without permission of the creators of those works.

EXTRA CREDIT

The article, linked above, has more details on each of these points.


Please rate the helpfulness of this tip.

Click on a star to rate it!

… for Random Weirdness

Tip #1582: Four Approaches to Translating Films

Larry Jordan – LarryJordan.com

Translation is an art, not a science.

Image courtesy of “Trope Talk.”

Topic $TipTopic

This article, written by Meg Shields, first appeared in FilmSchoolRejects.com. This is a summary.

Translation is an art, not a science. Sometimes the phraseology of one culture has no equivalent in another’s. And sometimes capturing the spirit of an evocative turn of phrase involves transforming things entirely.

The same, of course, holds true for movie title translations. In addition to properly describing a film and managing the expectations of a foreign audience, translated titles must also navigate a minefield that runs the gamut from cultural sensitivities to market preferences.

The core of this article is a link to a 12 minute video – called “Trope Talk” – that illustrates four different approaches to movie title translations, as seen in Chinese cinema. The methods are, briefly: (1) to translate literally; (2) to reinterpret; (3) to be poetic, and (4) to fudge the title to make it sell better.

Link.


Please rate the helpfulness of this tip.

Click on a star to rate it!

… for Apple Motion

Tip #1576: The Essential Write On Behavior

Larry Jordan – LarryJordan.com

The Write-on behavior animates lines to draw themselves on-screen.

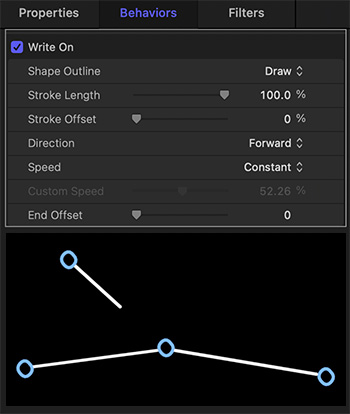
Write On settings (top) and a line animating itself on-screen (bottom)

Topic $TipTopic

Behaviors create animation without requiring keyframes; and one of the most essential behaviors is Write On.

The Write On behavior animates lines to draw themselves on-screen. It is located in Behaviors > Shape > Write On.

Be default, this effect animates (draws) a line on-screen, with the effect taking the entire duration of the project. Just as with all behaviors, you can change the speed of the draw by adjusting the In and Out of the effect.

But, a closer look at the settings for Write On shows a variety of interesting options that you may not have noticed.

  • Shape Outline. This draws, erases, or draws then erases a line.
  • Stroke Length. This changes a line into a pulse which starts at the beginning of the line, then travels along it to the end.
  • Stroke Offset. This moves the starting position of the line.
  • Direction. Forward or reverse.
  • Speed. This dials in acceleration and deceleration, as needed.

EXTRA CREDIT

Write On is the option of choice to watch a line draw on a map, an arrow travel through space, or a more complex shape animate itself into view.


Please rate the helpfulness of this tip.

Click on a star to rate it!

… for Adobe Premiere Pro CC

Tip #1571: Video Limiter Settings

Larry Jordan – LarryJordan.com

The Video Limiter keeps video levels legal.

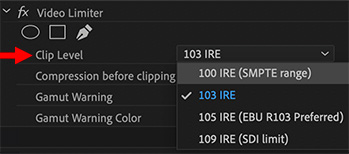
Video Limiter settings in the Effect Controls panel.

Topic $TipTopic

This post was written by Simon Walker on the Adobe forums. Simon is based in London.

In my experience, Premiere Pro’s Video Limiter effect has proven very useful as a method to keep luma and chroma levels legal for broadcast.

Video Limiter is only really meant to catch stray illegal pixels, and isn’t a replacement for properly colour correcting the clips, which is the best method to manage luma and chroma levels. However, I do think there is a place for a legalising check, especially if you’re on a deadline, and I’ve seen it used successfully on time sensitive projects.

The trick to getting a good result out of Video Limiter is to set the Reduction Axis parameter to Chroma and Luma, rather than the default setting of Smart Limit. It’s also useful to apply the effect to an adjustment layer, set to the duration of the sequence. Video Limiter is a Mercury Playback accelerated effect, and therefore GPU enabled, so it won’t slow down playback or final output.

One thing that’s worth noting is that if you’re dealing with bright saturated colours the limiter can affect the final colour output, so be prepared to adjust the Chroma Max setting to compensate.

On sport productions I’ve been involved with, I’ve found that the Chroma Max default setting of +130% can display an RGB gamut error on the scopes, and reducing this to around 100% removes the error (which is one of the techniques we used at the World Cup in Rio last year). However it also can desaturate the brightest colors. Whilst this will give a reliable result in most cases, it’s important to keep an eye on those bright orange and red saturated colours which turn up on football shirts and racing cars (yes, I’m looking at you Netherlands and Ferrari).

EXTRA CREDIT

The Video Limiter filter is located in Effects > Video Effects > Color Correction > Video Limiter.

Here’s a tutorial on how this works.


Please rate the helpfulness of this tip.

Click on a star to rate it!

… for Apple Final Cut Pro X

Tip #1573: The Broadcast Safe Effect

Larry Jordan – LarryJordan.com

Broadcast Safe makes sure there are no illegal video levels in your project.

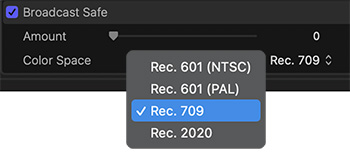
Settings for the Broadcast Safe effect.

Topic $TipTopic

The Broadcast Safe effect clamps video levels so that they do not exceed safe levels. (See Tip #1572.) This works, but there are limitations.

The Broadcast Safe filter is located in Effects browser > Color > Broadcast Safe. You apply it the same as any other effect.

NOTE: However, if you are applying other effects to the same clip, be sure that the Broadcast Safe filter is listed last. This prevents another filter from sending video levels into illegal levels after the Broadcast Safe effect is applied.

In the effect, select the color space of your project. For HD projects, select Rec. 709. For SD projects, choose one of the two Rec. 601 options. All HDR projects should use Rec. 2020.

For Rec. 601 or 709 footage, this clamps any video levels over 100% IRE to exactly 100%, and clamps any video levels below 0% IRE to exactly 0%.

Clamping means that all excessive video levels are locked to the same value, which will remove any detail in the clamped areas. A better option is to adjust levels using the Color Board, Curves or Color Wheels. However, the Broadcast Safe filter is MUCH faster and, most of the time, you don’t need to retain that texture detail.

CAUTION

The big limitation of the Broadcast Safe filter is that if you adjust the Amount slider, you will adjust both highlights and shadows. This will lead to bad results. What Apple needs to do is provide two separate sliders, one for highlights and one for shadows.

My general recommendation is not to change the Amount slider to avoid degrading your image.

EXTRA CREDIT

The best way to apply the Broadcast Safe filter in Final Cut is to use an adjustment layer. Here’s a tutorial from my website that describes this in more detail.


Please rate the helpfulness of this tip.

Click on a star to rate it!

… for Visual Effects

Tip #1561: How to Get Started in Motion Capture – FREE

Larry Jordan – LarryJordan.com

Motion capture doesn’t need to be expensive when you first start.

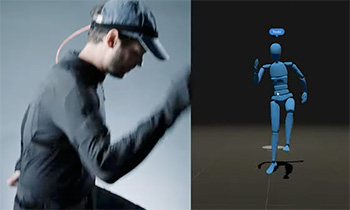
Image courtesy of Todd Blankenship.

Topic $TipTopic

This article first appeared in RocketStock.com. This is a summary.

After spending the past few months learning 3D, one of the biggest challenges (after making a decent looking 3D scene) was animating. Well, there are two good ways to do this. The better solution, yet requires a pretty serious investment, is using a motion capture suit. As for the no-budget option? I’ve turned to animation libraries from sites like Mixamo and Rokoko Motion Library.

If you want to get started learning motion capture for free, check out these free tools and assets. You can even see them in action in this video from Am I A Filmmaker?, where you will see the progression of learning motion capture with some really cool examples.

Here’s the video link.


Please rate the helpfulness of this tip.

Click on a star to rate it!

… for Apple Motion

Tip #1501: Get Rid of a White Background

Larry Jordan – LarryJordan.com

Removing a white background is easy, just hard to find.

Luma keyer settings (top), original image (lower left) and final.

Topic $TipTopic

Removing a white background in Motion is easy, but the settings are hard to find. This is one of those tips that, if you know it, seems easy. And, if you don’t, drives you nuts.

  • Import an element that has a white background into Motion and select it.
  • Apply Filters > Keying > Luma Keyer
  • Check the Invert checkbox to key on white (second red arrow).
  • Slide the top Luma slider to the right until the foreground is as solid as possible (top red arrow). Click the View > Matte icon to make sure the foreground is solid white.
  • To get rid of white edges, slide Matte Tools > Shrink/Expand to the right a pixel or two; I used 2.0 (bottom red arrow).

Done.


Please rate the helpfulness of this tip.

Click on a star to rate it!

… for Adobe Premiere Pro CC

Tip #1504: New Feature: Media Replacement

Larry Jordan – LarryJordan.com

This trick is to use the Essential Graphics panel to replace media.

Replacing media in the Essentials Graphics panel.

Topic $TipTopic

The new replaceable media feature in Motion Graphic templates (.mogrt) created in After Effects for use in Premiere Pro is very cool – and easy to use. Once you know one trick. And that trick is HOW to replace the media.

Let me show you.

  • Switch to the Graphics workspace.
  • Using the Browser feature in the Essential Graphics panel, find the template you want to use and drag it into the timeline.
  • Select the template in the Timeline, then click the Edit button in the Essential Graphics panel.
  • Twirl down MEDIA REPLACEMENT, then twirl down Media Replacement (yup, it’s listed twice) until you see the placeholder graphic.
  • Drag the image you want to insert from the Project/Bin panel on top of the placeholder graphic in the Essential Graphics panel.
  • To change the starting time of the inserted video, change the timecode setting for the In, below the image. (Not illustrated in screen shot.)

EXTRA CREDIT

  • This will need plenty of time to render.
  • You can change the image at any time by dragging a different image on top of the placeholder.
  • Trying to change graphics in the Effect Controls panel won’t work.
  • For those that know Apple Motion, this feature is the same as using Drop Zones in Motion.

Please rate the helpfulness of this tip.

Click on a star to rate it!

… for Apple Final Cut Pro X

Tip #1500: Detached vs. Expanded Audio in FCP

Larry Jordan – LarryJordan.com

The big difference between these two is sync.

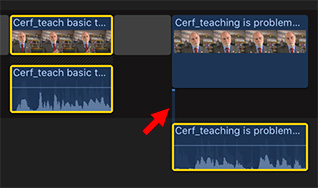
Expanded audio (left) vs. detached audio.

Topic $TipTopic

What’s the difference between “expanded” vs. “detached” audio, and does it make a difference? To answer the second question first: Yes, it makes a big difference.

EXPANDED AUDIO

Double-click the audio for a synced clip (or, select the clip and choose Clip > Expand Audio). This slightly separates the audio from the video without unlinking it; but leaves both clips in the Primary Storyline.

  • When you select either the video or the audio, the entire clip is selected.
  • When you move one side of the clip, the other side moves with it. You can’t get an expanded clip out of sync.
  • What you CAN do, however, is trim each side of the clip differently, which is the essence of a split edit.

NOTE: When you expand an audio clip, there is no connecting line between the audio and video clips.

DETACHED AUDIO

Select a synced clip and choose Clip > Detach audio. The audio separates into a discreet clip, connected via a link to the video clip (see screen shot). This separates the two clips and moves the audio out of the Primary Storyline and turns it into a Connected clip.

A detached audio clip can be selected, moved, deleted, or trimmed without affecting the video clip.

HOWEVER, if a detached audio clip is moved, such that it is out of sync with the video clip, there is no indicator these two clips are out of sync and there is no way – short of Undo – to get the two clips back into sync.

SUMMARY

If you need a standalone audio clip, detach it.

If you need a clip to remain in sync with the video, expand it.


Please rate the helpfulness of this tip.

Click on a star to rate it!

… for Apple Final Cut Pro X

Tip #1493: How to Create a Split Edit

Larry Jordan – LarryJordan.com

Split edits solve many editing problems.

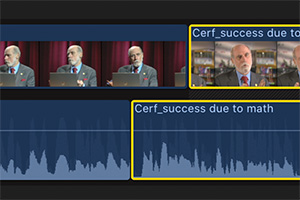
An example of a split edit, where audio and video edit at different times.

Topic $TipTopic

(I discovered this tip while researching a recent PowerUP webinar presenting Audio in Apple Final Cut Pro.)

A split edit is where the audio and video edit at different places in the timeline. It is a workhorse in editing, where you want to linger on the video while hearing different audio (see screen shot). Or vice-versa.

To create a split edit:

  • Double-click the audio portion of a clip in the Final Cut timeline (Shortcut: Control +S). This separates it from the video without unlinking it.
  • Select the Trim tool (Shortcut: T) from the Tools menu.
  • Click and drag the audio edit point to a new location. The audio edit point moves, without altering the video. (This type of edit is called a “Roll” trim.)

NOTE: You can do the same with the video edit point. Click and drag with the Trim tool.

EXTRA CREDIT

You can move the selected edit point multiple ways:

  • Type Control + [comma] / [period] to move left/right one frame.
  • Type Shift + Control + [comma] / [period] to move left/right ten frames
  • Type Shift + X to jump the edit point to the position of the playhead (assuming you have sufficient handles and are not jumping over other clips).

To remove a split edit, select the clip and choose Trim > Align Audio to Video. This trims (not moves) the audio to match the timing of the video for that clip.


Please rate the helpfulness of this tip.

Click on a star to rate it!