… for Visual Effects

Tip #1311: Toolfarm Top Ten Tutorials & Freebies

Larry Jordan – LarryJordan.com

The most popular VFX freebies and tutorials – all in one place.

{Image courtesy of Toolfarm.com.)

Topic $TipTopic Announced on News Year’s Eve, here are the “Toolfarm Top Ten Freebies & Tutorials” – the Top 10 most popular, fan-favorite freebies from 2020 at Toolfarm.

Link: www.toolfarm.com/news/top-10-freebies-2020/

Also, last week, Toolfarm posted their “Top Ten Tutorial Posts of 2020.”

Link: www.toolfarm.com/news/top-ten-tutorial-2020/

Some quick facts about Toolfarm’s 2020 Tutorial Posts

  • We posted 310 tutorials to our site in 2020 alone!
  • We have 2,404 tutorial posts published in total. The reason I’m calling them “tutorial posts” is because some posts have more than one tutorial.
  • While we used to post tutorials for mainly After Effects and Cinema 4D, in 2020 we published more about DaVinci Resolve, KeyShot, and audio plugins.
  • Informational posts have become more popular than the standard “how-to” tutorial posts.

Please rate the helpfulness of this tip.

Click on a star to rate it!

… for Random Weirdness

Tip #1283: Cool Tip to Improve Product Shots

This is a simple, but subtle trick that improves any product.

Give your product shots a new spin!

Topic $TipTopic

Every product shot is about making the product look great. But, what do you do when the product doesn’t move.

Sure, you can zoom in and pan around. But, well, that’s pretty boring.

Here’s the tip: Put the product on a turntable. This allows you to combine multiple moves into a single shot. Now your zoom not only pulls the eye into the shot, but it also reveals new visual information, which makes the shot all that more intriguing

Adding a Lazy Susan turntable to a product shot adds energy and it’s a cheap, totally believable way to increase production value.


Please rate the helpfulness of this tip.

Click on a star to rate it!

… for Apple Final Cut Pro X

Tip #1276: Quickly Reverse or Flip a Clip

Lawrence Sobczak

The Flipped effect is faster, the Transform settings provide more control.

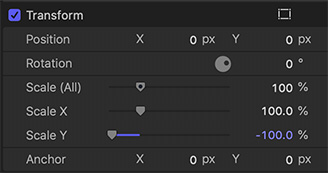
These Transform settings flip a clip vertically.

Topic $TipTopic

Lawrence Sobczak shared a very quick way to flip or invert a clip in Final Cut Pro. He writes:

When you want to mirror image, or invert, a clip in Final Cut, there are two ways to do it:

  • Apply Effects > Distortion > Flipped.
  • Go to Video Inspector > Transform > Scale and enter a negative number for Percent.

NOTE: Enter Scale X = -100 mirror images the clip. Enter Scale Y = -100 flips the image upside down. It’s also possible to scale and flip a clip, by making X a negative number while keeping Y as a positive number.

Cool tips! Thanks.


Please rate the helpfulness of this tip.

Click on a star to rate it!

… for Visual Effects

Tip #1271: How to Setup Network Rendering

Larry Jordan – LarryJordan.com

Network rendering speeds output, but setup can be tricky.

(Image courtesy of Pexels.com.)

Topic $TipTopic

Toolfarm.com has created an in-depth tutorial on render farms, also called “network rendering.” (Link)

The idea of network, or distributed, rendering is to distribute your render over a network, or farm, of computers, to speed up your render times. This can be done in many different programs with a myriad of different setups, so it isn’t as straight forward and clear cut as I’d like it to be.

Creating the right storage and management can be a challenge but it’s important to get that in place first. There are tons of resources out there but I’m keeping this short and sweet so this will be a page of resources more than actual instructions.

Subjects include:

  • Setting Up a Network Rendering for After Effects
  • Network Rendering with RenderGarden
  • Cinema 4D Team Render
  • Autodesk BackBurner for Autodesk Maya, 3ds Max, Flame, and more
  • Chaos Group V-Ray Swarm
  • Pipeline
  • Pixar’s Tractor
  • Digital Rebellion Pro Render
  • Aeriform Ramma
  • Using your Plug-ins and Software on a Network Rendering Setup

The article linked above has much more information, plus links to more resources.


Please rate the helpfulness of this tip.

Click on a star to rate it!

… for Random Weirdness

Tip #1248: The Creative Process of Filmmaking

Larry Jordan – LarryJordan.com

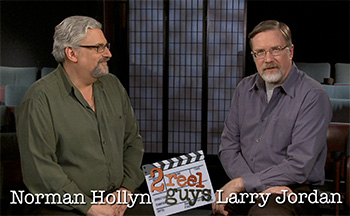
2 Reel Guys: Dedicated to the creative process of filmmaking.

“2ReelGuys” hosts: Norman Hollyn and Larry Jordan.

Topic $TipTopic

Several years ago, Norman Hollyn and I created a 32-part web series dedicated to the creative process of visual storytelling called “2 Reel Guys.” Learn more about this free series.

Norman was teaching at the USC Film School when we first met. Over that lunch, we decided to combine our skills and create a series of short web videos to help folks learn how to create films. Both of us felt that it wasn’t necessary to attend film school to be a filmmaker. But you DID need to know how the story-telling process itself worked.

Our goal was not to focus on technology, but story-telling. Written by Norman, hosted by Norman and myself and illustrated by the “2 Reel Guys Players,” we created the following episodes:

  1. It All Starts With Story
  2. Controlling Where The Eye Looks
  3. What Directors Do That Drive Actors Crazy
  4. Organization and Planning During Pre-Production
  5. Collaboration
  6. Directing Actors
  7. Don’t Be a Victim of Hit-and-Run Lighting
  8. Editing is Storytelling (Bad Master)
  9. Audio is More Important than Picture
  10. Planning Shots and Coverage
  11. Costumes and Wardrobe
  12. Use Color to Guide Emotions
  13. Camera Position and Framing (bad export)
  14. Dealing with Dancers
  15. Solving Production Problems
  16. Editing for Pacing
  17. Adding Music to a Scene
  18. Documentaries
  19. Sound Design
  20. Communicating With the Crew
  21. Comedy
  22. Directing Actors
  23. Communication
  24. Music Video
  25. Good Characters
  26. Location
  27. Staging a Fight
  28. Casting
  29. Lighting
  30. Emotional Turns
  31. Script
  32. Wedding Videos

Each show runs about ten minutes. Though technology marches on, telling stories remains the same from year to year.

If you haven’t visited this site, it’s well-worth your time.

Here’s the link.


Please rate the helpfulness of this tip.

Click on a star to rate it!

… for Visual Effects

Tip #1250: Special Effects in Miniature

Larry Jordan – LarryJordan.com

Models made the difference for The Mandalorian.

The “Razor Crest” (image courtesy of PremiumBeat.com)

Topic $TipTopic

This article, written by Mike Maher, first appeared in PremiumBeat.com. This is a summary.

“The Mandalorian” turns to a tried-and-true special effect — hand-crafted miniature models – to create stunning visuals. The Mandalorian’s ship, the Razor Crest, was initially concepted and then modeled in 3D. Small ships were printed for use by the production team to not only finalize the look of the ship, but to help with things like determining the size and layout of the ship itself.

After seeing the number of shots needed and the type of shots, production immediately began on both a physical miniature model of the ship itself, as well as a custom-made motion control rig and track to capture the footage.

The two-foot long Razor Crest model was printed piece by piece in a 3D printer. As soon as parts were completed, they were immediately handed off to John Goodson, who was in charge of assembling the on-camera model.

The 3D printed pieces were so fragile, there was no way they would hold up in construction, let alone on set. The print was fully assembled and then Goodson created a two-piece mold from that initial print.

To capture these miniature shots, ILM CCO and VFX Supervisor John Knoll manufactured a custom motion capture rig and track system in his home garage. A Canon DSLR would be mounted to a custom-made system.

EXTRA CREDIT

The article has more details, images and two videos that go behind the scenes showing how the visual effects of this movie were created.


Please rate the helpfulness of this tip.

Click on a star to rate it!

… for Adobe Premiere Pro CC

Tip #1245: What is the Assembly Workspace?

Larry Jordan – LarryJordan.com

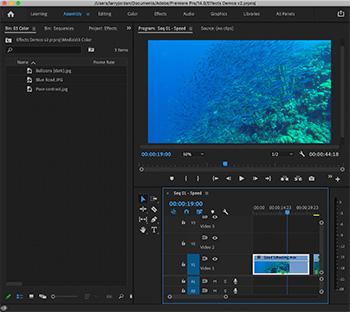
The Assembly workspace focuses on clips and story-telling.

(Image courtesy of Jim Walker and Lobsters Gone Wild Productions.)
The Assembly workspace is designed for fast review and rough-cut editing.

Topic $TipTopic

You’ve seen the text button in the Workspaces list at the top of Premiere Pro: Assembly. But what is this workspace and how do you use it?

PremiumBeat.com describes it as: “A workspace layout that has a large Project area with the Program & Source Monitors sharing [the same] space. This is a handy workspace if you like to use Premiere Pro’s Hover Scrub, then set In & Out and use shortcuts to quickly Insert or Overwrite edit. As the name suggests, this workspace is designed for quickly creating a rough cut in Premiere Pro.”

Here’s a detailed article from PremiereBro.com on workspaces in Premiere.


Please rate the helpfulness of this tip.

Click on a star to rate it!

… for Apple Motion

Tip #1228: How to Burn-in Timecode

Larry Jordan – LarryJordan.com

FxFactory Pro provides a wide variety of generators, transitions and effects for Motion and FCP X.

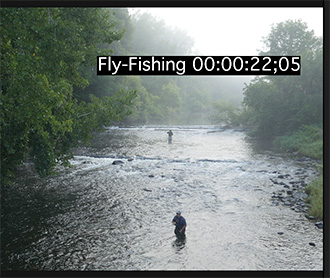
The Timecode generator, top, and the results. (Image courtesy: Hallmark Broadcast Ltd. (www.hallmarkbroadcast.tv))

Topic $TipTopic

Motion does not have the ability to burn timecode into video, say to provide a reference when sending a project to a client to review. But, you still can – with a little help from FXFactory.

Using the Timecode generator from FXFactory Pro, you can easily superimpose timecode for a single clip, or an entire project.

Adjustable settings include:

  • Position
  • Font size, color and kerning
  • Type of timecode
  • Background
  • Drop shadow

A free trial is available.

Link: https://fxfactory.com/info/fxfactorypro/


Please rate the helpfulness of this tip.

Click on a star to rate it!

… for Random Weirdness

Tip #1207: I Need Your Help

Larry Jordan – LarryJordan.com

The Inside Tips encourages reader-contributed tips. Please share yours with us.

We don’t know what we don’t know until we learn it from someone else.

Topic $TipTopic

I want to encourage you to submit a tip or two for “The Inside Tips.” We all benefit when we take the time to share what we know.

Random Weirdness about Media is a Tip Letter focused on media production. Production is a vast topic, far more than any single person can master.

Each of us, during our career, has benefited by learning from others – sometimes in a formal setting, more often in the course of daily work.

For this reason, it would be great if you could contribute a tip or two from your own experience. The Inside Tips are read in every state in the US, as well as 50 countries around the world.

Even the “simple things” only seem simple after we learn them.

Click this link to submit a tip…. And thanks!


Please rate the helpfulness of this tip.

Click on a star to rate it!

… for Apple Motion

Tip #1221: Interpreting the Alpha Channel

Larry Jordan – LarryJordan.com

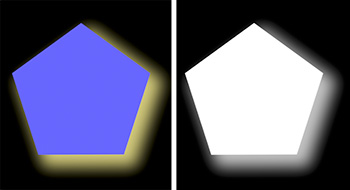
The Alpha channel displays transparency as shades of gray.

The source image with a drop shadow. The same image displayed as an alpha channel.

Topic $TipTopic

The alpha channel represents the transparency of each pixel, the same way color channels represent the amount of color in each pixel. But, how do you interpret what the alpha channel display shows?

At the top right of the Viewer is a small color square, immediately to the right of the screen display percentage indicator. Click it and choose Alpha.

Instantly, the screen switches to black and white. (The screen shot displays the color image on the left, and the alpha channel image on the right.)

NOTE: Since transparency ranges from transparent to opaque, the alpha channel is represented in most applications as a black-gray-white image.

  • Black. This represents regions which are fully transparent.
  • White. This represents regions which are fully opaque.
  • Gray. This represents regions which are translucent. The brighter the gray, the more “solid” that region appears.

The image in the screen shot is a fully opaque pentagon, with a translucent (75%) shadow set against a transparent background. This means that if this shape is added to a video, the pentagon will be superimposed, along with its shadow, over the video.

Shadows are almost always translucent. However, chroma-keys need the foreground to be solidly opaque with the background fully transparent, with no shades of gray. Now, using the alpha channel, you can quickly spot and fix problems.


Please rate the helpfulness of this tip.

Click on a star to rate it!