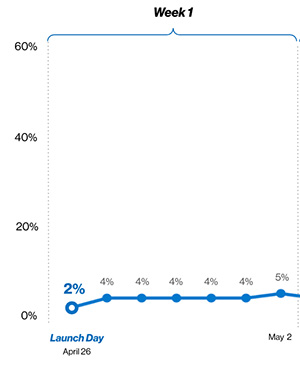
Customer’s value their privacy, but the stats are still coming in.
Section of the US opt-in tracking chart. (Courtesy Flurry Analytics.)
One of the most talked-about features in iOS 14.5 is Apple’s insistence that users give their permission for their personal data to be tracked. This created a firestorm of controversy in the industry, especially from developers who’s business plan is based on tracking, compiling or selling user data.
While initial surveys suggested 40% of iOS users would opt out, the reality is far more dramatic. Flurry.com, a company specializing in iOS and Android analytic software, is tracking the results.
VVC has the possibility to succeed, but not for a couple of years.
Image courtesy of Pexels.com.
Last week, Tip #1629 introduced the new VVC codec. This codec is designed to take the place of HEVC going forward. But, is it any good?
Jan Ozer, a technology writer and compressionist whom I respect a lot, recently took a deep dive into this subject for TechRadar.com. Here are some of his thoughts.
What’s the codec’s comparative efficiency? It is advertised as half the bandwidth of HEVC. Jan measures it closer to 30%. However, the reason publishers typically adopt new codecs like HEVC is because they open markets for new customers.
What new markets or platforms does the codec enable? Looking back, H.264 was very quickly deployed by streaming publishers because it enabled delivery to mobile devices, which the previous codec, VP6, didn’t. Similarly, most of the publishers that deploy HEVC do so to send 4K SDR/HDR videos to SmartTVs, a market they couldn’t affordably serve with H.264.
As we’ll discuss in a moment, VVC is at least 2-3 years out from meaningful deployments. Perhaps at that time 8K or VR will be new and compelling markets, though it’s generally acknowledged that without high dynamic range, 4K video is tough to distinguish from HD in most configurations. Best case, at this point, we just don’t know if VVC will enable any new markets or not.
Jan goes on to analyze seven more questions to help determine whether a codec will be successful. These include:
How is encoding time?
Can VVC be implemented in software on relevant platforms?
Does the Alliance for Open Media (AOM) support the codec?
Is the codec a MPEG standard?
What’s the technology ownership and monetization model?
How set is the royalty structure?
Is there a content royalty?
The article is excellent, readable and informative. The short take: “If you’re a streaming producer worried about missing the boat on VVC, file that concern in the “worry about in 2022” file.
Please rate the helpfulness of this tip.
Click on a star to rate it!
https://www.theinsidetips.com/wp-content/uploads/2019/09/Tips-Logo-700x150.jpg00Larry Jordanhttps://www.theinsidetips.com/wp-content/uploads/2019/09/Tips-Logo-700x150.jpgLarry Jordan2021-05-25 01:30:002021-05-25 01:30:00Tip #1657: Will the VVC Codec Succeed?
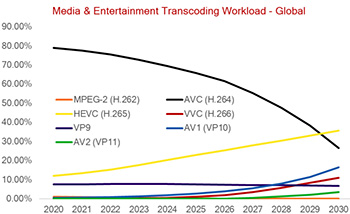
Rethink projects LCEVC to achieve 30% penetration by 2030.
The V-Nova logo.
StreamingMedia.com reports that V-Nova, the primary developer of the Low Complexity Enhancement Video Codec (LCEVC), announced royalty terms, which apply a capped, low per-user fee on the streaming service actually using the codec, and is free for encoder and decoder vendors.
V-Nova’s royalty involves different prices for different types of entities, like subscription and advertising-based services, and TV Everywhere, all capped at US $3.7 million per year.
They spoke with Alex Davies, senior analyst at Rethink about the V-Nova announcement, and a coauthor of the recently released Media & Entertainment Transcoding Workload and Device Royalty Forecast 2020-2030 which predicts codec deployments and usage through 2030. In preparing the report, Davies spoke with codec developers, phone and TV manufacturers, streaming producers, and other stakeholders, providing a broad-based perspective. For the record, the report predicts that LCEVC will achieve a 30% penetration by 2030.
This article, written by Adrian Penington, first appeared in NAB Amplify. This is a summary.
MPEG has been the dominant force in driving standardization of video compression format over three decades successfully delivering successive generations which drive bitrates down while keeping quality up.
In recent times its codec HEVC/H.265, the successor to the world’s current dominant code AVC H.264, has become mired in opaque patent pools which has hindered adoption and caused web giants and OEMs to seek alternatives. The mistakes in implementing HEVC and in not correcting them in time have come home to roost.
MPEG’s once dominant position seems to have come to an end — “and the blame seems to be entirely on the mess that arose from intellectual property claims and royalties,” concludes Rethink Research in a comprehensive analysis of the codec sector.
This matters because codecs are essential components of any video business, particularly when streaming content OTT to devices everywhere. Decisions on which horse to back need taking some time out and investments don’t run cheap. In fact, they could be about to get steeper for all concerned.
Instead of one codec to rule them all, as was the state of play for the last 30 years, what all this means for the next few decades is a fractured market with no single codec reach the same dominant position of MPEG 2 or AVC.
EXTRA CREDIT
Turning to the ReThink TV website, they summarize the report as:
AVC (H.264) will finally decline, but its direct successor (H.265) will not replace it entirely.
As HEVC grows, its own successor VVC (H.266) becomes a direct competitor. This, and its high royalty fees, will stall growth, as well as the memory of the infamous HEVC royalty wars.
AV1 will emerge as an OTT option, but is still dogged by Sisvel’s recent appearance and royalty claims.
LCEVC will take root, initially in the AOMedia ecosystem, but expanding comfortably into the MPEG family by 2030.
Here’s a link to the Executive Summary of the ReThink TV Report.
Please rate the helpfulness of this tip.
Click on a star to rate it!
https://www.theinsidetips.com/wp-content/uploads/2019/09/Tips-Logo-700x150.jpg00Larry Jordanhttps://www.theinsidetips.com/wp-content/uploads/2019/09/Tips-Logo-700x150.jpgLarry Jordan2021-05-18 01:30:002021-05-18 01:30:00Tip #1623: H.264 is Going Away. Chaos is Coming.
“Television becomes just one service inside of an IP broadcast.”
Image courtesy of HPAonline.com.
This article, written by Michael Balderson, first appeared in TVTechnology.com. This is a summary.
Broadcast television is no longer unique, and that will open up new and exciting doors over the next few years. More specifically, the broadcast industry’s transition to IP technology allows them to operate and compete in streaming markets, which will be a boost as the industry looks to transition to ATSC 3.0, embrace remote production and explore new opportunities to engage with viewers.
This was the focus of last week’s two-part Broadcasters Panel during HPA Tech Retreat 2021. The panel was moderated by industry pundit Matthew Goldman and featured Del Parks of Sinclair Broadcast Group, Dave Folsom of Pearl TV, Ken Fuller of CBS and Richard Friedel of Fox as panelists.
With IP a critical feature of the ATSC 3.0 standard, traditional video media systems can now move into new areas, according to Parks.
“Having an IP backbone does a couple of things: It gets us into a different operating environment globally, but it also gives us to a large degree some interoperability with 5G, with LT, with existing telecommunications,” Parks said. “We have in our labs at CES and NAB demonstrated switching back and forth between 5G and ATSC 3.0 seamlessly.”
https://www.theinsidetips.com/wp-content/uploads/2019/09/Tips-Logo-700x150.jpg00Larry Jordanhttps://www.theinsidetips.com/wp-content/uploads/2019/09/Tips-Logo-700x150.jpgLarry Jordan2021-05-18 01:30:002021-05-14 16:40:51Tip #1625: IP is the Future of Broadcast
Versatile Video Coding was finalized July 6, 2020, rolling out early 2021.
Image courtesy of Pexels.com.
The VVC codec is promoted as the successor to HEVC. (And HEVC is currently not predicted to achieve the success of H.264 – see Tip #1623). But what is it?
Versatile Video Coding (VVC), also called H.266, is a brand-new video compression technology that is under current development to help reduce video size while not sacrificing image quality…. The VVC codec is especially designed to aid in the smoothness of higher-quality video services such as 360° omnidirectional immersive multimedia, high-dynamic-range (HDR) video and conventional dynamic range video. (5KPlayer.com )
NOTE: How large are HD video files without compression? A 1080p 30fps video, would require bandwidth of 1423.82 Mbps! To stream a second of 4K video, bandwidth aproaches 6 Gbps!!
Compared with royalty-free video coding formats like AVI and VP9, the H.26x series, including H.266, H.265, H.264, etc., are proprietary with numbers of patent pool administrators.
Normally, one of the reasons that a new video coding standard is worth spreading is due to improvement of the video compression algorithm. The higher the compression ratio, the less the bit rate for data transmission, the smaller the file size would be. Given that, what are the benefits of H.266?
H.266 comes with new algorithm, 30% to 50% higher compression rate for the same video quality than HEVC. A video file encoded in VVC therefore would be much smaller than in HEVC, let alone one compressed using H.264 (AVC).
In terms of quality, H.266 so good that barely any cother odec can match it at the same data rate.
VVC is better for streaming UHD content in 4K, 8K and even 16K on TV.
Better support for High Dynamic Range (HDR) and 360° video.
Here’s a link with more details , written for non-engineers.
Please rate the helpfulness of this tip.
Click on a star to rate it!
https://www.theinsidetips.com/wp-content/uploads/2019/09/Tips-Logo-700x150.jpg00Larry Jordanhttps://www.theinsidetips.com/wp-content/uploads/2019/09/Tips-Logo-700x150.jpgLarry Jordan2021-05-18 01:30:002021-05-14 16:39:34Tip #1629: What is the VVC Codec
Handbrake is a free, general-purpose media compression program.
HandBrake is a free open-source video transcoder available for Linux, Mac, and Windows.
HandBrake takes videos you already have and makes new ones that work on your mobile phone, tablet, TV media player, game console, computer, or web browser—nearly anything that supports modern video formats.
Features:
Convert nearly any video to MP4 or MKV
Crop and resize video
Restore old and low-quality video
Remove combing artifacts caused by interlacing and telecine
Pass-through audio without conversion for certain audio types
Downmix discrete surround sound to matrixed surround or stereo
Adjust audio volume levels, and dynamic range for certain audio types
Preserve existing subtitles, and add or remove soft subtitles (subtitles stored as text)
HandBrake does not:
Combine multiple video clips into one
Pass-through video without conversion (video is always converted)
Create Blu-ray, AVCHD, or DVD discs
Transcode into professional codecs such as ProRes, DNx, or GoPro Cineform
HandBrake also does not defeat or circumvent copy protection of any kind. It does not work with video files employing Digital Rights Management (DRM). This includes but is not limited to, copy protected content from iTunes, Amazon Video, Netflix, or other online providers, and many commercial DVD and Blu-ray discs.
https://www.theinsidetips.com/wp-content/uploads/2019/09/Tips-Logo-700x150.jpg00Larry Jordanhttps://www.theinsidetips.com/wp-content/uploads/2019/09/Tips-Logo-700x150.jpgLarry Jordan2021-04-06 01:30:002021-04-02 16:55:50Tip #1549: What Is Handbrake?
Adobe Media Encoder Watch folders are flexible, useful & easy.
The Adobe Media Encoder logo.
Adobe Media Encoder (AME) supports creating nested watch folders, which is a great way to perform multiple actions at once.
A Watch Folder is an automated way to compress (or transcode, actually) any media file using AME with settings that you apply to the Watch Folder itself.
Here’s a tutorial I wrote that explains how to create a simple watch folder setup, then extends that into nested watch folders which can accomplish multiple compression tasks automatically and hands-free.
You can also program AME to automatically transfer compressed files to a website when compression is complete. We used this feature a LOT during our live coverage of NAB for the Digital Production Buzz.
Please rate the helpfulness of this tip.
Click on a star to rate it!
https://www.theinsidetips.com/wp-content/uploads/2019/09/Tips-Logo-700x150.jpg00Larry Jordanhttps://www.theinsidetips.com/wp-content/uploads/2019/09/Tips-Logo-700x150.jpgLarry Jordan2021-04-06 01:30:002021-04-06 01:30:00Tip #1550: Use Nesting to Add Power to Watch Folders
NFTs verify ownership and provide potential royalties.
(Image courtesy of Alesia Kozik, at Pexels.com.)
This article, written by Alejandro Medellin, first appeared in Shutterstock.com. This is a summary.
The seemingly-overnight meteoric rise in popularity of NFTs (non-fungible tokes) has confounded many, including myself, begging the question: What are NFTs? Are they a cryptocurrency, a form of digital media, a speculative asset? The answers are no, kind of, and yes.
NFTs are digital assets whose ownership is verified by thousands of computers around the world using blockchain technology. Turning a regular digital asset into an NFT is called “minting,” which “tokenizes” the digital asset on the blockchain. NFT’s are sold using cryptocurrency, so the buyer and seller need a cryptocurrency wallet to participate in the transaction.
The digital asset itself is no different than non-NFT media, but its verification on the blockchain gives owners of the NFT legitimacy. While some people may buy NFTs because they like the content, many are treating NFTs as speculative assets, which are purchased because they may increase in value and sold for profit. With many NFTs selling as one-offs or in limited quantities, the digital scarcity increases the value of an NFT over time.
When an NFT is sold, and the transaction is verified on the blockchain, owners have digital proof of their purchase. That doesn’t mean they own the original asset or the copyright for that asset. They just own access to the NFT version of that thing, which is verified and cannot be changed unless sold. The blockchain verifies the transaction, which acts like a digital receipt that validates ownership of the NFT.
NFT ownership can be bought and sold, which is verified each time on the blockchain, but the original creator of the NFT is permanent. Typically, artists receive payment once when they sell their artwork, but selling an NFT is different. Each time an NFT exchanges hands, the original creator of the NFT receives a cut of the profit, which is a royalty payment. With the hope that NFTs appreciate in value over time, creators could make more on royalties than the initial price of the NFT.
The entire article is worth reading – as NFTs are simply another revenue source for our digital assets. The link is at the top.
Please rate the helpfulness of this tip.
Click on a star to rate it!
https://www.theinsidetips.com/wp-content/uploads/2019/09/Tips-Logo-700x150.jpg00Larry Jordanhttps://www.theinsidetips.com/wp-content/uploads/2019/09/Tips-Logo-700x150.jpgLarry Jordan2021-04-02 01:30:002021-04-02 01:30:00Tip #1525: Monetize Images Using Blockchain
FFmpeg: Open-source transcoding software for the media industry.
Underlying many popular transcoding or media viewer applications, like VLC Player or Handbrake, is FFmpeg.
FFmpeg is a free and open-source software project consisting of a large suite of libraries and programs for handling video, audio, and other multimedia files and streams. At its core is the FFmpeg program itself, designed for command-line-based processing of video and audio files.
FFmpeg is part of the workflow of hundreds of other software projects, and its libraries are a core part of software media players such as VLC, and has been included in core processing for YouTube and iTunes. Codecs for the encoding and/or decoding of most audio and video file formats is included, making it highly useful for the transcoding of common and uncommon media files into a single common format.
NOTE: One of the license stipulations to using FFmpeg is that it can not be sold, it can only be given away. And, it can’t be bundled with any transcoding software that is sold.
You may not have used it directly because it can only be accessed via the command line in Terminal. But numerous applications exist to provide a front-end to FFmpeg.
It should be noted that Apple has issues with FFmpeg:
In some instances, unauthorized codec implementations have been used in third-party software and hardware products. Using any unauthorized implementation (such as FFmpeg and derivative implementations) might lead to decoding errors, performance degradation, incompatibility, and instability.
https://www.theinsidetips.com/wp-content/uploads/2019/09/Tips-Logo-700x150.jpg00Larry Jordanhttps://www.theinsidetips.com/wp-content/uploads/2019/09/Tips-Logo-700x150.jpgLarry Jordan2021-03-30 01:30:002021-03-26 16:31:03Tip #1516: What is FFmpeg?
We may request cookies to be set on your device. We use cookies to let us know when you visit our websites, how you interact with us, to enrich your user experience, and to customize your relationship with our website.
Click on the different category headings to find out more. You can also change some of your preferences. Note that blocking some types of cookies may impact your experience on our websites and the services we are able to offer.
Essential Website Cookies
These cookies are strictly necessary to provide you with services available through our website and to use some of its features.
Because these cookies are strictly necessary to deliver the website, refuseing them will have impact how our site functions. You always can block or delete cookies by changing your browser settings and force blocking all cookies on this website. But this will always prompt you to accept/refuse cookies when revisiting our site.
We fully respect if you want to refuse cookies but to avoid asking you again and again kindly allow us to store a cookie for that. You are free to opt out any time or opt in for other cookies to get a better experience. If you refuse cookies we will remove all set cookies in our domain.
We provide you with a list of stored cookies on your computer in our domain so you can check what we stored. Due to security reasons we are not able to show or modify cookies from other domains. You can check these in your browser security settings.
Google Analytics Cookies
These cookies collect information that is used either in aggregate form to help us understand how our website is being used or how effective our marketing campaigns are, or to help us customize our website and application for you in order to enhance your experience.
If you do not want that we track your visit to our site you can disable tracking in your browser here:
Other external services
We also use different external services like Google Webfonts, Google Maps, and external Video providers. Since these providers may collect personal data like your IP address we allow you to block them here. Please be aware that this might heavily reduce the functionality and appearance of our site. Changes will take effect once you reload the page.
Google Webfont Settings:
Google Map Settings:
Google reCaptcha Settings:
Vimeo and Youtube video embeds:
Other cookies
The following cookies are also needed - You can choose if you want to allow them:
Privacy Policy
You can read about our cookies and privacy settings in detail on our Privacy Policy Page.