… for Apple Final Cut Pro X

Tip #1251: Add & Resize Emojis

Larry Jordan – LarryJordan.com

Emojis convey emotions – why not use them in your projects?

The Emoji picker, Smileys category – featuring Mrs. Claus.

Topic $TipTopic

This holiday season, add some emojis to spice your visuals. Here’s how to add, adjust and size them in your next project.

  • All emojis are text. So, start by adding a text clip to the timeline.
  • Place your cursor in the text clip where you want an emoji to appear.
  • Type Control + Cmd + Spacebar.
  • Double-click any emoji icon to add it to your title at the position of the cursor.

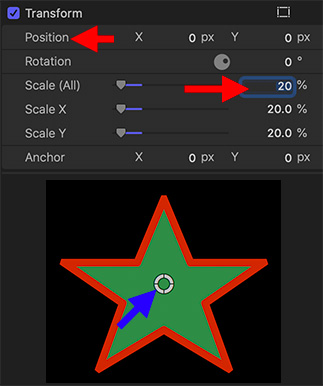
Just as with text, select an emoji and adjust its size using the Font Size controls. These will still look good at 400 points!

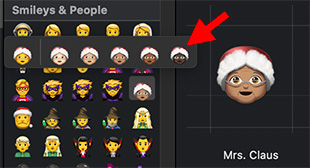
NOTE: Press and hold any emoji to see variations on that character (see screen shot).

EXTRA CREDIT

Emojis are much more than smiley faces. There are thousands to choose from. Scroll through the different categories to see what’s available.


Please rate the helpfulness of this tip.

Click on a star to rate it!

… for Apple Final Cut Pro X

Tip #1276: Quickly Reverse or Flip a Clip

Lawrence Sobczak

The Flipped effect is faster, the Transform settings provide more control.

These Transform settings flip a clip vertically.

Topic $TipTopic

Lawrence Sobczak shared a very quick way to flip or invert a clip in Final Cut Pro. He writes:

When you want to mirror image, or invert, a clip in Final Cut, there are two ways to do it:

  • Apply Effects > Distortion > Flipped.
  • Go to Video Inspector > Transform > Scale and enter a negative number for Percent.

NOTE: Enter Scale X = -100 mirror images the clip. Enter Scale Y = -100 flips the image upside down. It’s also possible to scale and flip a clip, by making X a negative number while keeping Y as a positive number.

Cool tips! Thanks.


Please rate the helpfulness of this tip.

Click on a star to rate it!

… for Apple Final Cut Pro X

Tip #1277: Trim – With More Options

Larry Jordan – LarryJordan.com

“Crop & Feather” is more accurately called “Trim & Feather.”

A cropped & feathered clip, with the settings I used to achieve this effect.

Topic $TipTopic

I create a lot of picture-in-picture effects in my projects. Recently, I discovered a way to make this process faster. Here’s how.

We often trim a clip to hide portions of the image so we can see the image beneath. Trimming (which Photoshop calls “masking”) hides part of the image without changing its size.

NOTE: Cropping on the other hand, removes portions of the image, then changes its size to fill the frame.

The Crop & Feather effect (Effects > Distortion) both trims a clip and adds feathering – either to the inside or out – of the trimmed clip. This means we don’t need to use a separate effect simply to feather the edges of a trimmed image.

In the screen shot, I trimmed the image to focus on the tree, then feathered the edges to the inside.

The screen shot shows the settings I used to achieve this.


Please rate the helpfulness of this tip.

Click on a star to rate it!

… for Apple Final Cut Pro X

Tip #1288: Top Ten Tips of 2020 for Apple Final Cut Pro

Larry Jordan – LarryJordan.com

It is fascinating to see what readers find interesting!

Topic $TipTopic

During this last year, The Inside Tips published 975 tips and techniques covering six subject categories:

  • Adobe Premiere
  • Apple Final Cut Pro
  • Apple Motion
  • Codecs & Media
  • Random Media Weirdness
  • Visual Effects

Here are three “Top Ten Tips Lists:” The first shows the most popular tips covering Apple Final Cut Pro. The second list shows the Top Ten most read tips across all categories. The third list shows the highest rated tips across all categories sorted by votes.

TOP 10 INSIDE TIPS of 2020
FOR APPLE FINAL CUT PRO

  1. Tip #1135: Boost and Smooth Dialog Levels
  2. Tip #715: How to Reset FCP X to Fix Problems
  3. Tip #342: Uses for Emoji in Final Cut Pro X
  4. Tip #778: Delete Render Files to Save Space
  5. Tip #437: Secrets of the Skimmer
  6. Tip #837: A Simply Useful Shortcut
  7. Tip #601: FCP X: Color Wheel Secret Tip
  8. Tip #816: A Baker’s Dozen Better Shortcuts
  9. Tip #870: Change the Look of a Dissolve
  10. Tip #438: Secrets of the Precision Editor

NOTE: Tips are sorted by views, most views listed first.


TOP 10 INSIDE TIPS of 2020
(Sorted by Views)

  1. Tip #479: Copy and Paste Masks in Premiere
  2. Tip #283: AAF vs. EDL vs. OMF Export
  3. Tip #413: Mask Multiple Clips with an Adjustment Layer
  4. Tip #474: DNxHR vs. ProRes
  5. Tip #329: Blurs and Mosaics are No Longer Safe
  6. Tip #592: Make Zooms More Interesting
  7. Tip #957: Apple Supports VP9 in macOS Big Sur
  8. Tip #1135: Boost and Smooth Dialog Levels
  9. Tip #715: How to Reset FCP X to Fix Problems
  10. Tip #342: Uses for Emoji in Final Cut Pro X

NOTE: Tips are sorted by views, most views listed first.


TOP 10 INSIDE TIPS of 2020
(Sorted by Ratings)

  1. Tip #742: The Best Advice to Keep Your Cool
  2. Tip #614: What is the Alpha Channel
  3. Tip #580: The History of Storyboards
  4. Tip #911: The Skin Tone Line is Your Friend
  5. Tip #515: Using the Active Camera Menu
  6. Tip #631: Get Freelance Work From Video Marketplaces
  7. Tip #1056: Move a Mix from Audition to Premiere
  8. Tip #624: Not All Captions Look Alike
  9. Tip #581: Create Colorful Lighting for 3D Text
  10. Tip #398: Use Watch Folders in AME for Automation

NOTE: Each tip was rated 5 out of 5. They are sorted by the number of votes each tip received, with most votes listed first.


Please rate the helpfulness of this tip.

Click on a star to rate it!

… for Apple Final Cut Pro X

Tip #1259: Change Keyframe Ease In/Out Speed

Larry Jordan – LarryJordan.com

Bezier control dots adjust Ease In/Out speeds and the shape of the motion path.

Drag the Bezier control handle along the motion path to change the Ease In/Out speed.

Topic $TipTopic

I discovered this tip while researching a recent PowerUP webinar. We can change the ease-in / ease-out speed when animating objects in Final Cut using keyframes.

Ease In and Ease Out refer to the acceleration of an object when it is animated using keyframes.

  • Ease In. The speed of an object approaching a keyframe.
  • Ease Out. The speed of an object leaving a keyframe.

By default, all keyframes in Final Cut Pro have both Ease In and Ease Out applied. This means an object accelerates when leaving a keyframe and decelerates when approaching a keyframe.

Here’s how to change the speed of this acceleration after applying a keyframe:

  • Select the clip in the timeline.
  • Rotate the object to move the position of the rotation handle.
  • Grab the small white dot at the end of the thin white line attached to the keyframe. (This line is called a Bezier control handle.)
  • Drag the dot along the motion path line to change the Ease In / Out speed.

NOTE: Dragging the dot around the keyframe puts a curve into the motion path (the dotted red line).

EXTRA CREDIT

Once you’ve adjusted the Ease In/Out speed, you can unrotate the object to the angle you need.

Control-click a keyframe and set it to Linear to have a constant speed between keyframes.


Please rate the helpfulness of this tip.

Click on a star to rate it!

… for Apple Final Cut Pro X

Tip #1260: How to Burn Timecode Into Video

Larry Jordan – LarryJordan.com

This generator can display either project or source clip timecode.

(Drone image courtesy of Terry Holland.)

Topic $TipTopic

Final Cut Pro provides a fast way to add timecode to your review videos using a generator.

Add Generator > Elements > Timecode to the top layer of your project. Final Cut will automatically superimpose it over all lower video layers.

In the Video Inspector, you can change:

  • Whether to display project or source clip timecode
  • The position of the timecode
  • Font, size and color
  • Background color
  • The starting timecode number
  • The label that appears to the left of the timecode (“Fly-Fishing” in the screen shot).

This feature makes it easy for both you and the people reviewing your videos to be sure you are talking about the same point of your project.


Please rate the helpfulness of this tip.

Click on a star to rate it!

… for Apple Final Cut Pro X

Tip #1261: What is Automatic Speed?

Larry Jordan – LarryJordan.com

Automatic Speed plays every frame in a clip, but at the frame rate of the project.

The Automatic Speed option in the Retiming menu at the bottom of the Viewer.

Topic $TipTopic

You may have noticed “Automatic Speed” in the Retime menu. What does this do?

Automatic Speed plays every frame in a clip, but at the frame rate of the project. Typically, it is used to create extremely smooth slow motion.

For example, using a modern iPhone, you can shoot up to 240 fps video, depending upon frame size. However, when you play this clip back in Final Cut, that clip plays at “normal” speed, matching the frame rate of the project.

NOTE: Behind the scenes, Final Cut is dropping frames to make the video playback speed appear “normal.”

When you enable Modify > Retime > Automatic Speed, you are telling Final Cut to play every frame in your high-frame-rate video, but at the frame rate of the project. This has the result of creating a slow motion clip.

NOTE: You can also use the Retime menu at the lower left corner of the Viewer. It looks like a stopwatch.

The biggest benefit to this procedure is that, unlike normal slow-mo, high-frame-rate playback is extremely smooth and every frame is in focus.


Please rate the helpfulness of this tip.

Click on a star to rate it!

… for Apple Final Cut Pro X

Tip #1240: Turn Categories Off or On

Larry Jordan – LarryJordan.com

Categories can easily be hidden – if you click in the right place.

The blue “Categories” button for the Titles browser.

Topic $TipTopic

The longer I use Final Cut, the more hidden features I discover. Here’s another. (I don’t know when this feature first appeared, but it is in the 10.5 version of Final Cut and probably many versions prior to that. )

Effects are grouped into categories, displayed on the left of the appropriate browser. If you click the button for that Browser once, the contents of that Browser are displayed.

However, if you click that now-blue button a second time, the category display is hidden. Click it a third time to show it again.

This “hiding” technique works for the:

  • Library List
  • Photos & Music browser
  • Titles & Generators browser

To hide/display categories for either the Effects or Transitions browsers, click the small sidebar icon in the lower-left corner of each browser.


Please rate the helpfulness of this tip.

Click on a star to rate it!

… for Apple Final Cut Pro X

Tip #1241: Shortcuts for On-screen Viewer Controls

Larry Jordan – LarryJordan.com

The on-screen controls make effect adjustments a lot faster and more intuitive.

On-screen Viewer controls in the Viewer (top) and Video Inspector (bottom).

Topic $TipTopic

The Transform, Crop and Distort inspector settings can all be adjusted on-screen. There are actually two places these can be enabled.

The first is at the bottom left of the Viewer. Click the small downward pointing arrow just to the left of the “Magic Wand” and select the controls you want to activate.

If the correct controls – indicated by the icon – are already selected, you only need to click the icon itself to enable them; as illustrated by the left red arrow in the screen shot.

– OR –

Go to the Video Inspector and click the small icon to the right of the name of the controls you want to activate – “Transform,” “Crop,” or “Distort.”

If the icon is gray, clicking will enable the controls. If the icon is blue, as shown by the right red arrow in the screen shot, clicking will disable the controls.

EXTRA CREDIT

Remember, when you are done using the on-screen controls to either click “Done” in the top right corner of the Viewer or click the now-blue icon in the Video Inspector to disable the controls.


Please rate the helpfulness of this tip.

Click on a star to rate it!

… for Apple Final Cut Pro X

Tip #1242: How to Move a Generated Shape

Larry Jordan – LarryJordan.com

Scaling a generator scales the frame, not the object. Use Transform to move it.

Don’t drag the white circle, use Transform > Position settings instead.

Topic $TipTopic

I use Generators > Shapes frequently in my projects – especially the arrow. However, if I don’t pay attention, when I scale the arrow smaller, then drag it around the screen, it disappears. Here’s why.

When you add Generators > Shapes to a project, use the Generator Inspector to set the shape, colors and shadows, but don’t change the Center setting.

Next, go to the Video Inspector and adjust Scale and Rotation to the size and orientation you need (bottom red arrow in the screen shot).

Finally, to adjust the position of the generator, DON’T use the white circle in the Viewer!! (Blue arrow.) Why? Because when you scaled the generator, you actually scaled the frame that contains it. Dragging the white circle drags the frame, not the image.

Instead, change the position of a generator using Video Inspector > Transform > Position (top red arrow). Or the on-screen Transform controls.

EXTRA CREDIT

This “disappearing generator” drove me nuts until I finally figured it out.


Please rate the helpfulness of this tip.

Click on a star to rate it!