… for Apple Final Cut Pro X

Tip #981: Discover the Hidden Comparison Viewer

Larry Jordan – LarryJordan.com

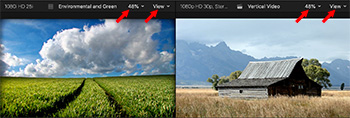
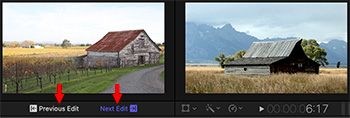
Comparison view displays the In of the previous or next clip.

Comparison View (left) with arrows pointing to Previous / Next edits.

Topic $TipTopic

Hidden in an unusual place inside Final Cut Pro X is Comparison Viewer. This can make effects like color matching a whole lot easier.

Unlike most other interface options, display the Comparison View from Window > Show in Workspace > Comparison Viewer (Shortcut: Cntrl + Cmd + 6) .

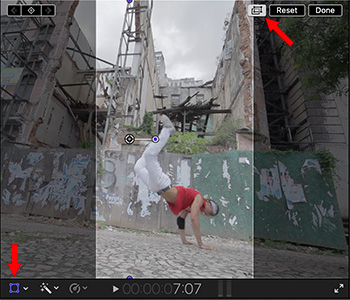
This displays a window to the left of the Viewer that, by default, shows the In of the clip just before the clip the playhead/skimmer is in.

Click Previous Edit / Next Edit (red arrows in the screen shot) to jump between clips in this display.

NOTE: You can’t play clips in the Comparison Viewer, just view the frame at the In.

Click Saved at the top, then Save Frame at the bottom to capture the current frame under the playhead. Now, when you click Timeline, you view previous or next clips, then compare those to the frame saved as part of the Save option.

EXTRA CREDIT

The Comparison Viewer has the same display options as the Viewer. Go to the View menu to see different ways of displaying an image.


Please rate the helpfulness of this tip.

Click on a star to rate it!

… for Apple Final Cut Pro X

Tip #982: The Event Viewer Offers Preview

Larry Jordan – LarryJordan.com

The Event Viewer previews whatever clip is selected in the Browser.

The Event Viewer (left) mirrors the controls in the Viewer’s View menu.

Topic $TipTopic

Another feature that is often overlooked in Final Cut is the Event Viewer. Unlike the Comparison Viewer (Tip #981) which just displays still frames, the Event Viewer provides playback and preview of whatever clips you are skimming or playing in the Browser.

Choose Window > Show in Workspace > Event Viewer (Shortcut: Cntrl + Cmd + 3) to display the Event Viewer.

Once open, any clip you select, skim, or play in the Browser is displayed at a much larger size in the Event Viewer.

The key benefit is enabling you to better select the precise In and Out for a clip by presenting a larger image. (Think of this as the “Preview monitor” in Final Cut Pro 7 or other NLEs.)

If you need it, it’s there. If you don’t, you can hide it so it doesn’t take up any extra space.

EXTRA CREDIT

It has the same controls for both size and view as the Viewer’s View menu (red arrows in the screen shot).


Please rate the helpfulness of this tip.

Click on a star to rate it!

… for Apple Final Cut Pro X

Tip #962: Apple Updates Final Cut Pro X

Larry Jordan – LarryJordan.com

The updates add significant new features to FCP X, Motion and Compressor.

The Apple Final Cut Pro X logo.

Topic $TipTopic

Last week, Apple continued the evolutionary growth of Final Cut Pro X releasing its 33rd free update – to version 10.4.9 – along with updates for Motion and Compressor. While none of these features are revolutionary, all are useful and include:

  • Proxy workflow enhancements
  • Automated tools for social media cropping
  • Editorial workflow improvements
  • Motion now supports 3D models in USDZ format, and include 66 new 3D models in the Motion Library
  • Motion adds a new Stroke filter which quickly outlines objects using its alpha channel
  • Compressor now supports custom LUTs

These free updates are accessed through the Mac App Store.

EXTRA CREDIT

The Pro Video codecs were also updated. To upgrade these, go to System Preferences > Software Update. All updates are free.

Here’s a link to learn more.


Please rate the helpfulness of this tip.

Click on a star to rate it!

… for Apple Final Cut Pro X

Tip #966: Fast Fades & Other Secrets

Larry Jordan – LarryJordan.com

Automatic audio crossfades are only one of many new features in the latest update.

Two adjacent clips with an automatic crossfade applied.

Topic $TipTopic

With the latest update to Final Cut Pro X, we can now quickly apply audio crossfades between two or more selected audio clips. Here’s the process:

  • Select two or more clips that you want to crossfade (the audio equivalent of a dissolve) between. These MUST be touching – any gaps and this won’t work.
  • Choose Modify > Audio Fades > Crossfade – or – Type Option + T.

NOTE: This shortcut mimics the video dissolve shortcut of Cmd + T.

Then, if you want to see what FCP did, select the clips with fades and choose Clip > Expand Audio Components. This allows you to see the overlap between clips. In this example, I highlighted the fade dots of each clip. In normal use, you’d only see one.

Final Cut automatically moves the fade dots and trims the ends of each selected edit point to create a crossfade. You can change any of these manually.

By default, each crossfade is 0.10 seconds. You can adjust this default duration for audio cross-fades, go to Final Cut Pro > Preferences > Editing and enter a new value into Crossfade. (I prefer fades between 1/2 and 1 second.)

EXTRA CREDIT

Here’s a tutorial from my website filled with little-known techniques from the latest FCP X update.


Please rate the helpfulness of this tip.

Click on a star to rate it!

… for Apple Final Cut Pro X

Tip #967: Final Cut Adds “Smart Conform”

Larry Jordan – LarryJordan.com

Smart Conform is fast and generally makes good decisions, but adjustments require keyframing.

A Smart Conform of a dancer. Drag image to adjust. Click arrows to reveal background.

Topic $TipTopic

One of the new features in the 10.4.9 update to Final Cut is Smart Conform. This takes an existing clip or clips and “crops” them to fit into a different aspect ratio. Typical examples are taking media shot 16:9, then converting it for a trailer on Instagram at 1:1 or an iPhone at 9:16.

A key point about Smart Conform is that it works at the clip level. Here’s how:

  • Create a project with the frame size you need; for example, Vertical.
  • Copy clips from an existing project into the new project – or – edit new clips into the project.
  • Select the clips you want to reframe and choose Modify > Smart Conform.

NOTE: In order to enable Smart Conform, the frame sizes of project and clips should not match.

Final Cut intelligently looks at each clip, applies the appropriate Spatial Conform to each clip, then crops the edges to display what it feels is the key content. (Brighter image in the screen shot.)

To see an overlay of the original clip, click the Transform on-screen controls (left arrow), then click the new “dual boxes” icon at the top right of the Viewer (right arrow) and then drag the center box to change the framing.

THOUGHTS

Based on some very quick tests, Smart Conform works quickly and tends to select appropriate framing. However, for objects moving within the edges of the frame, Smart Conform does not track objects during playback. Instead, you need to set keyframes in Transform > Position to compensate. Also, Smart Conform does not work with titles, generators or compound clips.

EXTRA CREDIT

Here’s a tutorial from my website that describes this in more detail.


Please rate the helpfulness of this tip.

Click on a star to rate it!

… for Apple Final Cut Pro X

Tip #944: Change Library Storage Locations

Larry Jordan – LarryJordan.com

This option organizes your media, while still keeping it external.

The Storage Locations panel, which is part of Library Properties.

Topic $TipTopic

By default, Final Cut Pro X either stores media in the library file, or points to its current storage location somewhere else on your system. But… there’s a third option that may make more sense for your project.

  • Select a Library in the Library List.
  • In the Inspector, click Modify Settings for Storage Locations.
  • Use the Media pop-up menu (see screen shot), to create a new, external, folder to store all files imported into this project.

Files from other locations will be copied into this location.

The benefits to using a custom library folder are:

  • Media is still stored outside the library; making it accessible to other projects and applications
  • Media is stored in one place, which makes moving libraries, backups, and archives a LOT easier.
  • Each Library can have its own custom folder, which simplifies organizing media by project.
  • It is still easy to share the same media between projects.

EXTRA CREDIT

The only downside to this option is that media is copied into this folder, which may increase total storage requirements.


Please rate the helpfulness of this tip.

Click on a star to rate it!

… for Apple Final Cut Pro X

Tip #945: Consolidate Your Media

Larry Jordan – LarryJordan.com

Consolidation can be done at any time – no need to wait to get organized.

The Consolidate button and resulting panel (below).

Topic $TipTopic

You’ve been editing like a mad fiend and the project is done. Now, you need to gather everything together for final backup and archiving. But, with media and files scattered across your system, just how are you going to do this? Easy, watch.

You may not know where all your files are, but Final Cut does. So, as I illustrated in Tip #944, we will create a custom media storage location, then consolidate all our media files into it.

  • First, open the Library you want to consolidate and select it’s name in the Library List.
  • Go to Inspector > Library Properties and click Modify Settings for Storage Locations.
  • Create a new location for the Media menu option.
  • Next, click Consolidate in the Media section.

The Consolidate command follows these rules:

  • When you consolidate files from a library into an external folder, the files are moved.
  • When you consolidate files into a library from an external folder, or from an external folder to another external folder, the files are copied.
  • These rules prevent broken links from other libraries.

NOTE: If the media is already external, and no other libraries are using it, you can manually delete the original media after consolidating to save storage space.

EXTRA CREDIT

  • If you are in mid-project, DO include Optimized and Proxy media.
  • If you are archiving a project, DO NOT include Optimized or Proxy media.

If FCP X needs either of these files and they are missing, it will automatically rebuild them.


Please rate the helpfulness of this tip.

Click on a star to rate it!

… for Apple Final Cut Pro X

Tip #946: Organize Custom Motion Projects

Larry Jordan – LarryJordan.com

One choice simplifies access. The other simplifies backups and archiving.

Storage Locations panel displaying Motion content storage options.

Topic $TipTopic

By default, when you create or customize any Final Cut Pro effects, transitions, titles, or generators in Motion, that content is stored in the Motion Templates folder located in your Movies folder. You can also store Motion content inside a library—for example, to move a project or library to another Mac, or to back up and archive your work. You may also want to store Motion content in the library if you’re working on a project with others and using shared storage.

If you have custom Motion content and you’re copying or moving clips, projects, or events to another library, storage device, or Mac, set the storage location for your Motion content to the library before doing so. Otherwise, the Motion content is not moved or copied with the other items, and you must manually back up and move the Motion Templates folder. Regardless, you must manually track and move any third-party (FxPlug) content, because it is not managed within the Final Cut Pro library.

EXTRA CREDIT

Storing Motion projects in the Motion Template folder means they are accessible to all Final Cut libraries.

Storing Motion projects in the library simplifies backups and archiving, but means those custom projects are not available for other libraries.

Motion projects that ship with Final Cut – that is, those you did not create yourself – are available to all libraries and can’t be moved into the library file itself.


Please rate the helpfulness of this tip.

Click on a star to rate it!

… for Apple Final Cut Pro X

Tip #925: Create a “Master Clip” for Efficiency

Larry Jordan – LarryJordan.com

Opening a Browser clip in the timeline emulates a Master Clip.

This file was opened in the timeline(left) and then effects were applied (right). (Image courtesy of Anne Gibson.)

Topic $TipTopic

Final Cut Pro X doesn’t actually support Master clips. But, here’s a little-known technique you can use to “create” one – along with significant efficiencies when you use these.

A Master clip is one where, when you change it, all the clips edited from it into the timeline change as well. FCP X does not support those type of clips. However, you CAN change a Browser clip BEFORE you edit portions of it into the timeline and have all those changes – like color correction, scaling or audio channels – travel with the edited portion into the Timeline. This means you can change a clip once, then have all those changes transfer during the edit. But, with the 10.4 update, Apple made creating these clips a whole lot less obvious.

NOTE: Final Cut Pro X used to call this “Open in Timeline.” That language has gone away.

Normally, when you edit clips into the Timeline, you can change that timeline clip’s settings or add effects, without affecting any other iteration of that clip in the timeline.

However, if, instead, you select a Browser clip, then choose Clip > Open, that Browser clip is opened in the Timeline, but NOT edited into it.

This means you can apply settings, effects, color correction or reorganize audio channels specifically to the Browser clip. Then, when you edit a portion of that clip into the timeline, all those modifications travel with it.

To remove the clip from the timeline, open a different project into the timeline, which takes it’s place.

EXTRA CREDIT

If you edit clips from the Browser into the timeline, then, open the clip into the timeline and make changes, any existing edited clips are not affected.


Please rate the helpfulness of this tip.

Click on a star to rate it!

… for Apple Final Cut Pro X

Tip #926: The Benefits of Compound Clips

Larry Jordan – LarryJordan.com

Compound clips are one way to nest one timeline into another.

A compound clip is indicated by this icon. (Image courtesy of Anne Gibson.)

Topic $TipTopic

Most of the time, when you make changes to a clip in the timeline, it does not change the source clip in the Browser or any other iterations of the source clip in the timeline. With one exception…

That exception is a compound clip.

Apple’s Help files state: “Compound clips can contain video and audio clip components, clips, and other compound clips. Effectively, each compound clip can be considered a mini project, with its own distinct project properties. Compound clips function just like other clips: you can add them to your project, trim them, retime them, and add effects and transitions. Icons appear on compound clips in the browser and the timeline.

Compound clips have many uses. You can:

  • Simplify a complicated project by creating a separate compound clip for each major section.
  • Sync a video clip with one or more audio clips and then combine the clips into a compound clip, to avoid inadvertently moving them out of sync.
  • Open any clip, edit its contents in the timeline, and then close it.
  • Quickly create a compound clip containing the clips in an event, based on the browser sort order.
  • Use a compound clip to create a section of a project with settings different from those of the main project.

Compound clips have the following characteristics:

  • You create compound clips in the browser or in the timeline.
  • Every compound clip in the timeline has a “parent” compound clip in the browser.
  • When you edit the contents of any compound clip, you are in fact editing the parent compound clip from the browser. Any changes you make to the compound clip are inherited by all of its child clips. For example, if you delete a title clip from the contents of a parent compound clip, the title clip is deleted from all child clips.

To create a compound clip, select one or more clips in the Browser or Timeline, then choose File > New > Compound Clip or type Option + G.


Please rate the helpfulness of this tip.

Click on a star to rate it!