Remove Effects is faster, Remove Attributes provides more control.
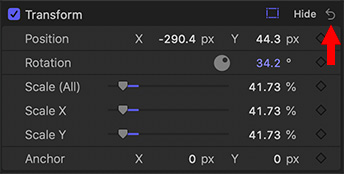
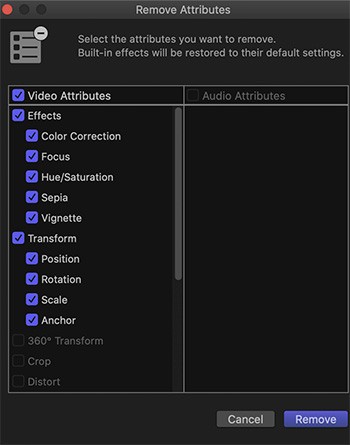
The Remove Attributes window. Blue checkboxes indicate applied effects or changed effect settings.
In the Edit menu for Final Cut Pro X are two options, both of which relate to removing effects. The key question is: what’s the difference?
Remove Attributes
Remove Effects
Here’s the difference:
When you select Edit > Remove Effects, all effects settings applied to all selected clips are instantly removed. This is the fastest way to reset one or more clips to its default (native) settings.
When you select Edit > Remove Attributes (screen shot), you are presented with a screen where you can select which effects you want to keep or remove from all the selected clips.
Remove Effects is the fastest way to totally reset a clip. Remove Attributes gives you more control over what is actually reset.
NOTE: It is important to note that both of these menu options can apply to one or more clips. Simply the select the clips you want to reset before choosing one of these two menues.
Render files save time – but take space. Delete them whenever you need more space.
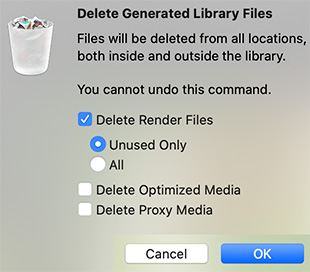
The “Delete Generated Media” dialog.
Final Cut Pro X creates render files whenever you apply an effect to a clip, or change a setting in the Inspector. This is not bad, in fact, its a good thing – because it allows FCP X to play even the most complex effects at full speed and resolution. However, these render files take space. They are as big as a “normal” video file – in fact, they use the same codec, frame size and frame rate as your project.
While you need them for any clips in your project, FCP X does not erase them when you remove a clip. Why? Because it assumes you may want to use that same clip and effect somewhere else in your project. So it saves the render files to save you time later.
This means that render files accumulate, taking up a lot of extra storage space. Fortunately, it is easy to get rid of them, here’s how.
Select the Library, if you want to make a global change.
Select an Event, if you want to delete render files only for the elements in an event.
Select a Project, if you only want to delete render files for a specific project.
Choose File > Delete Generated Media.
Choose Delete Render Files > Unused Only.
All unused render files will be deleted.
EXTRA CREDIT
You can delete “All” render files, but as soon as you reopen a project, any needed render files for that project will be re-created; this means you don’t really save much space by deleting all renders. A better choice for active projects is “Unused only.”
When a project is done, though, feel free to delete all render files to save space. In the event you delete render files that Final Cut needs, no problem. FCP X will simply re-create them. No problem.
Please rate the helpfulness of this tip.
Click on a star to rate it!
https://www.theinsidetips.com/wp-content/uploads/2019/09/Tips-Logo-700x150.jpg00Larry Jordanhttps://www.theinsidetips.com/wp-content/uploads/2019/09/Tips-Logo-700x150.jpgLarry Jordan2020-06-22 01:30:002020-06-22 01:30:00Tip #778: Delete Render Files to Save Space
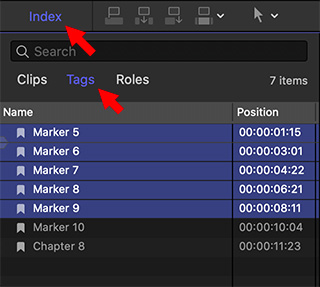
The Timeline Index makes it easy to delete multiple markers.
The Timeline Index, with five markers highlighted.
I use markers in all my projects, for chapters for navigation or to help me remember something. However, all those markers need to be cleaned up before I export the final project.
While we can’t copy or paste multiple markers in Final Cut Pro X, we can select multiple markers and delete them. Here’s how.
Open the project containing the markers you want to delete into the timeline.
Open the Timeline Index (Shortcut: Shift + Cmd + 2).
Click the Tags text button.
Select the markers you want to delete.
Press the big Delete key.
Gone.
EXTRA CREDIT
It may help to click either the Marker or Chapter Marker buttons at the bottom of the Timeline Index to make it easier to isolate markers from other timeline elements.
Please rate the helpfulness of this tip.
Click on a star to rate it!
https://www.theinsidetips.com/wp-content/uploads/2019/09/Tips-Logo-700x150.jpg00Larry Jordanhttps://www.theinsidetips.com/wp-content/uploads/2019/09/Tips-Logo-700x150.jpgLarry Jordan2020-06-22 01:30:002020-06-19 15:45:32Tip #786: Get Rid of Multiple Markers – Fast!
There’s no easy way to copy and paste multiple markers.
Chapter markers add to a timeline clip.
Here’s a tip that I discovered this week: if you add chapter markers to a clip, then wrap that clip in a compound clip, the markers won’t export.
Each week, I add chapter markers to my latest webinar to simplify navigation for people who download the QuickTime version.
Normally, as part of the editing process, I send my FCP X project to Adobe Audition for audio mixing; a process that retains all markers. This week, though, for technical reasons, I needed to mix the webinar in FCP X.
The fastest way to do that is to enclose all my timeline clips – and their 42 markers – in a compound clip, then apply the audio filters I needed.
However, when it came time to export, the chapter markers, which were attached to clips, did not export with the compound clip.
Instead, I needed to move the markers to the compound clip itself. However, there is no way in FCP X to select a group of markers to copy and paste them to another clip or project. You can copy individual markers, but not groups.
To get my markers to export I copied each marker individually from each clip to the compound clip. This wasn’t difficult, just really time-consuming.
I’ll add this to my list of “FCP X Features I’d Like To See” … along with a scrolling timeline.
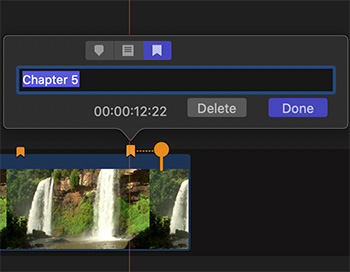
You can create a new thumbnail by dragging the orange circle to a new frame.
The round circle is the chapter marker thumbnail pin.
Ever wonder about that little orange “thingy,” hanging off the end of a chapter marker in the Final Cut Pro X timeline? Worry no more, here’s the answer.
The orange circle determines the frame FCP uses to create thumbnails for chapter markers. By default, it is set to 11 frames after the marker to allow time for a dissolve to complete. (Apple calls this the “Chapter marker thumbnail pin.”)
Apple’s help files state that you “can add chapter markers to your project so that when you share your finished movie, viewers can use the markers to quickly jump to those points in the movie. Apps and devices that recognize Final Cut Pro chapter markers during playback include iPod, iPhone, iPad, Apple TV, QuickTime Player, DVD Player, and most standard DVD and Blu-ray players.”
As an example, I add chapter markers to all my QuickTime training movies.
To set a new thumbnail, click the chapter marker once in the timeline to select it. The marker enlarges slightly to show that it’s selected, and a chapter marker thumbnail pin appears to the right of the selected chapter marker. Drag the pin to the frame you want it to display.
EXTRA CREDIT
I’ve discovered you can also add chapter markers to MP4 movies, depending upon whether the compression software you are using supports it.
Please rate the helpfulness of this tip.
Click on a star to rate it!
https://www.theinsidetips.com/wp-content/uploads/2019/09/Tips-Logo-700x150.jpg00Larry Jordanhttps://www.theinsidetips.com/wp-content/uploads/2019/09/Tips-Logo-700x150.jpgLarry Jordan2020-06-15 01:30:002020-06-13 09:51:41Tip #764: The Orange Thingy
This control only affects the timeline display, it doesn’t change any clips.
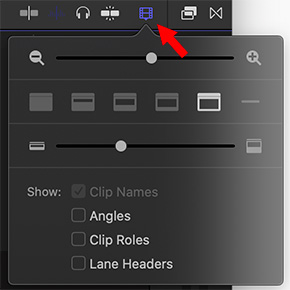
The Clip Appearance button in the top-right corner of the Timeline.
Final Cut offers several ways to customize the look of the timeline. Over in the top right corner of the timeline is an icon that looks like a film strip. This is the Clip Appearance button. This provides a variety of controls over how the timeline looks in Final Cut Pro X.
The top slider zooms into or out of the timeline. (For me, it is faster to use keyboard shortcuts: Cmd + [plus], Cmd + [minus], and Cmd + Z.)
The six icons on the second row determine the ratio of waveform to image. Far left is waveform audio only, second from the right is image only. The far right icon reduces the height of all tracks to thinner lines so you can see the overall organization of your project.
The slider on the third row determines the height of all clips.
The four checkboxes at the bottom enable the display of:
Clip names.
Multicam camera angle names.
Clip Role names.
Lane Headers. These only apply when you are displaying Roles.
Please rate the helpfulness of this tip.
Click on a star to rate it!
https://www.theinsidetips.com/wp-content/uploads/2019/09/Tips-Logo-700x150.jpg00Larry Jordanhttps://www.theinsidetips.com/wp-content/uploads/2019/09/Tips-Logo-700x150.jpgLarry Jordan2020-06-15 01:30:002020-06-15 01:30:00Tip #765: Customize Your Timeline
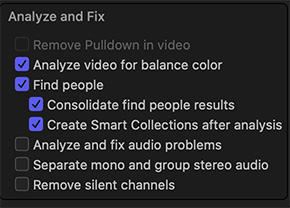
Analysis will take time, but it also runs in the background.
Video analysis options in the Media Import window of Final Cut Pro X
The following text is from the Apple Final Cut Pro X Help files. The analysis options are located in the Media Import window, or the Modify menu for clips already imported into the browser.
NOTE: Analysis runs in the background and how long it takes is dependent upon the length of your media and the speed of your CPU.
Final Cut Pro provides video and still-image analysis options that can automatically balance color in video and detect people and shot angles in video or still images. You can analyze video during import, or analyze video clips in the browser after import. Based on the results of the analysis, analysis keywords are added to clips or clip ranges.
Final Cut Pro provides these video and still-image analysis options:
Analyze for balance color: Analyzes video clips to detect color balance and contrast. Color is automatically balanced when you add the clip to the timeline. You can turn automatic color adjustments on and off at any time.
Remove pulldown: Analyzes video clips and removes pulldown patterns.
(This option is available only when importing from a tape-based camera or device; i.e. interlaced media.)
Find people: Analyzes video clips and still images for the number of people present and shot types. After analysis, any of the following keywords are added to the clips or clip ranges: One Person, Two Persons, Group, Close Up Shot, Medium Shot, and Wide Shot.
NOTE: To easily locate clips with “find people” analysis keywords, select the “Create Smart Collections after analysis” checkbox.
Consolidate find people results: Consolidates all of the “find people” analysis keywords into one shot type keyword and one people keyword for every 2-minute segment of video. The shot type keyword chosen is the one for the widest shot type, and the people keyword chosen is the one representing the most people. For example, if a video segment contains Medium Shot, Wide Shot, One Person, and Group keywords, the segment’s analysis keywords are reduced to Wide Shot and Group during consolidation.
Create Smart Collections after analysis: Creates a Smart Collection for each keyword applied when video clips and still images are analyzed for the presence of people. The Smart Collections are listed alphabetically in a People folder inside the event in the Libraries sidebar.
When you drag a media file from the Finder to a Final Cut Pro event or the timeline, the import begins automatically, without displaying a window of import options. You can set automatic import options in the Import pane of Final Cut Pro preferences.
Please rate the helpfulness of this tip.
Click on a star to rate it!
https://www.theinsidetips.com/wp-content/uploads/2019/09/Tips-Logo-700x150.jpg00Larry Jordanhttps://www.theinsidetips.com/wp-content/uploads/2019/09/Tips-Logo-700x150.jpgLarry Jordan2020-06-08 01:30:002020-06-08 01:30:00Tip #747: Video Analysis Options
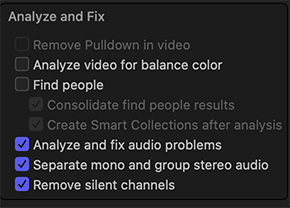
Audio analysis runs in the background and, generally, is very fast.
Audio analysis options in the Media Import window of Final Cut Pro X
The following text is from the Apple Final Cut Pro X Help files. The analysis options are located in the Media Import window, or the Modify menu for clips already imported into the browser.
NOTE: Analysis runs in the background and how long it takes is dependent upon the length of your media and the speed of your CPU.
Final Cut Pro provides automatic analysis options that can fix common audio problems, analyze and group audio channels, and remove silent channels. You can analyze audio during import, or analyze video clips with audio issues in the browser or in the timeline.
Final Cut Pro provides these audio analysis options:
Analyze and fix audio problems: Analyzes the audio for hum, noise, and loudness. Final Cut Pro automatically fixes problems that are considered severe (marked in red) and flags problems that are considered moderate (marked in yellow).
Separate mono and group stereo audio: Audio channels are analyzed and grouped as dual mono or stereo, depending on the results of the analysis. Automatically corrected audio channels are marked as Autoselected.
Remove silent channels: Audio channels are analyzed, and silent channels are removed. Clips that have had channels removed are marked as Autoselected.
When you drag a media file from the Finder to a Final Cut Pro event or the timeline, the import begins automatically, without displaying a window of import options. You can set automatic import options in the Import pane of Final Cut Pro preferences.
We may request cookies to be set on your device. We use cookies to let us know when you visit our websites, how you interact with us, to enrich your user experience, and to customize your relationship with our website.
Click on the different category headings to find out more. You can also change some of your preferences. Note that blocking some types of cookies may impact your experience on our websites and the services we are able to offer.
Essential Website Cookies
These cookies are strictly necessary to provide you with services available through our website and to use some of its features.
Because these cookies are strictly necessary to deliver the website, refuseing them will have impact how our site functions. You always can block or delete cookies by changing your browser settings and force blocking all cookies on this website. But this will always prompt you to accept/refuse cookies when revisiting our site.
We fully respect if you want to refuse cookies but to avoid asking you again and again kindly allow us to store a cookie for that. You are free to opt out any time or opt in for other cookies to get a better experience. If you refuse cookies we will remove all set cookies in our domain.
We provide you with a list of stored cookies on your computer in our domain so you can check what we stored. Due to security reasons we are not able to show or modify cookies from other domains. You can check these in your browser security settings.
Google Analytics Cookies
These cookies collect information that is used either in aggregate form to help us understand how our website is being used or how effective our marketing campaigns are, or to help us customize our website and application for you in order to enhance your experience.
If you do not want that we track your visit to our site you can disable tracking in your browser here:
Other external services
We also use different external services like Google Webfonts, Google Maps, and external Video providers. Since these providers may collect personal data like your IP address we allow you to block them here. Please be aware that this might heavily reduce the functionality and appearance of our site. Changes will take effect once you reload the page.
Google Webfont Settings:
Google Map Settings:
Google reCaptcha Settings:
Vimeo and Youtube video embeds:
Other cookies
The following cookies are also needed - You can choose if you want to allow them:
Privacy Policy
You can read about our cookies and privacy settings in detail on our Privacy Policy Page.