… for Apple Final Cut Pro X

Tip #749: Introduction to Clip Analysis

Larry Jordan – LarryJordan.com

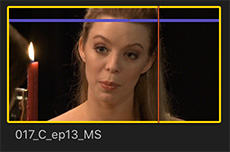
Finding people isn’t always reliable, but worth trying.

Areas with clip analysis keywords are indicated by a purple line in the browser.

Topic $TipTopic

The following text is from the Apple Final Cut Pro X Help files. The analysis options are located in the Media Import window, or the Modify menu for clips already imported into the browser.

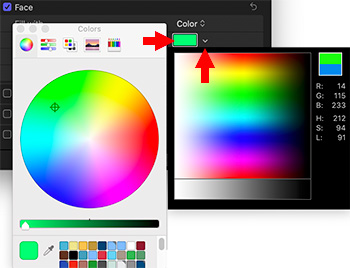
You can have Final Cut Pro analyze your media (video, audio, and still images) and automatically correct common problems. For example, you can balance color and remove excess hum or loudness.

You can also analyze clips to identify their contents. Analysis can detect the number of people in a shot and identify whether the shot is a close-up, medium, or wide shot. This is helpful if you need to quickly find a certain type of clip while viewing footage or editing a project.

You can analyze media during import or after you import the media into Final Cut Pro. You can also set Final Cut Pro to automatically analyze clips you drag directly to the Final Cut Pro timeline from the Finder.

After certain types of analysis, keywords are automatically added to clips or clip ranges based on the results of the analysis. For example, a clip showing several people might have the Group and Medium Shot keywords assigned. In the browser, clips with analysis keywords have a purple line at the top. (Clips with keywords you add manually or keywords imported from Finder tags or folder names have a blue line at the top.)

EXTRA CREDIT


Please rate the helpfulness of this tip.

Click on a star to rate it!

… for Apple Final Cut Pro X

Tip #715: How to Reset FCP X to Fix Problems

Larry Jordan – LarryJordan.com

Deleting FCP X Preferences does a lot to fix problems.

The Delete Preferences window in Apple Final Cut Pro X.

Topic $TipTopic

Most of the time, Final Cut Pro X is a solid, reliable program. Until it isn’t. Fortunately, there’s one keyboard shortcut that fixes most problems by resetting Final Cut perferences to their factory default settings. Here’s how:

  • Quit the application.
  • Then, press and hold Shift + Cmd while restarting the application from the Dock.

When this window (screen shot) appears, click the blue Delete Preferences button.

WHAT THIS DOES

  • All preferences reset back to default settings.
  • The list of recently opened libraries is emptied. (HOWEVER, your libraries are NOT erased. You’ll find them stored at the location you specified when you first created them.

Final Cut preferences do a lot, much more than simply determine what the interface looks like. They are deeply embedded into the operation of the program, even if we can’t directly modify most of them.

SUMMARY

In the old days, with FCP 7, we needed to do this every couple of weeks. Now, you may only need to do this a few times a year. Still, when FCP X is acting up, restart your computer. If that doesn’t fix it, this keyboard shortcut probably will.


Please rate the helpfulness of this tip.

Click on a star to rate it!

… for Apple Final Cut Pro X

Tip #734: What is Tone-Mapping

Larry Jordan – LarryJordan.com

Tone-mapping preserves highlights when displaying HDR media on SDR displays.

HDR media not tone-mapped (bottom) and tone-mapped (top). Tone-mapping preserves highlights.

Topic $TipTopic

HDR (High Dynamic Range) media has grayscale values that far exceed what our computer monitors can display. (The Apple Pro XDR is a video monitor, not a computer monitor.)

As well, if we try using HDR media in a Rec. 709 HD project, the white levels are way past out of control.

NOTE: To convert HDR video to SDR video as part of a project, use the HDR Tools effect.

Tone-mapping solves this problem. This process automatically converts the vast grayscale range of HDR into the much more limited range of SDR (Standard Dynamic Range).

Final Cut Pro X does this using either a preference setting (Preferences > Playback) or a setting in the View menu at the top right corner of the Viewer.

This screen shot illustrates the difference. When tone-mapping is turned off (bottom of image) the highlights are blown out, with the detail lost; even though the image will look fine on an HDR monitor.

The top of the image is tone mapped to convert the highlights to fit within SDR specs. This means the image will look good on your computer monitor AND on an HDR monitor.


Please rate the helpfulness of this tip.

Click on a star to rate it!

… for Apple Final Cut Pro X

Tip #735: Select Your Fastest GPU

Larry Jordan – LarryJordan.com

Use Preferences to select your fastest GPU.

The Preferences > Playback GPU option.

Topic $TipTopic

Starting with the FCP X 10.4.7 release, Final Cut now supports multiple GPUs and up to 28 CPU cores.

As part of the 10.4.7 release, FCP X received a new Metal engine for faster performance, along with internal/external GPU selection. Using preferences, you can now pick which GPU it uses for render and export.

To select a specific GPU, go to Preferences > Playback > Render/Share GPU.

NOTE: If you are running a MacBook Pro with an eGPU, be sure to select the eGPU in this menu to maximize the performance your system gets from that external device.


Please rate the helpfulness of this tip.

Click on a star to rate it!

… for Apple Final Cut Pro X

Tip #712: How to Export Multiple Projects at Once

Larry Jordan – LarryJordan.com

Final Cut now supports exporting multiple projects at the same time.

Select all the projects to export, then choose File > Share.

Topic $TipTopic

One of the new features in the 10.4 update to Final Cut Pro X is the ability to export multiple projects at the same time. This is a feature I use regularly as I create excerpts from my weekly webinars. The process is simple:

  • In the Browser, select all the projects you want to export.
  • Choose File > Share X Projects (“X” will be replaced by the number of projects you are exporting.
  • At which point, the export process remains the same.

NOTE: All projects must export using the same settings. If you need to vary settings by project, you’ll need to export each project individually.

EXTRA CREDIT

Use the Background Task window (Window > Background Tasks) to monitor the export process.


Please rate the helpfulness of this tip.

Click on a star to rate it!

… for Apple Final Cut Pro X

Tip #713: Color Picker Secrets

Larry Jordan – LarryJordan.com

The color picker you get depends upon where you click.

The two color pickers. Which one you get depends upon where you click.

Topic $TipTopic

There are two different color pickers in Apple Motion and Final Cut. Which one you get depends upon where you click.

THE macOS COLOR PICKER

Click the color chip to view the traditional color picker. Tips:

  • Press the Shift key to lock the color, but adjust saturation.
  • The color wells at the bottom hold an unlimited number of colors
  • To see more wells, drag the horizontal line just above them up or down.
  • To also see more wells, increase the size of the color picker.
  • Click one of the icons at the top to see more ways to choose colors

THE MOTION COLOR PICKER

Click the downward-pointing arrow to the right of the color chip to reveal the color picker first introduced in Motion. Tips:

  • This picker is designed for realtime color picking, simply drag your mouse over the color area, then click the color you like.
  • This option does not support color wells or the different ways to select colors available in the traditional color picker.

Please rate the helpfulness of this tip.

Click on a star to rate it!

… for Apple Final Cut Pro X

Tip #724: Background Tasks Window

Larry Jordan – LarryJordan.com

This window monitors everything FCP X is doing in the background.

The Background Tasks window, showing a Share operation in process.

Topic $TipTopic

The Background Tasks window is a great way to monitor what Final Cut Pro X is doing behind the scenes. Here’s how to access it.

Final Cut Pro X is designed to do a lot of its work in the background, so you can keep editing in the foreground without slowing down.

To see what’s happening behind the scenes, open the Background Tasks window by choosing Window > Background Tasks (Shortcut: Cmd + 9).

In this screen shot, I’m exporting two projects at the same time. To maximize system resources, Final Cut exports these sequentially; though from my perspective, I only executed one menu command.

If you need to cancel an operation, click the “Circle X.”

I most often use this to check on projects that can take a while:

  • Transcoding
  • Rendering
  • Sharing

Because this is a floating window, you can open it and move it wherever is convenient.


Please rate the helpfulness of this tip.

Click on a star to rate it!

… for Apple Final Cut Pro X

Tip #695: Display the Event Viewer

Larry Jordan – LarryJordan.com

The Event Viewer gives FCP X the ability preview browser images.

The Event Viewer (left) provides previews of browser images.

Topic $TipTopic

Hidden inside Final Cut Pro X is the Event Viewer, which allows us to compare images in the browser with images in the timeline.

To enable it, go to Window > Show in Workspace > Event Viewer.

Whatever clip you select in the browser, will be previewed in the Event Viewer.

  • To play a clip, click the image, then press spacebar
  • Set Ins or Outs in the browser.
  • All keyboard shortcuts that work in the browser also work in the Event Viewer
  • To change the size of both monitors, drag the vertical edge between them
  • If two-monitor viewing is enabled, the Event Viewer will appear on the same monitor as the viewer.

EXTRA CREDIT

Go to View > Show in Event Viewer to see the different display options the Event Viewer provides.


Please rate the helpfulness of this tip.

Click on a star to rate it!

… for Apple Final Cut Pro X

Tip #696: What Does the Alpha Channel Show?

Larry Jordan – LarryJordan.com

Alpha channels define the amount of translucency for each pixel.

When viewing alpha channels, black is transparent, gray is translucent and white is opaque.

Topic $TipTopic

Just as the red, green and blue channels define the amount of each color a pixel contains, the alpha channel defines the amount of transparency each pixel contains.

A pixel can be fully transparent, fully opaque or somewhere in between. By default, every video pixel is fully opaque.

NOTE: The reason we are able to key titles over backgrounds is that titles contain a built-in alpha channel that defines each character as opaque and the rest of the frame as transparent.

Using either the View menu at the top right corner of the Viewer or View > Show in Viewer > Color Channels > Alpha to display the alpha channel for whichever clip contains the playhead (or skimmer).

While we can easily work with alpha channels inside Final Cut, in order to export video that retains transparency information, we need to use the ProRes 4444 or Animation codecs. No other ProRes, HEVC or H.264 codec supports alpha channels.

EXTRA CREDIT

The Event Viewer also supports displaying alpha channels.


Please rate the helpfulness of this tip.

Click on a star to rate it!

… for Apple Final Cut Pro X

Tip #698: Playback Shortcuts

Larry Jordan – LarryJordan.com

7 shortcuts that simplify preview and playback.

The View > Playback menu.

Topic $TipTopic

Hiding in plain sight are seven shortcuts that can making previewing and playing your projects a lot easier.

These shortcuts are located in the View > Playback menu – and, I’ll bet, you looked at these once then immediately forgot about them.

Shortcut What It Does
space Plays from the position of the playhead
/ Plays selection
Shift + ? Backs up the Preroll duration and plays until reaching the postroll duration.
Shift + Option + I Plays from the beginning of the browser clip or timeline
Shift + Option + O Plays from curent playhead position to the end
Shift + Cmd + F Plays the timeline full-screen
Cmd + L Loops timeline playback

NOTE: Preroll and Post-roll durations are set in Preferences > Playback.


Please rate the helpfulness of this tip.

Click on a star to rate it!