… for Apple Final Cut Pro X

Tip #664: What is a Smart Collection?

Larry Jordan – LarryJordan.com

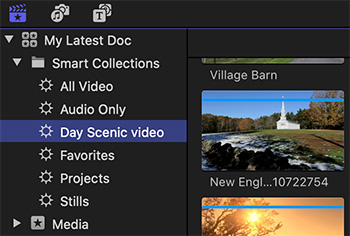
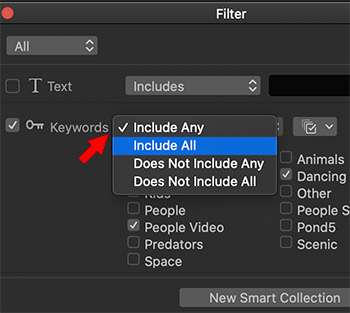
A “Smart Collection” is a saved search.

The default Smart Collection list associated with every FCP X library.

Topic $TipTopic

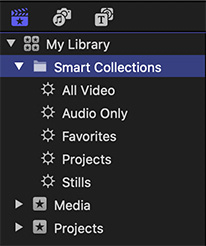
You see them listed at the top of every library: Smart Collections. But, what are they and how can they help us?

At its core, a Smart Collection is a saved search. If you double-click the name of any Smart Collection, it opens the Search Filter window, showing the criteria for that search and allowing you to change it.

You can easily create your own Smart Collections, but the interface is hard to find:

  • Click the magnifying glass at the top of the Browser.
  • Click the “slate” icon to the right of the search box.
  • This opens the Search Filter window.
  • Make whatever changes you want.
  • If you simply close the window, the current search is updated with your changes.
  • If you click the Save Smart Collection button at the bottom right, a new Smart Collection is created.

EXTRA CREDIT

Tip #84
explains how to create a Smart Collection.


Please rate the helpfulness of this tip.

Click on a star to rate it!

… for Apple Final Cut Pro X

Tip #682: My Rocking Horse Move

Don Smith – www.donsmith.me

Connection Override allows moving Primary Storyline clips without modifying connected clips.

The Connection Override icon.

Topic $TipTopic

Connection Override allows you to move a Primary Storyline clip without moving any connected clips attached to it. Pressing the tilde key (~) while dragging a Primary Storyline clip enables Connection Override.

NOTE: The tilde key is located just below the ESC key, to the left of the number 1.

Pressing Command then tilde turns on Connection Override until you press tilde to turn it off.

With that as background, Don Smith writes:

I wanted to find a way to ‘lock on’ the Connection Override to have both hands free to make adjustments. By default, you have to press and hold the tilde key.

So, I started experimenting. At first, I found that if you press and hold the tilde key, press and hold the Command key, release the tilde key first, then release the Command key last, the Connection Override would stay enabled hands-free.

Then, the OS was updated and my method broke. But, with a modification, it still works.

Use the Option key in place of the Command key. So, for newer Mac OSs, do what I call my ‘Rocking Horse’ move (because your fingers are rocking back and forth on the keys) and hold the tilde key, press and hold the Option key, release the tilde key, then release the Option key.

In both versions, you only have to tap the tilde key when finished to release the Connection Override lock.

Larry adds: I was just testing this and, in Catalina with FCP X 10.4.8, tapping Tilde then Command locks this setting on, then tapping Tilde turns it off.

Thanks, Don, for writing this up. I had forgotten this feature was there.


Please rate the helpfulness of this tip.

Click on a star to rate it!

… for Apple Final Cut Pro X

Tip #641: The Secret is Blend Modes

Larry Jordan – LarryJordan.com

The secret is blend modes and a compound clip.

Text, filed with a video, placed over a second video, with a drop shadow applied.

Topic $TipTopic

Here’s a straight-forward technique to put video inside a text clip, then key the results over a second video clip. And, for extra credit, I’ll show you how to add a drop shadow.

This is a three-layer effect using blend modes and a compound clip.

SETUP

  • On the Primary Storyline, put the background. The blue clip, in my screen shot.
  • On the layer above that, put the video you want to place inside the text. The glowing orange in my example.
  • On the layer above that, on the top layer, put the text.
  • Select the Primary Storyline clip and type V to make it invisible.

FILL THE TEXT

  • Select the text clip.
  • Go to the Video Inspector and set the blend mode for the text clip to Stencil Alpha.

The text is now filled with the image on Layer 2

PUT IT OVER THE BACKGROUND

  • Select the background clip and type V to make it visible again.
  • Select the text clip and the video on layer 2.
  • Go to New > Compound Clip.
  • Accept the default name and click OK.

The filled text now appears over the background on the Primary Storyline.

Done!

EXTRA CREDIT

  • Select the compound clip.
  • Go to Effects > Stylize and apply a drop shadow to the compound clip.
  • Adjust until it looks good to you.

Please rate the helpfulness of this tip.

Click on a star to rate it!

… for Apple Final Cut Pro X

Tip #642: Add a Cast Shadow to Text

Larry Jordan – LarryJordan.com

All it takes is changing one setting.

Text, filled with a gradient, with a cast shadow effect applied.

Topic $TipTopic

You can add a cast shadow to any clip, however it is most effective with text. Here’s how to create it.

In my example, I created a text clip and filled it with a gradient. (The color settings are in the Text Inspector > Face.)

  • Select the text clip.
  • Go to the Effects browser > Stylize and apply the Drop Shadow effect.
  • In the Video Inspector, change the drop shadow settings from Classic Drop Shadow to Perspective Back.
  • Finally, using the onscreen controls, tweak the shadow position and settings so it best matches your scene.

Done.


Please rate the helpfulness of this tip.

Click on a star to rate it!

… for Apple Final Cut Pro X

Tip #645: Update a Smart Collection

Larry Jordan – LarryJordan.com

To update any Smart Search simply double-click its name in the Library List.

To modify any custom Smart Search, simply double-click its name in the Library List.

Topic $TipTopic Smart Collections are saved searches; though “Smart Collection” is a much cooler name.

Did you know you can quickly update them? Here’s how.

Smile… this is a very quick tip:

To modify any custom Smart Search, simply double-click its name in the Library List.

Make your changes, then simply close the search box.

NOTE: If you click New Library Smart Search (or New Smart Search), you’ll create a new search, as well as changing the old one.


Please rate the helpfulness of this tip.

Click on a star to rate it!

… for Apple Final Cut Pro X

Tip #662: Sustaining a Musical Chord

Brian Thomas

The Retiming bar showing an audio clip slowed 75%.

Topic $TipTopic

Brian Thomas writes:

At the end of a recent video I wanted the music to fade out slowly but the piece I had chosen came to a fairly abrupt end. I tried cutting out various short lengths of that final chord and repeating it a number of times with ever decreasing volume while applying various audio effects but there was always some sort of reverberating echo effect in there – not cool.

Suddenly I had a brain wave: Use the Retime facility on the last chord and stretch it out to the desired length!

Usually we think of retiming (speeding up or slowing down of footage) as applying to the image part of the video but it can be very useful to manipulate independent soundtracks since whatever you do FCP X will do its best to retain the original pitch.

In my case I cut the soundtrack a few frames after the last chord had started, clicked on the remaining part of the chord, pressed Cmd + R to invoke Retiming and then clicked on the small vertical line at the right of the green area of the clip dragging it out to the new desired length of time.

NOTE: Clicking on the downward arrow in the middle of the clip, followed by “Slow” offers some convenient values of 50% or 25% straight off.

Dragging the chord out to 20% still gave me great results.

EXTRA CREDIT

  • Bonus 1: If you notice a slight absence of the upper frequencies then you may need to apply the audio EQ effect and boost appropriately.
  • Bonus 2: Apply this technique to make a whole piece of music exactly fit your footage – it will still sound right as the pitch doesn’t get altered. Neat, huh!

Please rate the helpfulness of this tip.

Click on a star to rate it!

… for Apple Final Cut Pro X

Tip #638: Store One Clip in Multiple Events

Larry Jordan – LarryJordan.com

This tip gives you options…!

The same clip of Lindsay in stored in two different events.

Topic $TipTopic

Here’s a fast – but hidden – way to store the same clip in more than one event. This is a very useful technique to help organize shots that may span multiple scenes.

Normally, Final Cut only allows storing a clip in one Event. If you drag it into a different event, the clip is moved from one event to the other.

However, if you select a clip (or group of clips ), start to drag it into a new event, then, while dragging, press and hold the Option key until you drag them into a new event, you’ll copy the clip into the new event.

This process does not duplicate media, it only copies the link to the media; which means that you are not using extra storage to make a copy. Also, these to copies are not clones. Whatever you do to one clip does not affect the other.

NOTE: This works best if you start to drag, then press and hold the Option key until the clips are fully dragged into the new event.


Please rate the helpfulness of this tip.

Click on a star to rate it!

… for Apple Final Cut Pro X

Tip #639: All vs. any

Larry Jordan – LarryJordan.com

Any is inclusive, All is exclusive.

The Search Filter dialog, showing options for keyword searches.

Topic $TipTopic

When searching for files using keyword search you have two main options: “Any” and “All.” Here’s what they mean.

When using keyword search – which is a great way to organize and find clips and ranges within a clip – there are four key search options. Here’s what they mean.

  • Any. This displays every clip that contains even one of the search criteria. For example, the screen shot displays clips that contain either “People Video” or “Dancing.”
  • All. This displays every clip that contains all the search criterial. For example, this displays only clips that contain both “People Video” and “Dancing.”
  • Does Not Include Any. This displays every clip that does not contain even one of the search terms. For example, this displays all clips that do not contain either “People Video” or “Dancing.”
  • Does Not Include All. This only displays clips that do not contain all search criteria. For example, this would not show clips that contain both “People Video” and “Dancing,” but would show clips that contain one of these.

EXTRA CREDIT

Search results are displayed instantly, as soon as you select them. Experiment with these on your own media and discover how they can help you find the clip you need when you need them.


Please rate the helpfulness of this tip.

Click on a star to rate it!

… for Apple Final Cut Pro X

Tip #640: Faster Freezes in Final Cut

Larry Jordan – LarryJordan.com

This creates freezes from both the Browser and Timeline.

A match frame freeze added at the position of the timeline.

Topic $TipTopic

You can always create a hold frame (Shift + H) in a clip. But, a hold frame is locked into the clip that created it. A freeze frame is a stand-alone piece of media that can be moved anywhere. Here’s a fast way to add freeze frames to the timeline in Final Cut Pro X.

  • Position the playhead on the frame you want to freeze in the timeline.
  • Type Shift + F. This creates a match frame for the same clip in the Browser.
  • Type Option + F. This adds a freeze frame of the frame under the playhead in the Browser on a layer above the Primary Storyline in the timeline.

NOTE: The duration of the freeze is based on the Still Image duration in Preferences > Editing.

EXTRA CREDIT

  • To add a freeze frame from any clip in the Browser, position the playhead on the Browser frame you want to freeze, then type Option + F.
  • To freeze a frame in the Timeline and add it to the Primary Storyline, position the timeline playhead on the frame you want to freeze and type Option + F.

Please rate the helpfulness of this tip.

Click on a star to rate it!

… for Apple Final Cut Pro X

Tip #622: Two Ways to Import Captions

Larry Jordan – LarryJordan.com

Importing XML brings in the entire project. Importing captions just brings in captions.

SRT captions imported into a Final Cut project timeline.

Topic $TipTopic

Recently, I was writing a tutorial on how to create, add and modify closed captions for Final Cut Pro X and I discovered this cool trick.

Final Cut supports SCC (CEA-608), SRT and iTT captions; each with different forms of formatting control. (See Tip # 623.)

  • When importing iTT captions, which are most often stored in a XML file, use File > Import > XML.
  • When importing SRT or SCC captions, use File > Import Captions.

When importing XML files, the entire project will be imported, including captions, media and timeline. When importing SRT captions, this will just import the captions themselves and place them on the timeline.


Please rate the helpfulness of this tip.

Click on a star to rate it!