… for Apple Final Cut Pro X

Tip #623: Not All Captions Look Alike

Larry Jordan – LarryJordan.com

Captions are designed for simplicity, not fancy formatting.

SRT caption formatting controls in Apple Final Cut Pro X.

Topic $TipTopic

SCC and SRT closed captions are designed for readability and flexibility, not formatting. The Federal Communications Commission’s rules about closed captioning include details about caption accuracy, placement, and synchronicity. They don’t say anything about formatting. Avoid problems – read this.

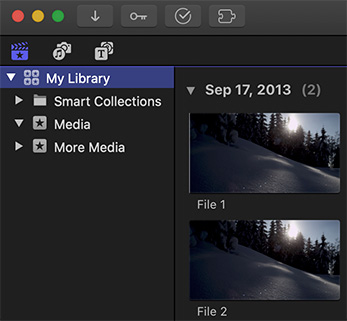
Captions are designed for readability and flexibility – you can turn them on or off, or choose between languages. Captions are not designed to be styled. All captions, except SCC, are designed to be stored in sidecar files. These are separate files from the media, but linked to it.

SCC captions, which can be embedded in the video itself — well, one language at least – are limited to two lines per screen each with only 37 characters per line. They also require a frame rate of 29.97 fps (either drop or non-drop frame).

Yup, limited.

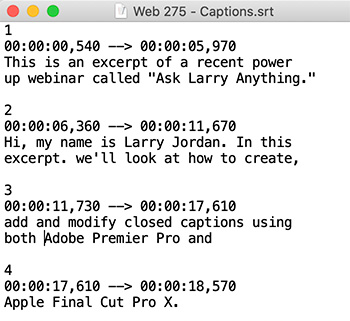
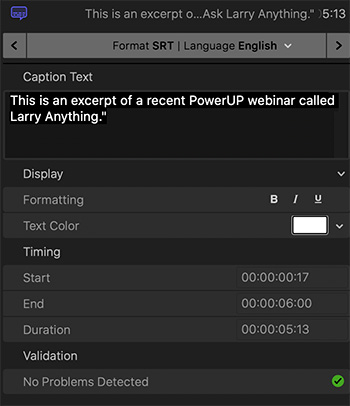
SRT captions are more flexible. SRT captions are known for simplicity and ease-of-use, especially when compared to other formats, many of which used XML-based code. It was adopted by YouTube as a caption format in 2008.

SRT only supports basic formatting changes including: font, color, placement and text formatting. HOWEVER, there is no clear standard for these style changes. Even if you apply them to your captions there is no guarantee that the software playing your movie will know how to interpret them.

The basic rule is: If you need text with style, use titles. If you need to enable or disable text on screen, use captions – but don’t expect much style control.


Please rate the helpfulness of this tip.

Click on a star to rate it!

… for Apple Final Cut Pro X

Tip #625: How to Easily Edit SRT Captions

Larry Jordan – LarryJordan.com

It is easy to make minor corrections to SRT caption files.

This is what an SRT caption text file looks like, viewed in Text Edit.

Topic $TipTopic

SRT captions are text files which are both easy to read and easy to edit. These text files can be opened in any text editor, such as Text Edit or BBEdit.

The format of the text inside the file is very specific:

  • Caption number. This must be on the top line and a unique, sequential number.
  • Timecode. This indicates the start and end of the caption, with the last set of numbers set off by a comma and representing milliseconds.
  • Caption text. This is one or two lines of text. Notice that this text file does not support significant text formatting.

As long as your text lines don’t run too long, you can easily correct spelling or punctuation errors.

EXTRA CREDIT

While you can correct timing in this file, Final Cut makes timing adjustments easier within their respective programs.


Please rate the helpfulness of this tip.

Click on a star to rate it!

… for Apple Final Cut Pro X

Tip #600: Store the Same Clip in More Than One Event

Larry Jordan – LarryJordan.com

Option-dragging creates independent references to the same clip.

This is the same clip, stored in two different events, with two different file names.

Topic $TipTopic

Normally, we can only store one clip in one event. Here’s a new technique that allows us to create independent copies of media without increasing storage needs.

If you import media into Final Cut Pro X using Leave Files in Place:

  • When you drag a media clip from one event to another, it moves the media file.
  • When you Option-drag a media clip from one event to another, it creates an independent copy of that clip, without copying the clip or increasing storage requirements.

Each clip can be independently renamed, edited into the timeline with different In/Out points, or have different effects applied to either clip without changing the other clip.

The big benefit to this is that you can create as many iterations of a clip as you need, without unnecessarily filling storage.


Please rate the helpfulness of this tip.

Click on a star to rate it!

… for Apple Final Cut Pro X

Tip #601: FCP X: Color Wheel Secret

Larry Jordan – LarryJordan.com

Lock the hue while varying the saturation.

Press and hold the Shift key while dragging to constrain the hue.

Topic $TipTopic

Here’s a secret tip when working with the macOS Colors window to choose a color.

Drag the small puck in the color wheel to choose a color, then press the Shift key.

This constrains the movement of the puck so that it moves in a straight line between its current position and the center.

This allows you to lock the hue while changing the saturation.


Please rate the helpfulness of this tip.

Click on a star to rate it!

… for Apple Final Cut Pro X

Tip #608: Enable On-screen Inspector Controls

Larry Jordan – LarryJordan.com

Blue means an on-screen control is enabled.

When an icon is blue, on-screen Controls in the Viewer are active.

Topic $TipTopic

In the Video Inspector are three icons that enable on-screen Viewer controls to create or modify a variety of Inspector effects.

Indicated by red arrows in the screen shot, when an icon is white, the controls are off. When an icon is blue, the controls are active and displayed in the Viewer.

You can activate these either by clicking them in the Inspector or selecting an effect from the small pop-up menu in the lower left corner of the Viewer.


Please rate the helpfulness of this tip.

Click on a star to rate it!

… for Apple Final Cut Pro X

Tip #570: 3 Ways to Create Split Screens in FCP X

Larry Jordan – LarryJordan.com

The key is to stack clips vertically, then scale and crop as needed.

A freeform split screen, courtesy of MotionArray.com.

Topic $TipTopic

This article first appeared in MotionArray.com. This is an excerpt.

Split screen videos can be a fun stylistic choice for a variety of video types, but they also allow you to display more information on-screen than a single clip. With split screens, you can create engaging motion graphics videos with just a little keyframing. In this tutorial, we are going to show you a variety of methods for creating dynamic split screen videos in Final Cut Pro X.

A split screen effect works by layering the footage and changing the shape and size of your video clips, so they are displayed alongside one another. Because of this, It’s helpful to know the layout you want to achieve so you can work out the sizes to make each video.

Option 1: Vertical & Horizontal Splits

Vertical and horizontal split screens are when the screen is divided into two sections, displaying a different clip on each side. For both of these types of split screen layouts, you can use the same method, but just change different cropping settings. For a vertical video, change the left and right crop controls. For horizontal, change the top and bottom crop controls.

Option 2: Multiple Video Splits

To create multiple splits, you can use the vertical/horizontal method above, but you’ll need to add more layers. Creating split screens with more than 2 layers of video can become a little complicated, especially if you want to be precise about your placement.

Option 3: Freeform Splits

Another style of split screen often used in music videos and motion graphics videos is the freehand split screen. Rather than neatly laid out in equal sizes, the freeform style consists of videos arranged in whichever way you want. It will take a bit of playing around to get right, but it’s worth it!

EXTRA CREDIT

The article, linked at the top, has details and videos illustrating how to create and animate each of these effects.


Please rate the helpfulness of this tip.

Click on a star to rate it!

… for Apple Final Cut Pro X

Tip #585: Hide Jump Cuts with Flow

Larry Jordan – LarryJordan.com

For best results, don’t change the duration of the transition.

The Flow transition is located in the Dissolves category.

Topic $TipTopic

The best way to hide a jump cut is using B-roll or a cutaway. However, when you don’t have those options, the Flow transition in Final Cut can bail you out of a tricky situation. Here’s how.

The Flow transition is relatively new in Final Cut. What it does is use Optical Flow technology to create new frames that blend the Out of the out-going clip into the In of the in-coming clip.

In doing so, it converts a jarring jump cut into a fast, smooth, 6-frame dissolve.

To apply, drag Flow from Transitions > Dissolves onto the edit point containing the jump cut.

EXTRA CREDIT

According to the Final Cut Pro X Help:

  • Use the Flow transition with the default duration only. Any other duration will generate unexpected results.
  • The Flow transition duration is always set at 6 frames regardless of the duration set in the Editing pane of Final Cut Pro preferences.
  • The Flow transition is disabled (treated as a standard dissolve) when you apply it to a generator or still image.

Please rate the helpfulness of this tip.

Click on a star to rate it!

… for Apple Final Cut Pro X

Tip #531: How to Delete Render Files in FCP X

Larry Jordan – LarryJordan.com

Any deleted generated media can easily be rebuilt.

This message shows the three categories of media that can be deleted at any time.

Topic $TipTopic

Final Cut generates a lot of files, even for small projects. While all these files are necessary during your edit, they are not necessary afterwards. When you need to recover storage space, here’s what you need to do.

There are three types of generated media that can be deleted:

  • Render files
  • Optimized media
  • Proxy files

NOTE: If, by chance, you delete the wrong thing, Final Cut will automatically rebuild it from existing files. This is a good reason to never trash camera native files until your edit is complete.

There are three areas from which you can delete generated media:

  • Library
  • Event
  • Project

Select the area you want delete files from in either the Library List or the Browser, then choose File > Delete Generated [ ] Files. (Where the brackets are will appear “Library,” “Project,” or “Event,” depending upon what you selected.)

FCP X will warn you that this action can not be reversed, which is true, but misleading. While you can’t undo the deletion, you can create new optimized or proxy media from File > Transcode Media.

And FCP X will create new render files whenever they are needed in your edit.

IMPORTANT NOTE! Do not delete the master files from your camera if you plan to delete optimized media later. Optimized media files are derived from the camera master files. Deleting both would be a very bad idea.

EXTRA CREDIT

While you can do this during an edit, you don’t save a lot, as Final Cut will rebuild whatever files it needs from what you deleted. The big benefit comes when you are archiving a project. Deleting generated media reduces the size of your archives.


Please rate the helpfulness of this tip.

Click on a star to rate it!

… for Apple Final Cut Pro X

Tip #549: What Is Optical Flow?

Larry Jordan – LarryJordan.com

Use Optical Flow for clips slower than 10%.

The video quality options in Final Cut Pro X’s Retime menu.

Topic $TipTopic

Optical Flow is a way to generate artificial frames to smooth extremely slow motion video. The ideal way to create extreme slomo is to shoot at a high frame rate, then slow it down. But, if you are editing after production is complete and no high-frame rate video was shot, you need to go to Plan B.

Optical Flow is Plan B.

When slowing a clip, you’ll get the best results by picking a speed percentage which divides evenly into 200. For example, 50, 33, 25, 20, 10, 5 and so on.

There are three choices for image quality:

  • Normal. Use this for speeds of 50% or faster, including fast motion/timelapse.
  • Frame Blending. Use this for speeds between 10 and 50%. This quickly dissoves between each slowed frame.
  • Optical Flow. This creates frames, what animators call “tweens” for very slow motion. Use this for speeds slower than 10%.

The problem is that optical flow often doesn’t work. By that I mean it generates strange artifacts, especially between foreground and background.

Over the years, I’ve found very few clips where optical flow works reliably. I tend to prefer frame blending with speeds at 20% or faster.

For extreme slow motion, the best option – and most reliable – is to shoot a high frame rate.

EXTRA CREDIT

To apply Optical Flow, slow a clip using the Retime menu, then choose Optical Flow from Video Quality.


Please rate the helpfulness of this tip.

Click on a star to rate it!

… for Apple Final Cut Pro X

Tip #568: YouTube Compression Settings for Compressor

Larry Jordan – LarryJordan.com

Compressor’s settings need tweaks for best YouTube compression.

Compressor’s video compression settings panel. Red arrows indicate areas to change.

Topic $TipTopic

In Tip #561 I shared YouTube’s optimized compression settings. Apple Compressor’s YouTube settings change based upon the frame size of the source media. While close, they need some tweaks for best results.

VIDEO SETTINGS

Match the size of your compressed frame to the source frame. There’s no reason to make it smaller and making it larger will only make it blurry.

Select the setting that matches your project frame size from Video Sharing Services. Then, in the Video tab:

  • Turn OFF Multi-pass
  • Turn OFF Add clean aperture information
  • If compressing for 4K, change the Data Rate to Custom, 35000.
  • 1080p and 720p video data rate settings are fine.

AUDIO SETTINGS

  • If compressing stereo, set the Bit Rate to 320 kbps.
  • If compressing mono, set the Bit Rate to 160 kbps.

Please rate the helpfulness of this tip.

Click on a star to rate it!