… for Apple Final Cut Pro X

Tip #081: Create a Custom Default Transition

Larry Jordan – https://LarryJordan.com

One simple keyboard shortcut speeds things along

Tip Screen Shot

Topic $TipTopic

You may know that Cmd + T applies the default transition – a cross-dissolve – to any selected edit point or group of edit points. What you may not know is that you can change the transition assigned to this shortcut.

To change the transition, open the Transition Browser and Control-click the transition you want to make the default. Choose Make Default.

Now, when you type Cmd + T, your newly-selected transition magically applies itself in the timeline.

EXTRA CREDIT

You can apply the default transition to multiple edit points. Simply select the clips to which you want to add transition, then type Cmd + T.


Please rate the helpfulness of this tip.

Click on a star to rate it!

… for Apple Final Cut Pro X

Tip #006: One Click to Better Color!

Larry Jordan – https://LarryJordan.com

One click and – poof! – a color cast is gone.

Tip Screen Shot

Topic Icon

With the 10.4 update to Final Cut Pro X, Apple made one small change to the Balance Color feature that converted it from useless to magical.

  • Put the playhead in the clip you want to color correct in the Timeline.
  • Select Modify > Balance Color.
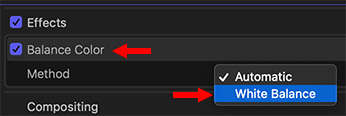
  • In the Video Inspector, enable Balance Color and change it from Automatic to White Balance.
  • Using the resulting eye-dropper, click something in the image that’s supposed to be gray.

Poof! FCP X removes the errant color cast and your image looks great!

You can do more with the color wheels to create a look, but nothing is faster at fixing a color cast than this.


Please rate the helpfulness of this tip.

Click on a star to rate it!

… for Apple Final Cut Pro X

Tip #025: Let Final Cut Do the Math

Larry Jordan – https://LarryJordan.com

Final Cut can handle duration arithmetic automatically.

Tip Screen Shot

Topic Icon

An earlier tip (#24) showed how to move edit points and clips using timecode. But, did you know that Final Cut can do that timecode math for you? This is especially useful when you are working with different frame rates and need to make changes that don’t translate to whole seconds.

Here’s how.

NOTE: To move a clip, or selected group of clips, you first need to select the Position tool. You don’t need to use the Position tool to move edit points.

With an edit point, points, clip or clips selected in the timeline:

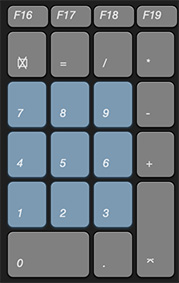
  • Press + [plus] to switch the timecode display into “data entry” mode and tell FCP X you intend to move the selection to the right.
  • Press [minus] to switch the timecode display into “data entry” mode and tell FCP X you intend to move the selection to the left.
  • Then, type the number of frames, seconds or minutes you want the selected objects to move.
  • Finally, press Enter to apply the shift.

For example:

  • Type +10 ENTER to move the selection 10 frames to the right
  • Type -20 ENTER to move the selection 20 frames to the left

Now it gets interesting…

    • Type +48 and, depending upon the frame rate of your project, FCP X will convert this into seconds and frames then move the selection.
    • Type 99, or -120, or 300, or -12345 and watch as FCP X converts the number you type into minutes, seconds and frames – based upon the frame rate of your project.

    Cool.


Please rate the helpfulness of this tip.

Click on a star to rate it!

… for Apple Final Cut Pro X

Tip #052: A Better Way to Preview an Effect

Larry Jordan – https://LarryJordan.com

Here’s how to see an effect without applying that effect.

Tip Screen Shot

Topic Icon

In the Timeline, put the playhead in the middle of a clip to which you want to add an effect.

This displays the clip in the Viewer.

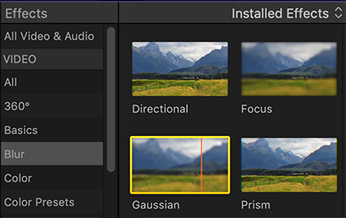
Next, open the Effects Browser (shortcut: Cmd + 5) and find the effect you want to apply.

Instantly, the effect – at its default settings – is displayed in the Viewer as though it was applied to the clip, but it isn’t… yet.

Even better, press the Option key. Now as you hover and drag over an effect in the Effects browser you’ll see the effect applied to the clip and, as you drag, the principle setting – for example, the amount of a Gaussian blur – changes allowing you to see how altering the setting will alter the effect.

If you like the results, double-click the effect to apply it.


Please rate the helpfulness of this tip.

Click on a star to rate it!

… for Apple Final Cut Pro X

Tip #5: A Fast Way to Fix Color Problems

Larry Jordan – https://LarryJordan.com

This one tip can solve really tricky color problems.

Tip Screen Shot

Topic Icon

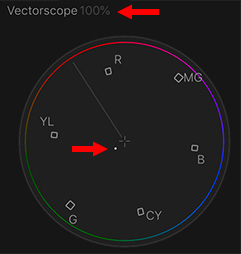
This one tip has solved more color problems for me than any other: “If something is supposed to be gray, it must appear as a small dot in the center of the Vectorscope.”

Use the Crop > Trim tool to isolate something in the frame that’s supposed to be gray (remember, black and white are also “gray”).

Next, using the Master color wheel in the Color Inspector, adjust the colors so that the dot is centered in the middle of the Vectorscope.

Then, undo the Crop by clicking the curved arrow next to Crop in the Inspector to see the full image.

EXTRA CREDIT

You have more control using the individual color wheels, starting with mid-tones, but it will take longer.


Please rate the helpfulness of this tip.

Click on a star to rate it!

… for Apple Final Cut Pro X

Tip #013: Adjust Spacing Between Two Letters

Larry Jordan – https://LarryJordan.com

Tweaking letter spacing can make titles easier to read.

Tip Screen Shot

Topic Icon

To adjust the spacing between two characters, put your cursor between the letters you want to kern, press Cmd + Option and the left or right square bracket keys to move the two letters on either side of the playhead closer or further apart.

While using the arrow keys won’t work, to kern characters, once you position the cursor, you can step through the text with the arrow keys to move the cursor to a different pair of letters.

NOTE: Most of the time, you won’t need to adjust body text, but adjusting the letter-spacing of titles will often help readability a lot.


Please rate the helpfulness of this tip.

Click on a star to rate it!

… for Apple Final Cut Pro X

Tip #2: 10 Keyboard Shortcuts To Make You Faster

Larry Jordan – https://LarryJordan.com

These ten shortcuts will help you instantly edit faster.

Tip Screen Shot

Topic Icon

When you start doing the same tasks over and over, keyboard shortcuts can make you more efficient. Here are the keyboard shortcuts I use virtually everyday when editing in Final Cut:

  • Control + Cmd + 1 — Toggle Library and Browser display on/off.
  • Shift + Z — Fit image into Viewer or project into Timeline.
  • Cmd + 7 — Show/Hide video scopes.
  • Shift + I — Jump the playhead to the In.
  • Option + X — Delete both the marked In and Out.
  • V — Toggle clip visibility off or on.
  • E — Perform a standard append edit at the end of the timeline.
  • W — Perform a standard insert edit at the position of the skimmer/playhead.
  • Option + W — Insert a gap into the Timeline at the position of the skimmer/playhead.
  • Cmd + B — Cut all selected clip(s) at the position of the skimmer/playhead.

BONUS

  • Shift + comma/period — Move selected edit point or connected clip ten frames left/right.
  • S — Toggle skimming on or off.

Please rate the helpfulness of this tip.

Click on a star to rate it!