… for Apple Final Cut Pro X

Tip #1589: New Use for Custom Overlays

Larry Jordan – LarryJordan.com

Overlays appear in the Viewer, but never export.

The Overlay portion of the View menu in the top right corner of the Viewer.

Topic $TipTopic

In Tip #980, I showcased a new Final Cut feature: Custom Overlays. But, recently, I discovered a new use for this feature that saves time during editing.

All the videos I post to social media have my website burned in as a watermark. For a variety of reasons, it is far easier to add watermarks during compression than to try to add it during the edit.

The problem is that I don’t always remember that the watermark will be added later and create text, titles or other visuals which are blocked by the watermark.

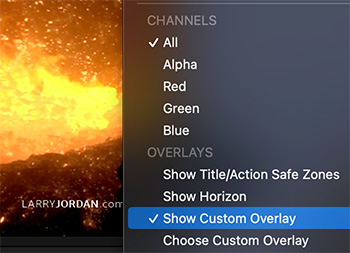
So, I created a custom overlay that displays my watermark during editing, but never outputs it.

This gives me the best of both worlds: a constant reminder of the size and position of the watermark, with no risk it will export as part of the master file.

Cool.

EXTRA CREDIT

Here’s a tutorial from my website that describes how to create and apply overlays in more detail.

If you want an overlay to burn in during export, either create it as a caption or a title. Overlays can not be included in the final export.


Please rate the helpfulness of this tip.

Click on a star to rate it!

… for Apple Final Cut Pro X

Tip #1590: An Easy Way to See Interlaced Video

Larry Jordan – LarryJordan.com

Interlacing is automatically converted to progressive when a clip is scaled.

Interlacing artifact (top image), the Video Field Dominance setting in the Info Inspector.

Topic $TipTopic

We have lived with interlaced video since the beginning of television. On TV sets, interlacing looks lovely. But, oh my! On the web, it looks atrocious!

Fortunately, Final Cut has two ways to quickly determine if a video clip is interlaced:

From the View menu in the top right corner of the Viewer, enable Show Both Fields. When the Viewer is set to 100%, you’ll see the thin, black, horizontal lines emanating from moving objects (top screen shot).

NOTE: If an interlaced image is scaled, interlacing lines will be removed, but their general motion blur will remain.

Or, go to the Info Inspector. Set the Basic menu in the lower left corner to Extended, then scroll down to see the Video Field Dominance setting. Anything other than Progressive means the clip is interlaced (bottom screen shot).

Scaling a clip, or editing it into a progressive project, will automatically convert it from interlaced to progressive.


Please rate the helpfulness of this tip.

Click on a star to rate it!

… for Apple Final Cut Pro X

Tip #1591: The Hidden Metadata of Final Cut Pro

Larry Jordan – LarryJordan.com

The default Basic setting displays the least metadata.

Click the Basic menu to reveal extensive metadata tracking for each clip in FCP.

Topic $TipTopic

There is a ton of metadata that Final Cut Pro tracks for each audio or video clip — all deeply hidden in the Info Inspector. Here’s how to unlock it.

  • Open the Info Inspector and scroll down to the bottom.
  • There, on the left, you’ll find a menu labeled Basic.
  • Click it and eleven different metadata displays are already configured. The one with the most data is Extended.
  • Select different options to see what they contain.
  • To configure your own metadata menu, select Edit Metadata View.

Please rate the helpfulness of this tip.

Click on a star to rate it!

… for Apple Final Cut Pro X

Tip #1572: What Is Range Check?

Larry Jordan – LarryJordan.com

Safe video levels are essential for any video not posted to the web.

The Zebra or Herringbone pattern flags shadow or highlight levels that are illegal.

Topic $TipTopic

Range check is a special option in the Viewer > View menu that flags shadow or highlight levels that are “illegal” for the timeline video clip containing the playhead.

If you only post video to the web, you don’t need to worry about video levels, the web will play anything.

However, if you need to submit programs to broadcast, cable, DVD, digital cinema or many streaming services, such as NetFlix, you need to be SURE your video levels are within spec.

There are four options:

  • Off. This is the default setting.
  • Luma. This flags luminance levels that are excessive.
  • Chroma. This flags color levels (mostly saturation) that are excessive.
  • All. This flags all illegal levels.

Excessive luma levels are those above 100% IRE or below 0% IRE (for Rec. 709 media) .

Excessive chroma levels are those that are over-saturated. (Saturation levels will vary by luminance levels.)

EXTRA CREDIT

Range check simply flags problematic footage. You correct this using either one of the color grading tools or Broadcast Safe. (See Tip #1573).


Please rate the helpfulness of this tip.

Click on a star to rate it!

… for Apple Final Cut Pro X

Tip #1573: The Broadcast Safe Effect

Larry Jordan – LarryJordan.com

Broadcast Safe makes sure there are no illegal video levels in your project.

Settings for the Broadcast Safe effect.

Topic $TipTopic

The Broadcast Safe effect clamps video levels so that they do not exceed safe levels. (See Tip #1572.) This works, but there are limitations.

The Broadcast Safe filter is located in Effects browser > Color > Broadcast Safe. You apply it the same as any other effect.

NOTE: However, if you are applying other effects to the same clip, be sure that the Broadcast Safe filter is listed last. This prevents another filter from sending video levels into illegal levels after the Broadcast Safe effect is applied.

In the effect, select the color space of your project. For HD projects, select Rec. 709. For SD projects, choose one of the two Rec. 601 options. All HDR projects should use Rec. 2020.

For Rec. 601 or 709 footage, this clamps any video levels over 100% IRE to exactly 100%, and clamps any video levels below 0% IRE to exactly 0%.

Clamping means that all excessive video levels are locked to the same value, which will remove any detail in the clamped areas. A better option is to adjust levels using the Color Board, Curves or Color Wheels. However, the Broadcast Safe filter is MUCH faster and, most of the time, you don’t need to retain that texture detail.

CAUTION

The big limitation of the Broadcast Safe filter is that if you adjust the Amount slider, you will adjust both highlights and shadows. This will lead to bad results. What Apple needs to do is provide two separate sliders, one for highlights and one for shadows.

My general recommendation is not to change the Amount slider to avoid degrading your image.

EXTRA CREDIT

The best way to apply the Broadcast Safe filter in Final Cut is to use an adjustment layer. Here’s a tutorial from my website that describes this in more detail.


Please rate the helpfulness of this tip.

Click on a star to rate it!

… for Apple Final Cut Pro X

Tip #1574: The Video Scope View Menu

Larry Jordan – LarryJordan.com

Pick the display options that work best for you.

The Video Scope View menu.

Topic $TipTopic

Looking at the Video Scopes in Final Cut reminds me of the small View menu in the top right corner of the scopes pane. Here’s a quick look at what this does.

The geometric shapes at the top (see screen shot) illustrate all the different ways to arrange the video scopes. My preference is the side-by-side option in the top right corner. I like seeing both the Vectorscope and Waveform Monitor at the same time.

  • Vertical Layout puts the scopes under the Viewer. While this is really cramped for a single monitor, it is often the best choice when using two monitors and displaying the Viewer on the second monitor.
  • Show Guides displays a thin white line as you hover the mouse over a video scope, allowing you to read pixel values as you move the cursor.
  • Monochrome removes all color display from the scopes, though it does not alter your media or timeline.
  • The slider, at the bottom, determines the brightness of the trace, that is the data from your video, in the video scope display.

Final Cut will remember these settings from one project to the next, until you change them.


Please rate the helpfulness of this tip.

Click on a star to rate it!

… for Apple Final Cut Pro X

Tip #1541: Create Shapes Filled with Video

Larry Jordan – LarryJordan.com

This nested compound clip effect is also good for filling logos with moving video.

Photoshop shape (top), with video inserted (middle), a nested compound clip (bottom).

Topic $TipTopic

OK, this is tricky, but worth trying. Here’s how to create a shape in Photoshop, fill it with moving video in Final Cut, then place it over a background.

In Photoshop:

  • Select the custom shape tool, then, from the menubar at the top, pick a shape you like. (The top screen shot shows a flower image.)
  • Make the background layer transparent.
  • Save the image as a PNG or PSD.

In Final Cut:

  • Create a new project.
  • Put the video you want to insert into the shape into the Primary storyline.
  • Stack the shape above it.
  • Select the shape and apply Video Inspector > Blend Mode > Stencil Alpha. The shape fills with the video.
  • Select both shape and video and choose File > New > Compound clip. Give this any name you like.
  • Place the shape, again, on top of the compound clip in the timeline.
  • Select the top shape and apply Effects > Keying > Keyer. It should automatically knock out the black background, leaving the red lines on top of the image from the compound clip. (Illustrated in the middle screen shot.)
  • Select both the new shape and the compound clip and choose File > New > Compound clip. (Yup, a nested compound clip!) Give this any name you like.
  • Stack that nested compound clip on top of the video you want to appear in the background (The barn, in the bottom screen shot.)

Done.

EXTRA CREDIT

This trick works with logos, text, custom shapes – the possibilities are endless.


Please rate the helpfulness of this tip.

Click on a star to rate it!

… for Apple Final Cut Pro X

Tip #1542: More Hidden Uses of the Tilde Key

Larry Jordan – LarryJordan.com

The Tilde key simplifies moving images in the Primary Storyline.

Topic $TipTopic

In Tip #1514, I illustrated how the Tilde key allows moving clips in the Primary Storyline without moving the clips attached to it.

After reading this, Stefan Sonnekus shared another use of the Tilde key:

The tilde key also works when deleting clips from the primary storyline.

Usually any video/audio clips connected to a clip you delete, will be deleted as well, but if you hold down the tilde key when you press Delete, the connected clips will remain in place in relation to the primary storyline. The clips to the right (i.e. coming after the clip you’ve deleted) on the primary storyline will then move to the left to fill the gap and the connected clip(s) will then be connected to the clip(s) that have filled the position of the clip(s) deleted from the primary storyline.


Please rate the helpfulness of this tip.

Click on a star to rate it!

… for Apple Final Cut Pro X

Tip #1552: Add Rain Drops to Your Video

Larry Jordan – LarryJordan.com

When adding rain, be sure not to show sky or ground unless they look appropriately rainy.

Water Pane settings (top) and the effect applied to a clip (bottom).

Topic $TipTopic

Shooting video in the rain is rarely a pleasant experience. Fortunately, Final Cut offers the ability to add rain later, in post, where things are warm and dry.

Select the clip you want to add rain drops to, then apply Effects > Distortion > Water Pane.

This creates the effect of looking at the scene through a window with rain pouring down.

Fast and very effective.


Please rate the helpfulness of this tip.

Click on a star to rate it!

… for Apple Final Cut Pro X

Tip #1528: A Better Way to Replace JPEG Images

Larry Jordan – LarryJordan.com

How you replace one image with another makes a difference.

Topic $TipTopic

Scott was having a problem:

I use Final Cut Pro to edit a lot of videos with JPEG slides in them. I find that, somewhat randomly, if I have to replace one of the slides by using “Replace with Retime to Fit,” the JPEG I’m replacing will move the order of the previous clip. It’s odd… sometimes it happens, sometimes it doesn’t.

The solution was changing how Scott replaced the images. JPEGs are still images, there’s nothing to “retime.”

So, instead of using Replace with Retime to Fit, I suggested that Scott use Replace from Start. This matches the duration of the timeline image, without moving other clips out of position.

Problem solved.


Please rate the helpfulness of this tip.

Click on a star to rate it!