… for Apple Motion

Tip #1292: Top Ten Tips of 2020 for Apple Motion

Larry Jordan – LarryJordan.com

It is fascinating to see what readers find interesting!

Topic $TipTopic

During this last year, The Inside Tips published 975 tips and techniques covering six subject categories:

  • Adobe Premiere
  • Apple Final Cut Pro
  • Apple Motion
  • Codecs & Media
  • Random Media Weirdness
  • Visual Effects

Here are three “Top Ten Tips Lists:” The first shows the most popular tips covering Apple Motion. The second list shows the Top Ten most read tips across all categories. The third list shows the highest rated tips across all categories sorted by votes.

TOP 10 INSIDE TIPS of 2020
FOR APPLE MOTION

  1. Tip #497: A Hidden Map in Motion
  2. Tip #840: Simple – But Eye-catching – Text
  3. Tip #1011: Unique Backgrounds FAST!
  4. Tip #496: A Very Cool Time-Warp Effect
  5. Tip #434: Create Smoother Gradients in Apple Motion
  6. Tip #498: Create a Spinning Globe
  7. Tip #956: Well… THAT was Obvious
  8. Tip #475: Fill Text with Video
  9. Tip #842: How to Improve Apparent Focus
  10. Tip #663: Motion Cinema Workspace

NOTE: Tips are sorted by views, most views listed first.


TOP 10 INSIDE TIPS of 2020
(Sorted by Views)

  1. Tip #479: Copy and Paste Masks in Premiere
  2. Tip #283: AAF vs. EDL vs. OMF Export
  3. Tip #413: Mask Multiple Clips with an Adjustment Layer
  4. Tip #474: DNxHR vs. ProRes
  5. Tip #329: Blurs and Mosaics are No Longer Safe
  6. Tip #592: Make Zooms More Interesting
  7. Tip #957: Apple Supports VP9 in macOS Big Sur
  8. Tip #1135: Boost and Smooth Dialog Levels
  9. Tip #715: How to Reset FCP X to Fix Problems
  10. Tip #342: Uses for Emoji in Final Cut Pro X

NOTE: Tips are sorted by views, most views listed first.


TOP 10 INSIDE TIPS of 2020
(Sorted by Ratings)

  1. Tip #742: The Best Advice to Keep Your Cool
  2. Tip #614: What is the Alpha Channel
  3. Tip #580: The History of Storyboards
  4. Tip #911: The Skin Tone Line is Your Friend
  5. Tip #515: Using the Active Camera Menu
  6. Tip #631: Get Freelance Work From Video Marketplaces
  7. Tip #1056: Move a Mix from Audition to Premiere
  8. Tip #624: Not All Captions Look Alike
  9. Tip #581: Create Colorful Lighting for 3D Text
  10. Tip #398: Use Watch Folders in AME for Automation

NOTE: Each tip was rated 5 out of 5. They are sorted by the number of votes each tip received, with most votes listed first.


Please rate the helpfulness of this tip.

Click on a star to rate it!

… for Apple Motion

Tip #1295: Motion Compositions are a Good Start

Larry Jordan – LarryJordan.com

Sometimes, the best way to learn is to take apart something that already works.

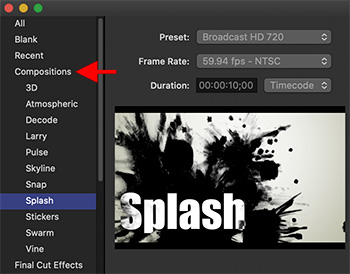
A mash-up of the Motion Project Browser, highlighting “Splash.”

Topic $TipTopic

If you are like me, you start Motion and skip right past the Project Browser to create a new project and start designing.

However, the next time you start Motion, take a look at the categories on the left of the Project Broswer (that’s the window that opens when you first start Motion, indicated by the red arrow in the screen shot).

Compositions are a collection of lower thirds, infographics (menus) and opening titles that can jump start your thinking when you need to create something for your next project.

For example, opening Compositions > Splash > Open displays a 12-second animated opening where all you need to do is add text. However, since this is a Motion project, you can also customize any of the settings, colors or elements that you like.

Take a look at these and you’ll learn a lot about how Motion works, as well as giving you plenty of ideas for your next project.

Some very cool stuff.


Please rate the helpfulness of this tip.

Click on a star to rate it!

… for Apple Motion

Tip #1258: Change Keyframe Ease In/Out Speed

Larry Jordan – LarryJordan.com

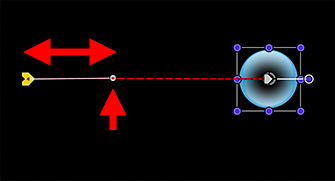
Bezier control dots adjust Ease In/Out speeds and the shape of the motion path.

Drag the white Bezier control dot to or from the keyframe to change Ease In/Out speeds.

Topic $TipTopic

I discovered this tip while researching a recent PowerUP webinar. We can change the ease-in / ease-out speed when animating objects using keyframes.

Ease In and Ease Out refer to the acceleration of an object when it is animated using keyframes.

  • Ease In. The speed of an object approaching a keyframe.
  • Ease Out. The speed of an object leaving a keyframe.

By default, all keyframes in Motion have both Ease In and Ease Out applied. This means an object accelerates when leaving a keyframe and decelerates when approaching a keyframe.

You can change the speed of this acceleration after applying a keyframe by selecting the keyframed object in the Layers panel, then click the keyframe you want to adjust.

This reveals a thin white line with a white dot at the end of it. (This line is called a Bezier control handle.) Drag the dot along the motion path line to change the Ease In/Out speeds.

NOTE: Dragging the dot around the keyframe puts a curve into the motion path (the dotted red line).

EXTRA CREDIT

Control-click a keyframe and set it to Linear to have a constant speed between keyframes.


Please rate the helpfulness of this tip.

Click on a star to rate it!

… for Apple Motion

Tip #1262: Change Behavior Ease In / Out Speed

Larry Jordan – LarryJordan.com

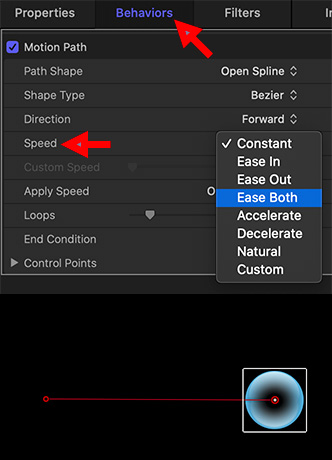
The Behavior menu provides eight different options to change acceleration.

The Behaviors inspector (top) showing the Speed menu. A Motion Path (bottom).

Topic $TipTopic

I discovered this tip while researching a recent PowerUP webinar. We can also change the ease-in / ease-out speed when animating objects using behaviors.

NOTE: Tip #1258 illustrates how to change Ease In/Out speed when using keyframes.

Ease In and Ease Out refer to the acceleration of an object approaching an end point when animated using Behaviors.

  • Ease In. The speed of an object approaching a keyframe.
  • Ease Out. The speed of an object leaving a keyframe.

Apply Behaviors > Basic Motion > Motion Path to an element in the Layers panel. Adjust the two end points to get the movement you want.

NOTE: Click in the middle of the red motion path line and drag to create a curved path.

Go to Inspector > Behaviors and change the Speed menu to change Ease In / Out speeds. Experiment with the different options to see which works best for your project.


Please rate the helpfulness of this tip.

Click on a star to rate it!

… for Apple Motion

Tip #1263: Animate Lights in Motion

Larry Jordan – LarryJordan.com

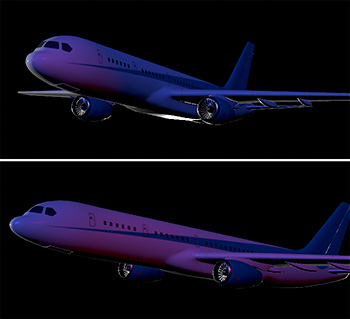
Use Lighting Setups for speed, then animate them by simply rotating a light.

A rotating red fill light emphasizes the slow turn of the aircraft in Motion.

Topic $TipTopic

Last week, I wrote an article for my newsletter on how to create dramatic lighting in Motion. Motion has a full range of lights and, more importantly, lighting presets that can add drama and visual interest to any scene – especially one that involves 3D objects.

NOTE: Here’s the link to the original tutorial.

After writing this article, I realized that it would look even better if the red fill light could slide along the body of the plane as it turned. It’s actually easy to do.

  • Select the light you want to adjust in the Layers panel.
  • Then, keyframe a slow horizontal rotation of that light to slowly pan across the body of the plane.

EXTRA CREDIT

The article, linked at the top, explains how to create this lighting effect.


Please rate the helpfulness of this tip.

Click on a star to rate it!

… for Apple Motion

Tip #1239: Change Clip Speed by Dragging

Larry Jordan – LarryJordan.com

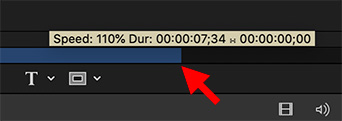
Option-dragging the Out changes the speed of a clip.

Option-dragging the Out of a clip changes its speed.

Topic $TipTopic

Here’s a way, suggested by MediaBox Productions, to change the speed of a clip in Motion – without using the Inspector.

  • In the mini-timeline, press the Option key and click the Out (i.e. the last frame of a clip). The pointer turns into the curved retime pointer.
  • Drag the Out point left to speed the clip up, or right to slow the clip down.

The change in speed for the clip is displayed in the yellow change box above the clip (see screen shot).


Please rate the helpfulness of this tip.

Click on a star to rate it!

… for Apple Motion

Tip #1243: Hidden Clip Control Options

Larry Jordan – LarryJordan.com

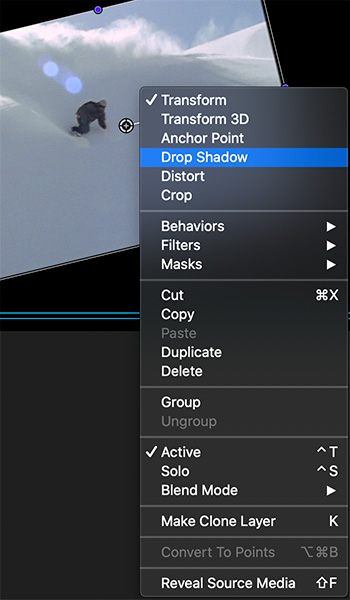
Controls, behaviors, and filters are all available from this contextual menu.

Control-click a video clip in the Motion Viewer to reveal this menu. (Image courtesy of StandardFilms.com.)

Topic $TipTopic

There is a wealth of clip control options hidden in the Motion Viewer. The trick is finding them.

Here’s the secret: Control-click a video clip that’s placed in the Viewer to reveal the options shown in the screen shot.

NOTE: Clicking in the Viewer, without clicking on a clip, does not reveal this menu.

From this menu, you can select a variety of tools, behaviors, filters and other options.


Please rate the helpfulness of this tip.

Click on a star to rate it!

… for Apple Motion

Tip #1244: Hidden Ways to Rotate Elements

Larry Jordan – LarryJordan.com

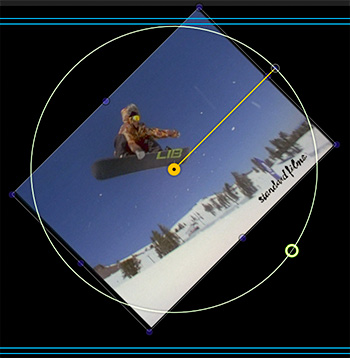
Colors and icons assist in rotating elements.

Press Shift and rotate a video clip to constrain rotation to 45° increments.

Topic $TipTopic

Motion provides two hidden options which can assist in rotating elements in the Viewer.

We all know that the Motion Inspector is where we can make changes to a selected element. However, the Viewer itself provides controls that can speed rotation.

When you select a clip in the Viewer (either by clicking it in the Layers panel or in the Viewer itself) a dot with a line attached appears in the center of the clip.

NOTE: If you change the Anchor point in the Inspector, the location of this rotation dot changes as well.

  • Drag the small dot at the right end of the line to rotate the clip. As you do, the line color stays white.
  • Press the Shift key and the line color changes to yellow and the angle of rotation is constrained to 45° angles.

Also, see the small light yellow dot about 4 o’clock in the screen shot? This represents the starting rotation for a clip. So, if you don’t like the current rotation, you can always go back – provided you don’t let go of the mouse first.


Please rate the helpfulness of this tip.

Click on a star to rate it!

… for Apple Motion

Tip #1227: Compare Two Images for Artifacts

Larry Jordan – LarryJordan.com

Differences caused by compression are very subtle and confined to edges.

A significantly enhanced difference map highlighting differences between images.

Topic $TipTopic

Ever wonder what happens to your images when they are compressed? Well, Motion has a elegant way to illustrate these differences. Here’s how to discover them.

  • Import the two clips or stills you want to compare – this works for both video and stills.
  • Select the top clip.
  • In the Inspector, change Properties > Blend mode to Difference.

The first thing you’ll notice is that differences are VERY slight.

To enhance these results, apply Filters > Color > Levels to the GROUP that holds both images. Then drag the mid-tone slider to the left. This boosts the difference results.

Anything showing gray is different between the two images. Again, you’ll see the big difference is edge definition.

EXTRA CREDIT

If you want to be extra precise, bring these images into your favorite NLE and compare them using the Waveform Monitor.

Two identical images would show a solid black line at 0.


Please rate the helpfulness of this tip.

Click on a star to rate it!

… for Apple Motion

Tip #1228: How to Burn-in Timecode

Larry Jordan – LarryJordan.com

FxFactory Pro provides a wide variety of generators, transitions and effects for Motion and FCP X.

The Timecode generator, top, and the results. (Image courtesy: Hallmark Broadcast Ltd. (www.hallmarkbroadcast.tv))

Topic $TipTopic

Motion does not have the ability to burn timecode into video, say to provide a reference when sending a project to a client to review. But, you still can – with a little help from FXFactory.

Using the Timecode generator from FXFactory Pro, you can easily superimpose timecode for a single clip, or an entire project.

Adjustable settings include:

  • Position
  • Font size, color and kerning
  • Type of timecode
  • Background
  • Drop shadow

A free trial is available.

Link: https://fxfactory.com/info/fxfactorypro/


Please rate the helpfulness of this tip.

Click on a star to rate it!