… for Apple Motion

Tip #1161: Create Burn or Scorch Marks

Larry Jordan – LarryJordan.com

Rule #1: The shorter an effects shot, the more effective it is.

A path, with a dark gray color, charcoal shape style and Multiply blend mode.

Topic $TipTopic

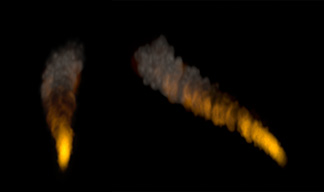
Recently, for a webinar, I needed to create the illusion of a child dragging a light saber across a carpet and setting it on fire. While the entire effect would take longer than a tip to explain, I did want to touch on creating a burn or scorch mark, which was part of this effect.

The number one rule for any effects shot is: The shorter the effects shot, the more effective it is. The longer a shot holds on the screen, the more time the audience has to find something wrong with it.

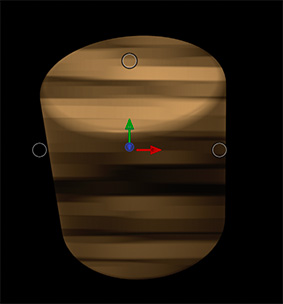
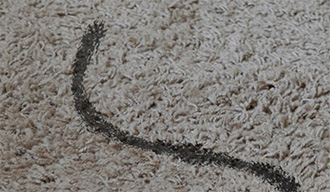
That being said, the screen shot illustrates this burn effect:

  • Create an irregular curve using the Pen tool
  • Expand the Outline width a lot; here I used 100
  • Apply Shape Style > Traditional > Charcoal 3
  • Apply Properties > Blend Mode > Multiply

The Multiply blend mode combines the darker pixels between the “burn” and the carpet underneath. This makes the burn seem more attached to the carpet itself.

This is a very simple effect that works well.

EXTRA CREDIT

For scorch marks, change the color to more accurately match the background, and, depending on what is doing the scorching, you may need to use geometric shapes.


Please rate the helpfulness of this tip.

Click on a star to rate it!

… for Apple Motion

Tip #1162: Particles Reflect Movement

Larry Jordan – LarryJordan.com

Particle systems change over time, this means they highlight animation applied to them.

A stationary flame (left), and the flame moving through space.

Topic $TipTopic

Recently, for a webinar, I wanted to create a burning effect. What I discovered is that when you move a particle system using behaviors or keyframes, it amplifies that movement.

Let me illustrate using Library > Particle Emitters > Pyro > Fire Plume.

In the screen shot, the left image is the flame with no motion applied.

However, once I animate the flame using either keyframes or behaviors, notice how the flame trails out, emphasizing the direction of the move. (See the right image in the screen shot.)

This is because the different particles that make up this effect are released at different times. The older particles were released when the object was closer to the left side.

This means that particle systems provide very organic ways to indicate something is moving – sort of like following the position of a steam engine by watching its plume of smoke.

I’d “known” this intuitively about particles, but it hadn’t really sunk in until I saw the results of this movement in a real-live effect.

EXTRA CREDIT

You can easily experiment with this yourself by putting a particle emitter into a project, then, as the playhead plays, simply drag the particle emitter around the screen and watch what happens.


Please rate the helpfulness of this tip.

Click on a star to rate it!

… for Apple Motion

Tip #1163: Fill a 3D Object with Texture

Larry Jordan – LarryJordan.com

To retain texture, especially for white 3D objects, use Stencil Luma.

A white cylinder, filled with bamboo, yet retaining the lighting texture.

Topic $TipTopic

One of the new features in Motion 5.4.7 is 3D objects. They are in their own category in the Library. Here’s a better way to give them texture.

In the screen shot, I created a cylinder made out of strips of bamboo. Sorta. Here’s how.

  • Drag Library > 3D Objects > Cylinder into the timeline.
  • Using the 3D controls, position it however you want. Here, I tipped it forward to see the difference between the top and sides.
  • In the same group, drag Library > Content > Backgrounds > Bamboo Weave under the cylinder in the Layers panel.
  • Select the cylinder and change Inspector > Properties > Blend mode to Stencil Luma.

Stencil Luma retains the grayscale texture, while keying the background into the foreground.

NOTE: Stencil Alpha would replace the white, but lose all the depth provided by the lighting.

EXTRA CREDIT

To emphasize the shading created by the lighting, add Filters > Color > Levels to the cylinder, then tweak the Levels settings to emphasize the differences in grayscale.


Please rate the helpfulness of this tip.

Click on a star to rate it!

… for Apple Motion

Tip #1139: Change the Speed of a Clip

Larry Jordan – LarryJordan.com

Remember, effects in Motion can have different durations than the clips they are applied to.

The Set Speed behavior adjusted to 25% slomo, with both Ease In & Out applied.

Topic $TipTopic

Like anything in Motion that involves movement, changing the speed of a clip requires a behavior. Here’s how to create a slow-motion effect.

Select the clip in the Layer’s panel who’s speed you want to change, then apply Behaviors > Retiming > Set Speed.

In Inspector > Behaviors > Set Speed (see screen shot):

  • Speed adjusts the overall speed of the clip. Less than 100 is slower.
  • Ease In Time and Curve adjust how the clip gradually changes from normal speed to adjusted.
  • Ease Out Time and Curve adjusts how the clip ends the speed effect and returns to normal speed.

The Ease In/Out settings only apply when the speed effect is shorter than the clip itself. This allows the clip to start or end at normal speed, then change in the middle.

NOTE: I discovered that setting an In or Out to the Set Speed effect does not properly trim it. You will probably need to drag an edge to change it’s duration.

EXTRA CREDIT

It is easier to adjust these settings and watch what happens than to describe them in words.


Please rate the helpfulness of this tip.

Click on a star to rate it!

… for Apple Motion

Tip #1140: Create a Hold (Freeze) Frame

Larry Jordan – LarryJordan.com

Hold frames work both in the middle and at the end of a clip. Motion supports both.

Note this hold frame starts and ends in the middle of a clip.

Topic $TipTopic

As long as I’m thinking about speed changes (Tip #1139)
let me describe how to create a hold, or freeze, frame.

  • Put the playhead on the frame you want to freeze, then apply Behaviors > Retiming > Hold Frame.
  • This freezes the frame under the playhead until the end of the clip.

NOTE: However, any synced audio linked to that clip continues to play.

EXTRA CREDIT

To play a clip, pause in the middle, then resume playback:

  • Put the playhead in the mini-timeline where you want the pause to take effect
  • Choose Mark > Mark In from the menu bar. (Typing “I” won’t work.)
  • Move the playhead to where you want the freeze to end and choose Mark – Mark Out. (Again, typing “O” won’t work.)

Please rate the helpfulness of this tip.

Click on a star to rate it!

… for Apple Motion

Tip #1141: Loop a Video Segment

Larry Jordan – LarryJordan.com

Remember, Loop calculates frames from the start of a clip.

The Loop and Set Speed Behavior settings.

Topic $TipTopic

The Loop behavior loops a portion of a video over and over and… over. Here’s how to use it.

Apply Behaviors > Retiming > Loop to a clip.

The Loop behavior applies to the start of a clip. If that’s not what you want to loop, trim the clip until the video you want is at the start of the clip.

Using Inspector > Behaviors > Loop, set the number of frames you want to loop. The default is 30.

EXTRA CREDIT

It is often helpful to change the speed of a looping clip, for example, to slow it down.

To do so, apply Behaviors > Retiming > Set Speed and set the Speed setting to the slow motion you want.

NOTE: Be sure to drag Loop above Set speed so that the frames are chosen from the source video. If Set Speed is dragged above Loop, the frame count is based on the slowed-down clip.


Please rate the helpfulness of this tip.

Click on a star to rate it!

… for Apple Motion

Tip #1116: A Design Thought on Depth

Larry Jordan – LarryJordan.com

Sometimes a design element can help reinforce the illusion of depth.

Here, the darkened line emphasizes the depth created by rotating the text.

Topic $TipTopic

In other tips, I used Y-axis rotation to create the illusion of depth; especially for text. However, sometimes adding a design element can help sell that illusion even more.

In the screen shot, the text was rotated 50° on the Y-axis. While this clearly creates the illusion that the text is receding into the screen, we can do more to emphasize this.

For example, in the screen shot, I added a line to reinforce this illusion in three ways:

  1. The line is rotated at 50° on the Y-axis
  2. The near edge of the line is wider than the far edge, which was done by manually dragging the control points that define the boundaries of the line to make the near edge slightly wider.
  3. The line is darker than the text above it which makes the line seem like it is “going away” from the text.

No single technique will work the same for every effect, but using graphical elements to reinforce placement of text is often much better than just using the text by itself. And I thought this was a cool example to share with you.


Please rate the helpfulness of this tip.

Click on a star to rate it!

… for Apple Motion

Tip #1117: Adjustable Grid, Guides and Ruler

Larry Jordan – LarryJordan.com

Grids, Guides and Ruler are all adjustable.

Grids, guides and ruler are enabled from the View menu (top) and adjusted in Preferences > Canvas (bottom).

Topic $TipTopic

Inside the Motion Viewer are an adjustable grid, moveable guides and customizable ruler bar. Here’s how to display and adjust them.

To enable their display, select the option you want from the View menu in the top right corner of the Viewer. (Upper panel in screen shot.)

To customize how they look, go to Preferences > Canvas and tweak. (Lower panel in screen shot.)

EXTRA CREDIT

Even when displayed, these overlays will not export.


Please rate the helpfulness of this tip.

Click on a star to rate it!

… for Apple Motion

Tip #1118: What is Ease In / Ease Out?

Larry Jordan – LarryJordan.com

To give movement a more “natural” look, experiment by adding “Ease Both.”

The Speed settings for Behaviors > Basic Motion > Motion Path.

Topic $TipTopic

Most Motion effects that involve movement have a Speed setting that determines if and how the speed of that movement changes over time.

For example, the screen shot illustrates the eight options for modifying the speed of the Motion Path behavior.

  • Constant. The object’s speed remains constant for the entire duration of the effect.
  • Ease In. The object’s speed decreases as it approaches a keyframe or end of the effect.
  • Ease Out. The object’s speed increases as it leaves a keyframe or the beginning of the effect, then maintains a steady speed thereafter.
  • Ease Both. The object speeds up leaving a keyframe or the start of the effect, maintains a steady speed in the middle, then slows down as it approaches a keyframe or the end of the effect.
  • Accelerate. The object’s speed continually increases over the duration of the effect.
  • Decelerate. The object’s speed continually decreases over the duration of the effect.
  • Natural. The speed at which the object moves over the path is determined by the shape of the path. For example, if the path is a U-shape curve, the object moves faster as it moves toward the low point of the U and slower as it moves up the edges.
  • Custom. This allows setting keyframes to adjust speed over the duration of the effect.

Please rate the helpfulness of this tip.

Click on a star to rate it!

… for Apple Motion

Tip #1093: Audio is Motion’s Achilles Heel

Larry Jordan – LarryJordan.com

Always trim an audio clip to end one frame earlier than the end of a fade.

The HUD displaying the arrow to select effects applied to an element.

Topic $TipTopic

Audio is Motion’s Achilles heel. The audio controls in Motion are terrible. However, here’s a trick that can bail you out when you are in a hurry and need to add an audio clip that’s longer than your project.

Motion works best when you add a complete soundtrack, then edit to that, rather than trying to combine multiple audio elements. However, sometimes you need to add an audio fade to the end of a project. Except, every time you do, the audio either doesn’t fade or it fades then pops at the end. What’s going on?

The problem is that effects and audio are separate clips and, most often, their timing doesn’t match. Here’s what you need to do.

  1. Add an audio clip to your project
  2. Go to the Audio tab at the top of the Layers panel and select the audio clip. This displays it in the mini-timeline.
  3. Position the playhead where you want the audio to end and set an Out (type “O“).
  4. With the audio clip still selected, apply Behaviors > Audio > Audio Fade In / Fade Out.
  5. Display the HUD. If the fade controls are not displayed, click the small up/down arrow to the right of the HUD title (see screen shot) and select the effect.
  6. Adjust the duration of the fade out as needed.
  7. Finally, and this is the important step, make SURE the Out of the fade is one frame LONGER than the Out of the audio clip.

Modifying the timing of both the effect and the clip assures the fade will be heard, the audio will disappear and there will not be a pop at the end.


Please rate the helpfulness of this tip.

Click on a star to rate it!