… for Apple Motion

Tip #1094: Secret Spinning

Larry Jordan – LarryJordan.com

Pressing the Shift key, while dragging, constrains the axis to 45° increments.

The Spin behavior with the inner circle constrained to a 45° angle.

Topic $TipTopic

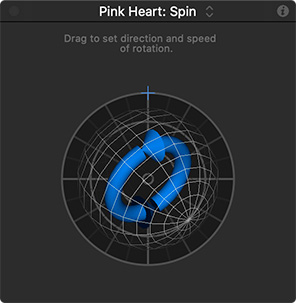
Spin is a very popular Behavior that gets elements in a Motion project to spin! (I know, I know, who would have guessed…?)

What you may not know is that there is a hidden keyboard shortcut that helps you make the most of this move.

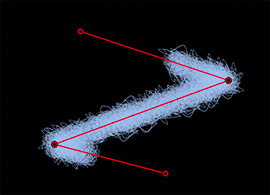
Dragging the outer circle determines the direction and speed of the spin. (For example, dragging a 90° arc means that the selected element will rotate 90° over the duration of the effect.)

Dragging the inner blue circle changes the axis of the spin.

Here’s the secret: Press the Shift key while dragging that inner circle to constrain the axis to 45° increments. This makes it very easy to rotate an element exclusively on, say, the Y axis.

I use this technique frequently, for example, when I want to apply perspective to text by rotating just on the Y axis.


Please rate the helpfulness of this tip.

Click on a star to rate it!

… for Apple Motion

Tip #1095: Playful, More Effective, Colors

Larry Jordan – LarryJordan.com

Texture and color variations improve almost every element. Gradients can help.

The gradient color options, with the results of this setting displayed below.

Topic $TipTopic

Coloring an element is something we do all the time. But, it is often much more interesting to color using gradients. Here’s how.

  • Select an element in the Layers panel. (White elements work best, but almot any color element can be used.
  • Apply Filters > Color > Gradient Colorize.
  • In Inspector > Filters > Gradient Colorize, select your own colors, or choose an existing style (menu at the top red arrow in screen shot).
  • Play with the lower controls and watch how they change the look of the gradient (lower red arrow in screen shot).

NOTE: If the colors in the original element interfere with the gradient, apply Filters > Color > Hue/Saturation, then remove all the saturation to convert the element to grayscale before applying the gradient.

EXTRA CREDIT

The only control missing from this effect is the ability to rotate the gradient so that it could flow from a different direction than simply the top.


Please rate the helpfulness of this tip.

Click on a star to rate it!

… for Apple Motion

Tip #1084: Effects Playground: Time Tunnel

Larry Jordan – LarryJordan.com

This is a fun, fast and fascinating effect, with lots of opportunities to play.

The “worm hole” effect described in this article.

Topic $TipTopic

Ever wanted to travel through a worm hole? Now you can – and Motion creates it. (This looks better when it is moving than as a still.)

Here’s how to create this:

  • Drop Generators > Cellular into the Viewer.
  • Select the Cellular element, then, in Inspector > Generator change:
    • Gradient change the color on the right. (You can use any other color scheme you like.)
    • Size: 3
    • Speed: 0.5
  • With the Cellular element selected, apply Filters > Stylize > Slit Tunnel. Then, in Inspector > Filters, change:
    • Speed: 5
    • Perspective: 0.3
    • Glow: 0.02
    • Change the glow color to radioactive green.

Done.

EXTRA CREDIT

  • Position and/or animate the center of the tunnel elsewhere in the frame.
  • Replace Slit Tunnel with Slit Scan and watch what happens.

Please rate the helpfulness of this tip.

Click on a star to rate it!

… for Apple Motion

Tip #1085: What’s a Replicator?

Larry Jordan – LarryJordan.com

Replicators create patterns from one or more shapes.

A spiral replicator with the Oak color gradient pattern applied.

Topic $TipTopic

A Replicator creates a pattern from a single object or a group of objects. Traditionally, we think of a pattern as a rectangle, but, in Motion, we have a lot more options.

Replicators can be use to repeat a logo to fill the screen as the background for text, or creating interesting patterns, or, well, just about anything, really.

NOTE: A key difference between particles and replicators is that particles have a “life,” the duration that a particular particle is displayed on screen. Replicated objects “live” forever.

Replicators can take different shapes, including:

  • Point
  • Line
  • Rectangle
  • Circle
  • Burst
  • Spiral (see screen shot)
  • Wave
  • Or a custom geometric form

Replicators can also change color across the pattern, as this screen shot illustrates.

EXTRA CREDIT

Animate Replicators by applying Behaviors > Replicator > Sequence Replicator

.


Please rate the helpfulness of this tip.

Click on a star to rate it!

… for Apple Motion

Tip #1086: Turn on Motion’s Grid

Larry Jordan – LarryJordan.com

Grids don’t export, but they do help you align objects more easily.

Motion’s grid (top) with the preference settings that adjust it.

Topic $TipTopic

Motion has a grid you can use to align elements. Here’s how to turn it on, then configure it for your next project.

To display the grid, choose View > Overlays > Grid (or select it from the View menu in the top right corner of the Viewer.)

To modify the grid, go to Motion > Preferences > Canvas (illustrated in the screen shot) where you can adjust grid spacing and color.


Please rate the helpfulness of this tip.

Click on a star to rate it!

… for Apple Motion

Tip #1059: Animate a Line

Larry Jordan – LarryJordan.com

Write on animates borders attached to lines, paths and paint strokes.

The Draw and Erase setting applied to a path using the Write On behavior.

Topic $TipTopic

This is a fun and fast way to animate any path, line or paint brush in Motion using the Write On behavior. Even better, you can animate a line to draw, erase, or draw then erase itself. Here’s how this works:

  • Using the Pen or Paint Brush tool, draw a path in Motion.
  • With the path selected, choose a border from the HUD (Option + Cmd + L) or Inspector > Object. The border needs a width greater than 0.

NOTE: Personally, I prefer applying Shape Styles, but these, too, need a wider border value.

  • With the path element still selected in the Layers panel, choose Behaviors > Shape > Write On. This animates the border starting at the beginning of the path.
  • Adjust the Offset value to change where drawing the border starts.

This technique is great at creating animated travel lines for a map, or calling attention to a moving object.

EXTRA CREDIT

  • Change the duration of the Write on behavior to change it’s speed.
  • Select the Write on behavior, then, in Inspector > Behaviors, change the menu from Draw to Erase. This animates the removal of the border, Or Draw and Erase, which draws it on, then draws it off.

Please rate the helpfulness of this tip.

Click on a star to rate it!

… for Apple Motion

Tip #1060: Shape Styles Are Magic

Larry Jordan – LarryJordan.com

Shape styles can be applied to any element that allows a border.

The Shape Styles menu in the HUD.

Topic $TipTopic

Any shape, path or element that supports a border can have its boring white border replaced with one of hundreds of much more interesting styles. Here’s how.

  • Select a shape, path, paint stroke or any object that supports a border.
  • Display the HUD (Option + Cmd + L).
  • At the bottom of the HUD, click the Shape Style menu to display over 100 colors, textures, object, lights and fluids that can be applied to the border itself. (See screen shot.)
  • The border width determines the size of these styles.

I have many favorites in lights, textures and abstract.


Please rate the helpfulness of this tip.

Click on a star to rate it!

… for Apple Motion

Tip #1061: Create HDR-compatible Projects in Motion

Larry Jordan – LarryJordan.com

Motion can easily create HDR projects. You just need to change two settings.

The Color Space menu in File > Share > Settings.

Topic $TipTopic

We can create HDR-compatible projects in Motion by changing only two settings. Here’s what you need to know.

You can choose between two basic color spaces in Motion: Standard and wide gamut HDR.

NOTE: Wide gamut HDR refers to a greater range of colors and color saturation. It does not determine pixel brightness.

To work in a wide gamut HDR color space, also called Rec. 2020, you must first configure two settings. First:

  • Select the Project in the Layers panel.
  • Go to Inspector > Properties and change Color Processing to Wide Gamut HDR.

Next, when the project is complete and you are ready to export:

  • Choose File > Share.
  • In the Settings panel, change the Color Space setting to either Rec. 2020 HLG or Rec. 2020 PQ – depending upon what your distributor requires.
  • NOTE: Don’t use Rec. 2020 – it is an outdated setting.

    This setting determines the color of images you see in the canvas, as well as the color space and appearance of your exported project (the output media file). “Use canvas setting” matches the current project. Instead, set render color space to HDR Rec. 2020 HLG or HDR Rec. 2020 PQ if you intend to export an HDR movie when you complete the project

    The color-processing setting may affect the appearance of your final render. For example, when the project is changed from Standard to Wide Gamut HDR, the effect of some filters or blend modes may change in appearance.

    EXTRA CREDIT

    Remember, we can not use computer monitors to view HDR material. We need to use external, HDR video displays. Computer monitors are not accurate.


    Please rate the helpfulness of this tip.

    Click on a star to rate it!

    … for Apple Motion

    Tip #1045: Bug Fixes in Two Recent Updates

    Larry Jordan – LarryJordan.com

    The Motion update is free and available in the Mac App Store.

    Topic $TipTopic

    Two recent updates to Motion 5 fixed a lot of bugs. Here’s what’s fixed in these two updates.

    10.4.10 UPDATE

    • Fixes an issue in which XAVC media from the Sony PXW-FX9 camera is not recognized.

    10.4.9 UPDATE

    In addition to adding 3D Objects and the new Stroke filter, this Motion update:

    • Adds square and vertical presets to the Display Aspect Ratio Snapshots in the Project Inspector.
    • Fixes an issue that prevented image masks from responding to opacity changes made to a source object.
    • Improves performance when working with particle emitters.
    • Fixes an issue with the Align To behavior and scrolling text.
    • Fixes a stability issue after switching to Cinema Layout.
    • Fixes a stability issue during playback with Dynamics turned on in the Advanced Pane of the Shape Inspector.
    • Fixes an issue in which still images might be exported with the incorrect color space.
    • Fixes an issue in which the Spirals Generator rendered incorrectly.

    Please rate the helpfulness of this tip.

    Click on a star to rate it!

    … for Apple Motion

    Tip #1047: Create a Vertical Video Project

    Larry Jordan – LarryJordan.com

    Square and vertical video require custom settings in Project > Properties.

    The Inspector > Properties settings you need to change for vertical video.

    Topic $TipTopic

    Since the beginning of television, video used a horizontal aspect ratio. Since the beginning of cell phone photography and video, mobile users shot vertical video.

    Sigh…. Drives all us old-school video people nuts!

    Still, you gotta change with the times. Here’s how to create a vertical video project in Motion.

    • Create a new project using the Motion Project Browser. Since Motion always creates images at the highest possible quality, it doesn’t matter which setting you pick.
    • Once the project opens, select Project in the Layers panel (It’s named “Project.”)
    • Enter the Width and Height values, in pixels, of the new project. (These will generally be 720 x 1280 or 1080 x 1920.
    • Make sure Pixel Aspect Ratio is set to Square.
    • Set the Duration to whatever length you need.

    EXTRA CREDIT

    We can’t save project presets, so you’ll need to do this for each project. However, you can save the entire project as a template: File > Publish Template.


    Please rate the helpfulness of this tip.

    Click on a star to rate it!