… for Apple Motion

Tip #1783: Animate the Background of a Title

Larry Jordan – LarryJordan.com

An animated background calls even more attention to the foreground title.

The Title Background animates over a particle system and animated title.

Topic $TipTopic

Normally, when we add a title to a video, we want the background video to remain stationary. But, there’s no rule that says it must.

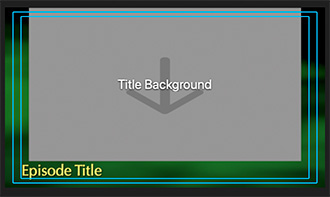
When you create a title using Motion, Apple displays a special kind of drop zone (or placeholder) called “Title Background.”

This placeholder is automatically filled with whatever video is located under the title. (All other drop zones require you to specify the video you want inside it using the Inspector.)

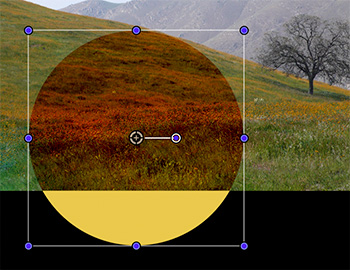
Well, though this placeholder automatically fills with the background video, you can still animate it. For example, in the screen shot, it starts full screen, then, using keyframes, I scale it to 85% and raise it up so that the title slides in underneath, floating over the Simple Background particle system.

Once you realize that you can animate the background as well as the foreground of a title, there’s no end to the creative opportunities.


Please rate the helpfulness of this tip.

Click on a star to rate it!

… for Apple Motion

Tip #1784: Function Keys Make Motion Move

Larry Jordan – LarryJordan.com

I use these F-keys in every Motion project.

This preference is off by default. Find it in System Preferences > Keyboard > Keyboard.

Topic $TipTopic

Not all Mac keyboards support Function keys (called: “F-keys”). But, for those that do, Motion has built in F-key shortcuts. Here’s what they do.

  • F1. Show Inspector > Properties
  • F2. Show Inspector > Behaviors
  • F3. Show Inspector > Filters
  • F4. Show Inspector > Selected object
  • F5. Show/Hide Project pane
  • F6. Show/Hide Timeline
  • F7. Show/Hide HUD
  • F8. Toggle Viewer full-screen
  • F9. Show/Hide Background Tasks window
  • F10. Output to VR headset

EXTRA CREDIT

F-keys are not enabled by default. To turn them on go to: System Preferences > Keyboard > Keyboard and check the check box illustrated in the screen shot.

Laptops and some smaller keyboards have an Fn key in the lower left corner. Press this while typing a number to emulate pressing an F-key.


Please rate the helpfulness of this tip.

Click on a star to rate it!

… for Apple Motion

Tip #1766: Quickly Create False Colors

Larry Jordan – LarryJordan.com

Difference creates a surreal, intense color effect

Blend modes are set using Inspector > Properties. The lower arrow indicates where.

Topic $TipTopic

Motion, like many graphics applications, includes a variety of blend modes to provide more dynamic blending between objects; especially moving objects. Difference is a rarely-used blend mode that creates eye-catching effects.

Difference displays the arithmetic difference between overlapping color objects. In general, I’ve found it creates a surreal, intense color effect.

The cool thing about Difference is that the colors change depending upon both foreground and background colors. As well, colors animate as objects move around the frame.

To apply the effect, select the foreground object in the Layers panel. Then go to Inspector > Properties and change Blend Mode to Difference.

If you haven’t played with this recently, it’s worth taking the time to experiment.


Please rate the helpfulness of this tip.

Click on a star to rate it!

… for Apple Motion

Tip #1767: Multiply Makes Luma Keys Easy

Larry Jordan – LarryJordan.com

Multiply superimposes dark areas while removing lighter areas – automatically.

Foreground (top), background (middle), combining the two using Multiply. (Image courtesy Wewe Yang, Pexels.com.)

Topic $TipTopic

Multiply is a blend mode that drops out a white background while superimposing the darker portions of the image on a background.

It’s like a very fast luma key without having to make any adjustments. Here’s how it works.

In the Layers pane, stack the element with a white background on top of the background image.

Select the foreground image and go to Inspector > Properties and set Blend Mode to Multiply.

There’s nothing to adjust. Light areas are removed and darker areas are superimposed – instantly. The screen shot illustrates the process.

NOTE: The black edges in the top screen shot are from the Motion background, they are not part of the signature image itself. (The signature is Benjamin Franklin.)


Please rate the helpfulness of this tip.

Click on a star to rate it!

… for Apple Motion

Tip #1768: Color Burn Makes Colors More Intense

Larry Jordan – LarryJordan.com

Use Color Burn to intensify darker colors.

The Color Burn blend mode makes darker colors more intense.

Topic $TipTopic

Color Burn is a blend mode that intensifies the dark areas in two superimposed images.

Before you read the description below, taken from Apple’s Help, look at the screen shot.

Whites in the background image replace the foreground image, while whites in the foreground image become transparent. Midrange color values in the background image allow midrange color values in the foreground image to show through. Lighter midrange color values in the background image allow more of the foreground image to show through. Darker midrange values in all visible overlapping areas are then mixed together, resulting in intensified color effects.

To apply this effect:

  • Select the foreground element in the Layers pane.
  • Go to Inspector > Properties and apply the Color Burn option in the Blend Mode menu.

The order of two layers affected by the Color Burn blend mode is important. In the screen shot, the yellow sun is foreground.


Please rate the helpfulness of this tip.

Click on a star to rate it!

… for Apple Motion

Tip #1746: Create an HDR Project in Apple Motion

Larry Jordan – LarryJordan.com

Creating an HDR project requires changing three settings.

An edited version of the Inspector showing the location of the Color Processing menu and an HDR image.

Topic $TipTopic

Creating an HDR project in Motion requires changing three settings. However, those settings are pretty well hidden. Here’s how to do it.

SET COLOR PROCESSING

By default, all Motion projects are set to HD (Rec. 709) color space. We need to change this first.

  • Select the Project in the Layers pane.
  • Go to Inspector > Properties and change the Color Processing menu from Standard to Wide Gamut HDR.

SET RENDER PROCESSING

This setting determines the color of images you see in the canvas, as well as the color space and appearance of your exported project (the output media file) when “Use canvas setting” is selected in the Settings pane of the share window.

  • Go to the View menu in the menu bar, then select Render Color Space.
  • From this menu, select the video format of your project. In my example, I set this to HDR Rec. 2020 HLG, which matches my media.

NOTE: If your media does not match your project, you’ll need to convert it using HDR Tools.

SWITCH NON-HDR MONITORS TO TONE MAPPING

  • If you have a Pro Display XDR monitor, you are done.
  • If you are using your Mac display, which does not display HDR media, go to the View menu in the menu bar at the top and check Show HDR as tone mapped.

NOTE: This View menu option is only enabled when the Project is set to Wide Gamut HDR.

You have now created an HDR project and allowed HDR media to be displayed accurately on the Mac monitor. This is still HDR media, however, so exporting video from this project won’t look good on a non-HDR monitor.

EXTRA CREDIT

While this allows Motion to display and export HDR media, you will probably still need to apply Filters > Color > Levels to adjust the gray scale values to your liking. In other words, these steps get you close, but you’ll need to go through a color grade before you are ready for final output.


Please rate the helpfulness of this tip.

Click on a star to rate it!

… for Apple Motion

Tip #1748: Use HDR Media in an HD Motion Project

Larry Jordan – LarryJordan.com

The “secret sauce” is HDR Tools.

Using HDR HLG media in an HD project, the Levels filter (top), HDR Tools (middle) and the corrected image.

Topic $TipTopic

Apple Motion supports HDR media, both for HDR and HD projects. Here’s how to use HDR media in an HD (Rec. 709) project.

The secret is HDR Tools.

By default, all Motion projects are Rec. 709 (HD). To change this:

  • Add your video into a Motion project.
  • Select the video in the Layers pane and choose Filters > Color > HDR Tools.

NOTE: Your video will not look perfect after applying this filter, but it should look better.

  • In Inspector > Filters > HDR Tools, select the conversion that most closely resembles your footage using the Mode menu. In my example, I’m working with HLG footage and converting it to Rec. 709.
  • Again, with the video selected in the Layers pane, choose Filters > Color > Levels. Adjust the Levels so that your video looks good in the Viewer.

NOTE: These adjustments are why I wish Motion provided video scopes so we could set levels properly.

Notice that HDR Tools is applied first, then the Levels filter is added.

The lower image in the screen shot shows an HLG HDR image with HDR Tools applied, then Levels were adjusted to create the finished gray scale.

Here’s an Apple KnowledgeBase article on using HDR Tools.


Please rate the helpfulness of this tip.

Click on a star to rate it!

… for Apple Motion

Tip #1749: When to Use HDR Tools in Apple Motion

Larry Jordan – LarryJordan.com

HDR Tools is only necessary when your HDR media does not match your project.

HDR Tools applied to a clip, illustrating the Mode menu contents.

Topic $TipTopic

HDR Tools is a filter that exists for both Final Cut Pro and Motion that converts HDR media into different formats. For example (see screen shot), you will need to apply Filters > Color > HDR Tools when:

  • You import HDR media into a Rec. 709 project.
  • You import HDR HLG media into a HDR PQ project.
  • You import HDR PQ media into an HDR HLG project.

NOTE: By default, HDR Tools is set for HDR to Rec. 709. While that sounds benign, it is not a good option. You will always get better quality by selecting the specific format of your HDR media (HLG or PQ).

The screen shot illustrates the options in the Mode menu.

EXTRA CREDIT

If you don’t know the format of your HDR media, BE SURE!! to find out before you start editing. The differences between HLG and PQ are significant.


Please rate the helpfulness of this tip.

Click on a star to rate it!

… for Apple Motion

Tip #1714: Apple Updates Motion

Larry Jordan – LarryJordan.com

This release is all bug fixes, no new features.

The Motion logo, along with the latest version number.

Topic $TipTopic

Last week, as part of updates to all their media applications, Apple updated Motion to version 5.5.2. All of the changes listed by Apple are bug fixes, no new features were announced.

Here’s the complete list of fixes, as released by Apple:

  • Fixes an issue in which a 3D object would render with incorrect brightness on Mac computers with Apple silicon.
  • Fixes an issue in which Motion could quit unexpectedly when closing a project after export.
  • Fixes an issue in which emoji would render incorrectly in an HDR project.
  • Fixes an issue in which Motion could quit unexpectedly when closing the application with the HUD open.
  • Fixes an issue in which Motion could quit unexpectedly when adjusting the opacity of a gradient using the onscreen control.
  • Fixes an issue in which Motion would quit unexpectedly when dragging media or an object into a USDZ media well.

Here’s a link to Apple’s Release Notes for Motion.


Please rate the helpfulness of this tip.

Click on a star to rate it!

… for Apple Motion

Tip #1718: The New Stroke Filter in Motion

Larry Jordan – LarryJordan.com

This creates borders ranging from tacky to lovely. It is highly flexible and fun!

A heart shape with an ice blue outline gradient using the Stroke filter.

Topic $TipTopic

One of the new features in Apple Motion is the Stroke filter. This creates lovely border effects around shapes.

  • To experiment with this, add a shape to a Motion project. (In this example, I used a heart.)
  • Select the layer containing the shape.
  • Choose Filters > Border > Shape. By default, a red border appears. Not to worry, we’ll change it next.
  • Go to Inspector > Filters > Stroke.
  • Change the Stroke Type to Outline Gradient. This causes the gradient to radiate out from the center of the element, rather than circularly around the shape.
  • Now, start tweaking: colors, width, position, fades… the works.

This creates border effects ranging from tacky to lovely. It is by far the most flexible border effect in Motion.


Please rate the helpfulness of this tip.

Click on a star to rate it!