… for Apple Motion

Tip #671: Combine Behaviors and Keyframes

Larry Jordan – LarryJordan.com

Combining keyframes with behaviors is an easy way to create unusual effects.

A keyframed Motion Path, with the Randomize parameter behavior.

Topic $TipTopic

This tip originally appeared as an Apple KnowledgeBase article. This is an excerpt.

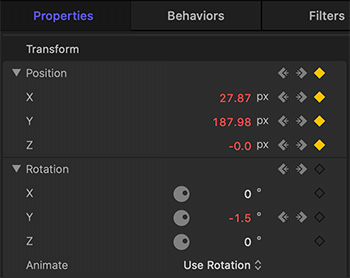
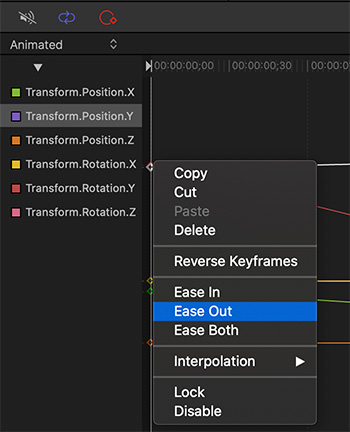
Any object can have behaviors and keyframes applied to it simultaneously. When this happens, the values generated by the behavior and the keyframed values applied to the parameter are combined. For example, if you create an animation path using keyframes, you can create a completely predictable and smooth movement.

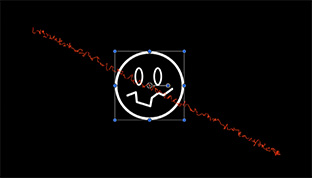
However, if you apply the Randomize parameter behavior to the same object, its effect combines with the keyframed motion path you created. As a result, the animation path follows the general direction you want, with random variation in it to make it interesting.

Although this example discusses how you can combine behaviors and keyframes to create animation paths, you can combine behaviors and keyframes for any parameter.

EXTRA CREDIT

The article, linked above, has more details and examples.


Please rate the helpfulness of this tip.

Click on a star to rate it!

… for Apple Motion

Tip #672: Checkbox Widget in Motion

Larry Jordan – LarryJordan.com

Checkboxes provide an easy way to enable or disable a setting in a Final Cut Pro X template.

The Checkbox rigging control panel.

Topic $TipTopic

This tip originally appeared as an Apple KnowledgeBase article. This is an excerpt.

Checkboxes are a control structure, created in Motion, that allow an editor in Final Cut to toggle something on or off.

Checkbox widgets allow you to switch between two snapshots—that is, between two sets of parameter states. Typically, checkbox widgets are used to create an on/off type of effect, although you can store any parameter states in either snapshot, creating more of a toggle effect.

The activation checkboxes in the Rig Inspector and in the Layers list (beside the checkbox widget) have no effect on the constituent parameters of the checkbox.

Checkbox widgets contain the following controls in the Rig Inspector and Widget Inspector:

  • Checkbox: Use this widget control to switch between two snapshots (parameter states).
  • Edit Mode: Click the Start button to enable snapshot recording.

Checkboxes provide an easy way to enable or disable a setting in a Final Cut Pro X template.


Please rate the helpfulness of this tip.

Click on a star to rate it!

… for Apple Motion

Tip #661: Lock Text Height, But Not Width, in Apple Motion

Don Smith – www.donsmith.me

The secret is an almost-invisible dummy layer.

Note each line has a locked dummy field, containing the letter “g”.

Topic $TipTopic

Don Smith writes:

I create templates in Motion for use in Final Cut Pro X. I needed a way to lock the height of a text box vertically to accommodate a descender character, but not horizontally.

I duplicated the line, left its position unchanged, and, in the lower layer, I put a ‘g’ in it and turned its opacity to zero. However, at zero opacity, the character disappeared and the vertical size of the text box collapsed.

Instead, I found, an opacity setting of .01 made the character stay, but it remained invisible which allowed me to lock the height of the dummy text box.

I then locked the dummy layer.

Because the user could only use the visible duplicate, now it doesn’t matter if the visible text box in the same position as the dummy gets a character with a descender or not. The visible line, being in the same position as the dummy that’s locked vertically, keeps the height of the enclosing folder locked and objects linked to that text, or its enclosing folder, can depend on the height of the text box to remain stable no matter what the user types into it.


Please rate the helpfulness of this tip.

Click on a star to rate it!

… for Apple Motion

Tip #663: Motion Cinema Workspace

Evan Fitzer

Control + Option + U displays the Cinema Layout. Control + U displays Classic.

Cinema view displays a larger Layers on the left and larger Inspector on the right.

Topic $TipTopic

Evan Fitzer writes:

First a quick note to let you know how much I enjoy these Inside Tips. So nice to have them in my inbox each morning. My tip isn’t really a tip, per se. Just pointing out that Motion has two different UI layouts available. The Classic Layout, and Cinema Layout.

  • Select: Window > Window Layout > Classic/Cinema (shortcut: Control + Option + U).

I now use the Cinema layout almost exclusively. I find it more balanced and pleasing to the eye. As well, I think it’s more intuitive and easier to navigate. In the end though, it really comes down to personal preference.

Larry adds: OOH! I like this a lot! This puts Layers on the left and the Inspector on the right. I had forgotten this!


Please rate the helpfulness of this tip.

Click on a star to rate it!

… for Apple Motion

Tip #665: B-spline Masks

Larry Jordan – LarryJordan.com

The key to the B-spline is feathering and mask blend modes.

A B-spline mask, using a subtraction blend mode with feathering.

Topic $TipTopic

There are five different masks in Apple Motion. The B-spline mask is probably the most misunderstood.

B-spline masks always create curves. (A Bezier mask, on the other hand, can create corners or curves.)

Where B-splines get interesting, however, is when you start changing the Mask Blend Mode. You modify these by selecting the mask, then going to Inspector > Mask. There are four choices:

  • Add: Adds the mask to the alpha channel (the default setting). This is useful for adding back regions of an image that other masks are cutting out.
  • Subtract: Subtracts a mask from the alpha channel. This is useful for creating holes in the middle of layers, or for masking out additional regions of an image that are untouched by other masks.
  • Replace: Replaces the layer’s original alpha channel, as well as any other masks applied to the same layer that appear underneath the current mask in the Layers list, with the current mask. You can add masks above, set to whatever blending mode you like.
  • Intersect: Masks out all regions of the layer that do not overlap the mask itself (but does not replace a layer’s original alpha channel). This includes other masks applied to the same layer that appear nested underneath the intersecting mask in the Layers list.

The final mask is the combined result of all image masks applied to the layer.

EXTRA CREDIT

Remember, you can combine different masks to the same layer to allow you to select very specific, non-geometric shapes.


Please rate the helpfulness of this tip.

Click on a star to rate it!

… for Apple Motion

Tip #643: Change the Default Settings of an Effect

Larry Jordan – LarryJordan.com

The rigging, elements and effects in the Aged Paper effect, displayed in Motion.

Topic $TipTopic

Virtually all the effects in Final Cut Pro X were first created in Motion and saved as a template for Final Cut Pro X. This means that, in many cases, if you don’t like the default settings, they are easy to change.

For example, these are the settings for Aged Paper. You can change the look itself by adjusting elements on each layer.

However, if all you need is to adjust a default setting:

  • Twirl down Rig.
  • Select one of the widgets, like Mask Size.
  • Go to Inspector > Widget and adjust the settings to suit.
  • Save the file, give it a name that reflects your changes and save it in a category that makes sense to you.

Done.


Please rate the helpfulness of this tip.

Click on a star to rate it!

… for Apple Motion

Tip #648: Keyframe a 3D Move

Larry Jordan – LarryJordan.com

Once you set a keyframe, whenever you change a parameter, a new keyframe is set.

Position and rotation keyframes are set in Inspector > Properties for the selected element.

Topic $TipTopic

Behaviors make it easy to animate text. But, many times, the behavior is just too manic – especially for 3D text. In those situations, keyframes are a better choice. Here’s a quick technique.

Keyframes are set in the Inspector. You can use the Record Keyframe control (the big red circle below the Viewer) but, I find that sets too many keyframes which makes editing harder.

Instead, to animate position or rotation:

  • Position and rotate the element to its starting position.
  • Position the playhead in the mini-timeline where you want to set the first keyframe.
  • Go to Inspector > Properties.
  • Twirl down Position and Rotation to review additional X, Y, and Z axis controls.
  • NOTE: I find Y-axis rotation to be the most effective way to display 3D text.

  • Click one of the gray gray diamonds. Gray diamonds indicate frames without a keyframe. Gold diamonds indlcate a rame with keyframes.
  • Change the position of the playhead (FIRST!) then reposition the element. New keyframes are created automatically.
  • Repeat until the move is complete.

EXTRA CREDIT

  • Move between keyframes by clicking the left / right arrows in the Properties panel.
  • To change a keyframe, position the playhead on the frame you want to change, then reposition the element. Keyframes are modified automatically.

Please rate the helpfulness of this tip.

Click on a star to rate it!

… for Apple Motion

Tip #653: Adjust Keyframe Landing Speed

Larry Jordan – LarryJordan.com

Ease In/Out Behavior can be changed in the Keyframe Editor

Control click any keyframe in the Keyframe timeline to display timing options.

Topic $TipTopic

Normally, keyframes move at a linear rate. However, this can be altered. Here’s what you need to know.

To adjust the speed with which animation approaches or leaves a keyframe:

  • Display the Keyframe Editor (Window > Keyframe Editor)
  • Control-click any keyframe and choose:
  • Ease In to slow animation as it approaches a keyframe.
  • Ease Out to accelerate from a keyframe
  • Ease Both to slow as animation approaches a keyframe and accelerate animation as it leaves it.

For additional control, experiment with the options in the Interpolation menu.

NOTE: Keyframes must be applied before they can be modified.


Please rate the helpfulness of this tip.

Click on a star to rate it!

… for Apple Motion

Tip #620: Clone vs. Copy in Apple Motion

Larry Jordan – LarryJordan.com

Clones simplify syncing style changes.

Control-click any layer and choose Make Clone Layer.

Topic $TipTopic

I just discovered clones in Motion recently. Clones are an easy way to make multiple elements all look the same and change their look in sync with each other.

Create an element and make of copy of it. These become independent elements. When you change the color of one, it doesn’t affect the other.

Clones, though, are different. Clones are EXACT style and geometry replicas of the original. While you can apply different effects and transform settings to each, all the options in Inspector > Shape disappear for a clone.

When you change any of the Style or Geometry settings of the master, they are instantly reflected in the clone. And you can’t change the color or geometry of a clone – the options themselves don’t exist.

The more you play with this, the more ways you’ll find to use it.

EXTRA CREDIT

To create a clone, control-click an element in the Layer panel and choose Make Clone Layer (shortcut:K).


Please rate the helpfulness of this tip.

Click on a star to rate it!

… for Apple Motion

Tip #627: Use Replicators for Repeating Effects

Larry Jordan – LarryJordan.com

Replicators duplicate and animate objects.

Replicator controls, along with keyframes for Offset.

Topic $TipTopic

This is a tip where I’m giving you a recipe, but you will need to figure out the ingredients.

Replicators are a little-used behavior in Motion. Replicators take elements, which could be anything from a simple line to a logo, duplicate it and, depending upon the settings you apply, animate it.

You can see examples of these in Library > Replicators.

However, you can also create your own:

  • Import a logo or use elements from the Library.
  • Click the Replicate button in the top right of the Motion interface.
  • Go to Inspector > Replicator and play with the Replicator Controls.
  • One way to animate this is to apply two keyframes to Offset. Put the first keyframe at the start of the project and the last keyframe on the last frame of the project. If the Offset amount is a multiple of 100%, the animation will seamlessly loop as the project repeats.
  • For other animation, apply Behaviors > Replicator > Sequence Replicator.

The controls are simple – but, depending upon what you are replicating, the results could be very interesting!


Please rate the helpfulness of this tip.

Click on a star to rate it!