… for Apple Motion

Tip #628: Cool, Pre-Built 3D Lighting Effects

Larry Jordan – LarryJordan.com

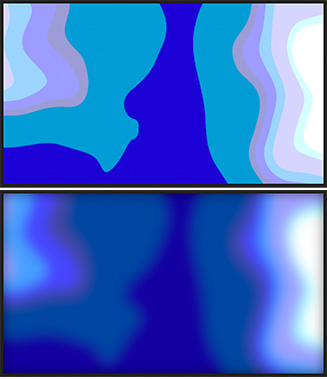
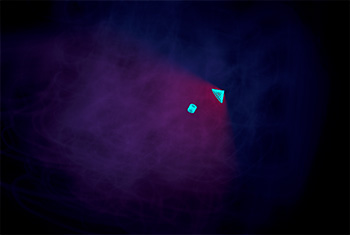
Lights can create very interesting backgrounds – especially with particles.

The Diagonal Left lighting setup, colored with blue and red lights and one light converted to Spot.

Topic $TipTopic

Motion has extensive lights and lighting controls available within the app. In fact, they are one of the few elements in Motion that fully exist in 3D space. But, while powerful, they also require an understanding of 3D space, which is confusing to many.

Here’s a way to get started with 3D lights, without causing your brain to explode.

In this example, we’ll apply lights to a particle cloud.

  • Create a new project.
  • Drag Library > Particle Emitters > Smoke > Rising Smoke into the center of the Viewer.
  • Click the 3D icon just to the left of the lock icon in the Layer’s panel to convert the layer from 3D to 3D.
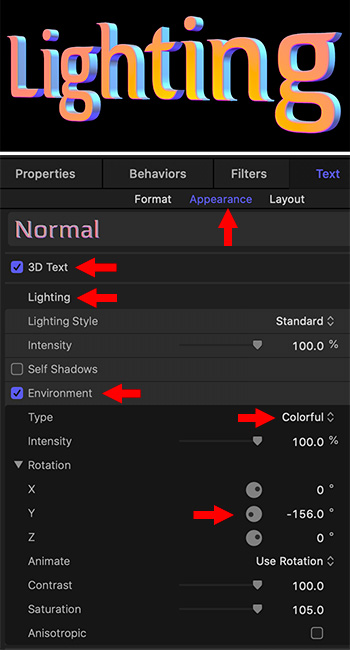
  • Go to Object > New Light Setup and apply any set of lights you like.
  • Select any light in the Layers panel, go to Inspector > Light and change its color, or type, or, anything. Watch what happens.

The particle system provides a cloud that picks up every light. Play and see what you discover.

EXTRA CREDIT

Each light can be animated for movement, color and direction. This is a great way to create a background for an infographic.


Please rate the helpfulness of this tip.

Click on a star to rate it!

… for Apple Motion

Tip #604: Fill Elements Fast in Motion

Larry Jordan – LarryJordan.com

Fill adds color or gradients to any selected element.

The original shape is on top, the filled gradient is on the bottom.

Topic $TipTopic

The Fill filter replaces an element in Motion with either a solid color or gradient. To use it:

  • Import or add any element that has an alpha channel (transparency). In this screen shot, I used a gadget called “Atom 01.”
  • Add Filters > Stylize > Fill
  • Go to Inspector > Filters and switch Color to Gradient, then pick your style or color range. In the screen shot, this is the Candy Corn style.

EXTRA CREDIT

Here’s the YouTube video this article was based on.


Please rate the helpfulness of this tip.

Click on a star to rate it!

… for Apple Motion

Tip #605: Add Motion Blur to Animation

Larry Jordan – LarryJordan.com

Smooth animation and reinforce movement with Motion Blur.

In Inspector > Properties for a Project set Samples and Shutter Angle.

Topic $TipTopic

Motion Blur smoothes animation and reinforces the illusion that an object is moving. Once your animation is complete, here’s what you need to do.

  • Select the project at the top of the Layers panel.
  • In Inspector > Properties set Samples to 16 and Shutter Angle to 180°
  • Finally, at the top right corner of the Viewer, in the Render menu, turn Motion Blur on.

NOTES

  • Increasing the shutter angle increases the amount of the blur.
  • Increasing the samples increases the quality of the motion blur, but also increases render time.

You won’t be able to play this in realtime unless you render the project, or export it and play the resulting movie.

EXTRA CREDIT

Here’s the YouTube video this article was based on.


Please rate the helpfulness of this tip.

Click on a star to rate it!

… for Apple Motion

Tip #606: Motion: Password Protect Still Frame Exports

Larry Jordan – LarryJordan.com

Secure PDFs are far smaller than media stills and excellent for emailing.

Select Save as PDF from the Print menu to create a secure PDF of a still frame.

Topic $TipTopic

It’s easy to export a still frame of a project using File > Share > Save Current Frame. But… what if you need to password protect that still frame so that only the people who need to see it can see it?

Simple. Watch.

What we are going to do is print a PDF of the current frame.

  • Choose File > Page Setup to set the page size.
  • Choose File > Print to print the current frame under the playhead.
  • In the Print window, choose Save as PDF from the PDF menu.
  • In the PDF window, click Security Options.
  • In the Security Options window, enable the level of security you need, then assign a password.
  • Click OK to accept all settings.
  • Give the file a name and storage location and click Save.

Done.


Please rate the helpfulness of this tip.

Click on a star to rate it!

… for Apple Motion

Tip #595: Create Unusual Borders in Motion

Larry Jordan – LarryJordan.com

Shape styles can be applied to any shape, and are control by Outline > Width.

A rectangle with a blue Traditional > Acrylic shape style applied.

Topic $TipTopic

You are probably familiar with using Fill and Outline for shapes. But there is a wealth of other edge options hiding in Shape Styles. After you draw a shape, or use the pen or paint brush tools to create a shape, select the shape using the Arrow tool.

NOTE: If you select a shape using the Shape tool, changes will affect the NEXT shape you draw, not the current one.

  • With the shape selected, check Outline, then enter a Width value of 10 or more.
  • Open the HUD (F7) and click Shape Style at the bottom. There you’ll find dozens of different styles from Traditional to Light, that can be applied to the edges of your shape.
  • Use Width to modify the width of the effect.

EXTRA CREDIT

Shape styles can only be applied to the edges of a shape drawn by the shape, pen or paint brush tools.


Please rate the helpfulness of this tip.

Click on a star to rate it!

… for Apple Motion

Tip #596: An Easy Way to Create a 3D Look

Larry Jordan – LarryJordan.com

By default, Motion elements are 2D.

Top red arrow: Switch from 2D to 3D. Middle arrow: Move an element back in space. Bottom arrow: Adjust rotation of element.

Topic $TipTopic

Motion provides a very easy way to create 3D effects, where one element passes through another. Best of all, it just takes one mouse click.

After creating the shapes you want:

  • Store them in the same folder. (This isn’t strictly necessary, but it makes things easier.)
  • On the right side of the group holding the shapes, click the 3 Shapes icon, indicated by the top red arrow. This switches the group from 2D to 3D.
  • Select an element, then go to Inspector > Properties and twirl down Rotation. Adjust the Y axis so the shape goes back from the front of the screen.
  • Twirl down Position and adjust Z position until one shape passes through the next.

Tweak Position and Rotation settings for all elements to get the look of the depth you want.


Please rate the helpfulness of this tip.

Click on a star to rate it!

… for Apple Motion

Tip #597: Create Striking Duo-Tone Images in Motion

Larry Jordan – LarryJordan.com

Threshold creates striking duo-tone images, which you can then colorize.

Threshold creates duo-tone images (top) from a full color image (middle) using the settings illustrated at the bottom.

Topic $TipTopic

If you want to create striking, duo-tone backgrounds, the Threshold filter in Apple Motion is exactly what you need.

The Threshold filter converts full-color images into stark, black-and-white images which you can then colorize using the same filter. The operation is simple:

  • Select an image. Then, apply Filters > Color > Threshold.
  • Instantly the image is a black-and-white duotone.
  • Next, select one of the two color boxes and adjust colors to suit. For me, the most effective color to adjust is the darker box.

The screen shot shows the results (top), source (middle), and the settings that got us there (bottom).


Please rate the helpfulness of this tip.

Click on a star to rate it!

… for Apple Motion

Tip #571: Useful Motion Keyboard Shortcuts

Larry Jordan – LarryJordan.com

300+ shortcuts organized and ready for you.

Topic $TipTopic

The folks at ShortCutWorld.com have compiled a list of 300+ keyboard shortcuts for Apple Motion and grouped them into 29 categories!

This is the most extensive list of shortcuts for Motion that I’ve seen in a long while.

Here’s the link.


Please rate the helpfulness of this tip.

Click on a star to rate it!

… for Apple Motion

Tip #581: Create Colorful Lighting for 3D Text

Larry Jordan – LarryJordan.com

Colorful lighting is one menu choice away, and you can customize it to suit.

A sample lighting effect and the settings that created the colors.

Topic $TipTopic

There’s a hidden lighting secret in Motion for 3D text that is worth learning: colored light! At the top of the screen shot is an example of lighting 3D text with colored light. Here’s how to create it:

  • Create any 3D text.
  • Select the text in the Layers panel.
  • Go to Inspector > Text > Appearance, then twirl down Lighting and enable Environments.
  • Show the contents of Environments by clicking the word Show to the right of the word “Environments.”
  • Change Type from Field to Colorful.
  • Change the Rotation to pick out the colors you like.
  • For more control, twirl down Rotation and modify each of the axes. The effect changes with each. I’ve found that changing X rotation creates some very dramatic underlighting.

When you get the look you want, ah, stop tweaking. The screen shot shows the settings I used to create the lighting effect at the top.

Done.


Please rate the helpfulness of this tip.

Click on a star to rate it!

… for Apple Motion

Tip #582: Make a Better Background

Larry Jordan – LarryJordan.com

Backgrounds, to be useful, need to be slow, dark and soft.

The Goo background before (top) and after (bottom) after effects are applied.

Topic $TipTopic

The problem I have with most of Apple’s default backgrounds is that they are too BRIGHT and too in-focus for text. Well, yeah, they are too busy, too.

Fortunately, this is easy to fix. Here are some ideas to try when you need to bring a background back under control. I’m going to work with Library > Content > Backgrounds > Goo, but you can pick anything.

  • It’s moving too fast. Select the Clouds layer inside Goo, then go to Inspector > Generator and change Speed to 0.07.
  • All the edges are waaay too sharp. This is because this effect is simply the Cloud generator with a Posterize filter applied. Select the Goo layer, apply Filters > Blur > Gaussian Blur and, in the Inspector, manually type in an Amount of 150.

NOTE: If you try to use the slider, it will stop at 64. Manually typing in numbers allows you to enter much larger values for almost every parameter.

  • It’s also too bright, so, with the Goo layer selected, apply Filter > Color > Levels and make sure it is placed below Gaussian Blur in the Layers panel. Adjust the mid-tone slider so that the background gets as dark as you need. If there’s a lot of light shades, pull down the highlights a bit, too.

NOTE: You could do something similar by adjusting Opacity, but that actually makes the background transparent. Levels makes it darker without adding transparency.

As with all effects, adjust the settings until you are happy. In the screen shot, the top image is “before,” the bottom image is “after.”


Please rate the helpfulness of this tip.

Click on a star to rate it!