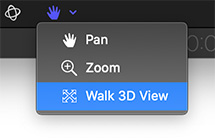
The Walk 3D View tool lets you position a camera in 3D space as you would in a computer game, using a keyboard-and-mouse navigation method.
In Motion, select a camera, click and hold the view tools pop-up menu in the canvas toolbar, then choose Walk 3D View. The pointer changes to indicate that the Walk 3D View tool is active.
Use the Up, Down, Right, or Left Arrow keys to move the camera in 3D space; press and hold the Option key while using the arrow keys to move the camera more slowly. You can also drag in the canvas to orient the camera.
NOTE: The Walk 3D View tool is available only when Active Camera, Camera, or Perspective is selected from the Camera pop-up menu.
Please rate the helpfulness of this tip.
Click on a star to rate it!
https://www.theinsidetips.com/wp-content/uploads/2019/09/Tips-Logo-700x150.jpg00Larry Jordanhttps://www.theinsidetips.com/wp-content/uploads/2019/09/Tips-Logo-700x150.jpgLarry Jordan2020-01-16 01:30:002020-01-16 01:30:00Tip #376: Use Walk 3D View to Position Cameras
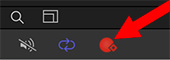
The Record Button simplifies adding keyframes to projects.
The Record Button in “add keyframe” mode.
This first appeared in an Apple KnowledgeBase article. There are two ways to apply keyframes in Motion: Automatically and manually. Here’s the automatic method – using the Record button.
Turn on the Record button (Shortcut: A), located at the bottom left of the Viewer, to create a new keyframe whenever you adjust any parameter. This method is useful when you want to create keyframes for multiple parameters in your project.
Here are the steps:
1. In Motion, do one of one following:
Click the Record button on the left side of the timing toolbar.
Press A.
Choose Mark > Record Animation.
The Record button is highlighted.
2. Select an object in the canvas, Layers list, or Timeline.
3. Drag the playhead to a new position in time.
4. Modify one or more parameters by doing any of the following:
Use the onscreen controls to move, scale, or manipulate objects.
Use the controls in the Inspector or HUD to move, scale or manipulate objects
NOTE:
Keyframes are added at the current playhead position for any parameters you modified.
5. Repeat steps 3 and 4 to add additional keyframes.
NOTE: As long as the Record button is enabled, any parameter modifications your make in your project are recorded as new keyframes. In the Inspector, all modifiable parameters are highlighted red to remind you that parameter changes are being recorded as keyframes.
Please rate the helpfulness of this tip.
Click on a star to rate it!
https://www.theinsidetips.com/wp-content/uploads/2019/09/Tips-Logo-700x150.jpg00Larry Jordanhttps://www.theinsidetips.com/wp-content/uploads/2019/09/Tips-Logo-700x150.jpgLarry Jordan2020-01-16 01:30:002020-01-11 07:23:30Tip #377: The Record Button Easily Adds Keyframes
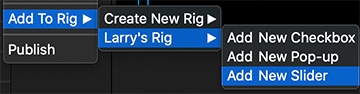
Rigging is the process of creating effect controls in Motion that can be used in Final Cut. Normally, you create a rig, then add a widget (effect control), then add one or more snapshots (settings for the widget).
A rig in Motion has no effect until it contains a widget with assigned snapshots (parameter states).
As an alternative to creating a widget using the buttons in the Rig Inspector, you can create a rig and a widget and then apply a parameter to the widget in a single step.
In Motion, do one of the following:
In the Inspector, click a parameter’s Animation menu (the down arrow that appears when you position the pointer over the right side of a parameter row), choose Add To Rig, choose a rig, then choose a widget type from the submenu.
Drag a parameter row from any Inspector pane to a rig object in the Layers list.
Dropping the parameter row immediately on the rig object creates a slider widget. Pausing briefly causes a drop menu to appear, allowing you to select the widget type you want to create.
A new widget appears in the Layers list, under its parent rig. In the Widget Inspector, the parameter you chose appears under the Edit Mode button, ready for snapshot assignment.
Please rate the helpfulness of this tip.
Click on a star to rate it!
https://www.theinsidetips.com/wp-content/uploads/2019/09/Tips-Logo-700x150.jpg00Larry Jordanhttps://www.theinsidetips.com/wp-content/uploads/2019/09/Tips-Logo-700x150.jpgLarry Jordan2020-01-09 01:30:002020-01-03 14:41:54Tip #325: Add a Widget and Parameter in One Step
To move a Motion project file to another computer, you must also move all media that the project uses, including all QuickTime, still image, and audio files. In addition, any third-party Motion plug-ins or nonstandard fonts used in the project must be installed on the new computer, or they’ll be unavailable to your project.
Similarly, when you finish a project and want to archive it, it’s a good idea to archive the project file and all media, graphics, fonts, custom behaviors, filters, and third-party add-ons used in the project. If you need to restore the project for later revisions, you’ll have everything you need to get started quickly.
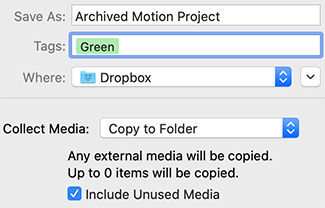
In Motion, save the project file using File > Save as, then choose the Collect Media option and collect all project media into a folder.
Copy the folder containing the saved project file and all media used in the project to another computer or location.
As you can see in this screen shot, archived projects can be saved anywhere.
NOTE: If you move a project to another computer without selecting the Collect Media option, media can go offline (even if you’ve manually moved the media files) due to broken links.
Please rate the helpfulness of this tip.
Click on a star to rate it!
https://www.theinsidetips.com/wp-content/uploads/2019/09/Tips-Logo-700x150.jpg00Larry Jordanhttps://www.theinsidetips.com/wp-content/uploads/2019/09/Tips-Logo-700x150.jpgLarry Jordan2020-01-09 01:30:002020-01-09 01:30:00Tip #343: Move Motion Assets to a Different Computer
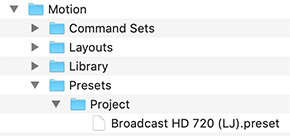
Each custom project preset you create (such as Broadcast HD 720) is saved as a separate file in your computer’s /Users/username/Library/Application Support/Motion/Presets/ folder. If you create custom presets that you rely on, you can move them to other computers that have Motion installed.
In the Finder, open your custom preset files stored in: [ Home directory ]/Library/Application Support/Motion/Presets/.
Copy a custom preset file (which has a .preset filename extension) to the new computer and store it in: [ Home directory ]/Library/Application Support/Motion/Presets/.
NOTE: If the Library folder is hidden, switch to the Finder, press and hold the Option key, then choose Go > Library.
Please rate the helpfulness of this tip.
Click on a star to rate it!
https://www.theinsidetips.com/wp-content/uploads/2019/09/Tips-Logo-700x150.jpg00Larry Jordanhttps://www.theinsidetips.com/wp-content/uploads/2019/09/Tips-Logo-700x150.jpgLarry Jordan2020-01-09 01:30:002020-01-03 14:39:52Tip #344: Copy a Motion Preset to Another Computer
Keeps moving objects pointing in the direction of their movement.
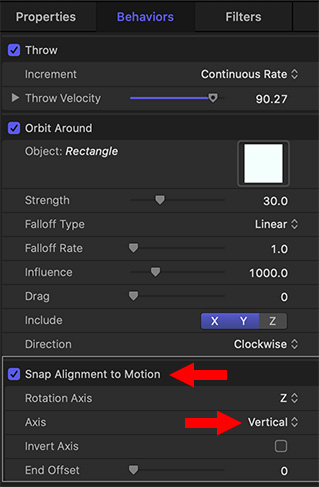
Three motion behaviors applied to a moving object: Throw, Orbit Around & Snap Alignment to Motion.
The purpose of the “Snap Alignment to Motion” behavior is to keep moving objects, like arrows, pointing in the direction of their movement, regardless of how their position changes.
Here’s how this works.
Create an object, then apply behaviors to get it moving.
NOTE: In my case, I created an arrow, then applied a Throw behavior to get it to move, then Orbit Around to get it to circle another object.
Once you have the motion applied the way you want, apply Behaviors > Basic Motion > Snap Alignment to Motion.
Now, when you play the timeline, the arrow – or your object – should now point in the direction it moves.
EXTRA CREDIT
If your object, like mine, is stubbornly pointing 90° away from its line of motion, change the Axis setting from Horizontal to Vertical. Now, the object will track properly.
Please rate the helpfulness of this tip.
Click on a star to rate it!
https://www.theinsidetips.com/wp-content/uploads/2019/09/Tips-Logo-700x150.jpg00Larry Jordanhttps://www.theinsidetips.com/wp-content/uploads/2019/09/Tips-Logo-700x150.jpgLarry Jordan2020-01-02 01:30:002019-12-28 08:34:28Tip #315: Use the Snap Alignment Behavior in Motion
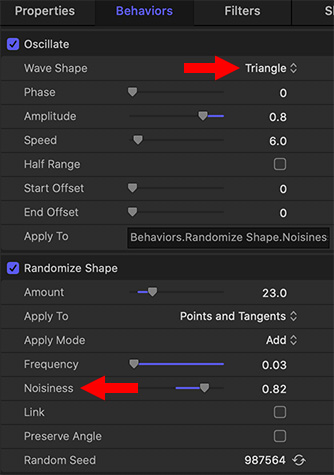
Parameter Behaviors can be applied to any setting to create much more interesting movement.
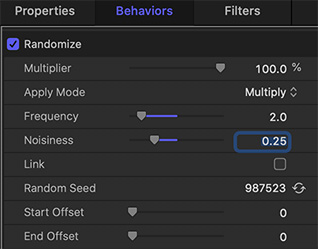
The Oscillate parameter behavior settings applied to Noisiness in the Randomize behavior.
In another tip (#330), we learned how to apply a Parameter Behavior to a filter. In this tip, we’ll learn how to apply a parameter behavior to another behavior; and, along the way, we’ll create our own version of a friendly ghost. Here’s how.
Create a new Motion project.
From Library > Shapes, drag a shape into the Viewer. (I used the Club Suit shape.)
Select the shape in the Layers panel.
Apply Behaviors > Shape > Randomize. This causes the shape to wiggle. To make it more amorphously ghost-like, match my settings in the lower half of the screen shot.
Next, hover your mouse over Noisiness and click the small downward-pointing arrow on the right.
From the menu, select Oscillate. This causes the values in Noisiness to change over time.
Again, match my settings in the top half of the screen shot. Notice the different results you get by changing the wave shape.
NOTE: To remove a setting, select it in the Layers panel and delete it.
EXTRA CREDIT
To make this shape more “ghosty,” I also:
Changed Properties > Opacity to 25%
Changed the color to light blue using Filters > Color > Colorize
Softened the edges using Filters > Blur > Gaussian Blur
Have fun playing.
Please rate the helpfulness of this tip.
Click on a star to rate it!
https://www.theinsidetips.com/wp-content/uploads/2019/09/Tips-Logo-700x150.jpg00Larry Jordanhttps://www.theinsidetips.com/wp-content/uploads/2019/09/Tips-Logo-700x150.jpgLarry Jordan2020-01-02 01:30:002020-01-02 01:30:00Tip #326: Animate a Shape Using Behaviors
Settings for the Randomize parameter behavior applied to a color chip.
Parameter behaviors are a very intriguing part of Motion that allow you to animate a setting, not just an element. For example, rather than oscillate an object so it changes position randomly, you can randomize the colors applied to an element.
These provide unlimited creative potential and the best way to see what they can do is to play with them. While this effect can be applied to anything, including video clips, let’s keep this simple.
Create a new Motion project.
From Library > Shapes, drag a shape into the Viewer. (I used the Club Suit shape.)
Select the shape in the Layers panel.
Apply Filters > Color > Colorize to the selected shape. This changes the color of the shape based upon the color settings of Remap White to.
In Inspector > Filters, hover your mouse over Remap White to and look to the right side of the line. There will be a small downward pointing arrow. Click it.
From the pop-up menu, select Add Parameter Behavior > Randomize. This randomizes the colors of this filter.
Then, using the settings in this screen shot, slow everything down to prevent visual whiplash.
Now that you know how this technique works, experiment with other settings and other parameters.
NOTE: I show how to apply a parameter behavior to a behavior in Tip #326.
EXTRA CREDIT
To remove a setting, simply select it in the Layers panel and delete it.
Please rate the helpfulness of this tip.
Click on a star to rate it!
https://www.theinsidetips.com/wp-content/uploads/2019/09/Tips-Logo-700x150.jpg00Larry Jordanhttps://www.theinsidetips.com/wp-content/uploads/2019/09/Tips-Logo-700x150.jpgLarry Jordan2020-01-02 01:30:002020-01-02 01:30:00Tip #330: What’s a Parameter Behavior?
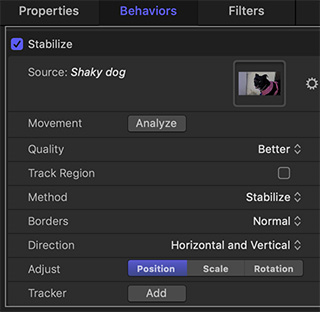
Use the Stabilize tracking behavior to smooth shaky motion in a movie or image sequence. Using the Stabilize behavior, there are three ways to analyze a clip:
Use the behavior’s default advanced motion analysis technique that evaluates the entire frame of a clip to extract movement data without using onscreen trackers.
Use onscreen trackers that analyze a reference pattern (a small group of pixels) in the canvas. These are the same trackers used by the Match Move and Analyze Motion behaviors.
Use a combination of the advanced motion analysis and onscreen trackers.
How to Stabilize a Clip
Select the layer containing the clip you want to stabilize.
Choose Behaviors > Motion Tracking > Stabilize.
Go to Inspector > Behaviors, then use the Direction pop-up menu to choose one of the following options:
Horizontal and Vertical: Applies the stabilize transformation to the X and Y dimensions.
Horizontal: Applies the stabilize transformation to the X dimension.
Vertical: Applies the stabilize transformation to the Y dimension.
Enable or disable the Adjust buttons, as follows:
Position: Enable this button to apply the analyzed position data to the clip. (The X and Y position changes in the footage are smoothed or stabilized.) To stabilize the X and Y position of the shot and leave scale or rotation changes intact, enable Position and disable Scale and Rotation.
Scale: Enable this button to apply any analyzed scale data to the clip. (Scale changes in the footage are smoothed or stabilized.) To stabilize or smooth changes in scale and leave position or rotation changes intact, enable Scale and disable Position and Rotation. (The Scale option is not related to the Zoom option in the Borders pop-up menu.)
Rotation: Enable this button to apply analyzed rotation data to the clip. (Changes in the rotation of the footage are smoothed or stabilized.) To stabilize or smooth changes in rotation in the shot and leave position or scale changes intact, enable Rotation and disable Position and Scale.
For the smoothest result, enable all three Adjust buttons (Position, Scale, and Rotation).
NOTE: You can change the Method, Borders, Direction, and Adjust parameters before or after the clip is analyzed.
Please rate the helpfulness of this tip.
Click on a star to rate it!
https://www.theinsidetips.com/wp-content/uploads/2019/09/Tips-Logo-700x150.jpg00Larry Jordanhttps://www.theinsidetips.com/wp-content/uploads/2019/09/Tips-Logo-700x150.jpgLarry Jordan2019-12-26 01:30:002019-12-20 17:09:02Tip #301: Stabilize a Shaky Clip in Motion
We may request cookies to be set on your device. We use cookies to let us know when you visit our websites, how you interact with us, to enrich your user experience, and to customize your relationship with our website.
Click on the different category headings to find out more. You can also change some of your preferences. Note that blocking some types of cookies may impact your experience on our websites and the services we are able to offer.
Essential Website Cookies
These cookies are strictly necessary to provide you with services available through our website and to use some of its features.
Because these cookies are strictly necessary to deliver the website, refuseing them will have impact how our site functions. You always can block or delete cookies by changing your browser settings and force blocking all cookies on this website. But this will always prompt you to accept/refuse cookies when revisiting our site.
We fully respect if you want to refuse cookies but to avoid asking you again and again kindly allow us to store a cookie for that. You are free to opt out any time or opt in for other cookies to get a better experience. If you refuse cookies we will remove all set cookies in our domain.
We provide you with a list of stored cookies on your computer in our domain so you can check what we stored. Due to security reasons we are not able to show or modify cookies from other domains. You can check these in your browser security settings.
Google Analytics Cookies
These cookies collect information that is used either in aggregate form to help us understand how our website is being used or how effective our marketing campaigns are, or to help us customize our website and application for you in order to enhance your experience.
If you do not want that we track your visit to our site you can disable tracking in your browser here:
Other external services
We also use different external services like Google Webfonts, Google Maps, and external Video providers. Since these providers may collect personal data like your IP address we allow you to block them here. Please be aware that this might heavily reduce the functionality and appearance of our site. Changes will take effect once you reload the page.
Google Webfont Settings:
Google Map Settings:
Google reCaptcha Settings:
Vimeo and Youtube video embeds:
Other cookies
The following cookies are also needed - You can choose if you want to allow them:
Privacy Policy
You can read about our cookies and privacy settings in detail on our Privacy Policy Page.