… for Apple Motion

Tip #187: Quickly Create Transparent Graphics

Larry Jordan – https://LarryJordan.com

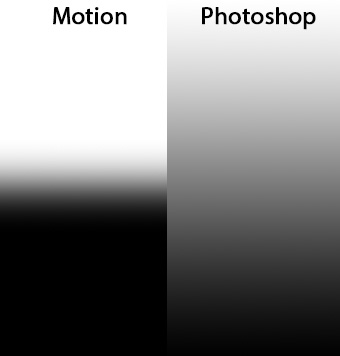
Transparency is also called the “alpha channel.”

Properties panel in Motion 5 showing  transparent background setting.
Set project transparency using Inspector > Properties.

Topic $TipTopic Like Photoshop, Motion makes creating images that contain transparency easy. In fact, transparent backgrounds are the default setting. But, if things go west, here’s how to create a transparent background.

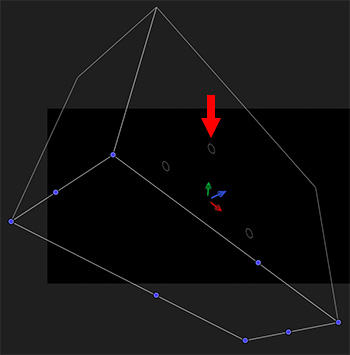
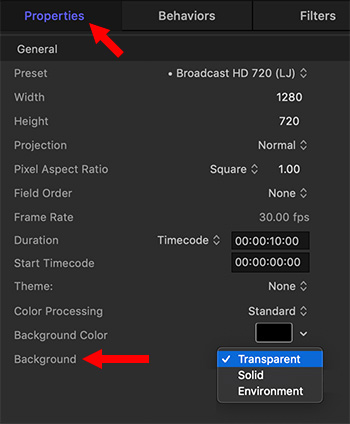
  • Create a motion graphic as usual.
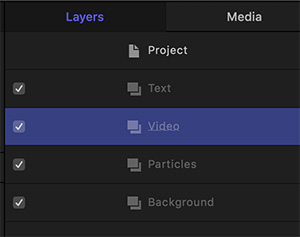
  • In the Layers panel, select the project.
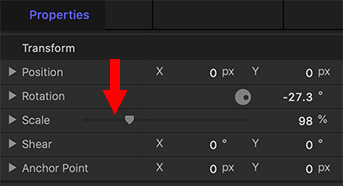
  • Go to Inspector > Properties, then make sure that Background is set to transparent.

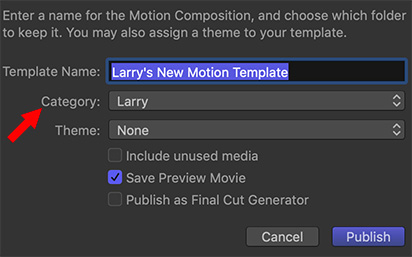
Now, when you export your movie or save it as a Final Cut Generator, it will include a transparent background.


Please rate the helpfulness of this tip.

Click on a star to rate it!

… for Apple Motion

Tip #154: 3D Transform Tool Adds Perspective

Larry Jordan – https://LarryJordan.com

On-screen controls allow faster element manipulation.

Tip Screen Shot

Topic $TipTopic

There are two ways to add perspective to any element in Motion: The Inspector and the 3D Transform tool. To enable the 3D Transform tool, click the icon to the immediate right of the Arrow tool that looks like a wire globe.

When you select an element in the Layers panel, a white wireframe box appears around it. Inside are three circles and three color arrows. The secret code is R – G – B.

  • R (Red) – Makes adjustments on the horizontal axis
  • G (Green) – Makes adjustments on the vertical axis
  • B (Blue) – Makes adjustments to and from the viewer (camera); the Z-axis.

For example, dragging the green arrow slides the shape vertically.

But, the real secret is in the three white circles. These create rotation.

  • Left circle. Rotates on the vertical axis. (It displays a green line.)
  • Top circle. Rotates on the Z-axis. (It displays a blue line.)
  • Right circle. Rotates on the horizontal axis. (It displays a red line.)

By selecting the 3D Transform tool and dragging these six controls, you can quickly and intuitively adjust the position and rotation of any selected element.


Please rate the helpfulness of this tip.

Click on a star to rate it!

… for Apple Motion

Tip #188: Move Layers with a Keyboard Shortcut

Larry Jordan – https://LarryJordan.com

Moving layers need not be difficult.

Tip Screen Shot

Topic $TipTopic

Moving layers in Motion with the mouse can be challenging because you need to very carefully watch the location of that thin blue line.

It is much better to use a keyboard shortcut. This is one of those shortcuts that, once you learn it, you’ll wonder how you ever lived without it.

  • Cmd + ] — Go up
  • Cmd + [ — Go down

Sigh… so simple.


Please rate the helpfulness of this tip.

Click on a star to rate it!

… for Apple Motion

Tip #189: A REALLY Fast Way to Copy Settings

Larry Jordan – https://LarryJordan.com

Dragging is fast, easy and precise.

Tip Screen Shot

Topic $TipTopic

As projects get more complex, matching settings becomes increasingly tricky. Here’s a fast way to copy one or more settings from one element to another.

  • Select the layer that has the settings you want to copy.
  • Then, from the Inspector, select the settings you want to copy.
  • Once selected, drag them from the Inspector to the element you want to apply them to.

NOTE: All the settings you want to copy must be visible in the Inspector. To copy settings hidden in other menus, simply make those settings visible and repeat the process.

EXTRA CREDIT

  • To select a single setting: click-and-drag it.
  • To select multiple settings that are next to each other: Shift-click
  • To select multiple settings that are not next to each other: Cmd-click.

Please rate the helpfulness of this tip.

Click on a star to rate it!

… for Apple Motion

Tip #091: A Faster Way to Fine Tune

Larry Jordan – https://LarryJordan.com

This is a great option when you need to make small adjustments.

Tip Screen Shot

Topic $TipTopic

Every slider in Motion has a track that it slides in.

Press the Option key while clicking on the track and you’ll change the value of the setting by one unit.

Click left of the slider to decrease the value, click right of the slider to increase the value.

Not all sliders support this, but most of them do.


Please rate the helpfulness of this tip.

Click on a star to rate it!

… for Apple Motion

Tip #093: Create Better Gradients

Larry Jordan – https://LarryJordan.com

Motion creates very poor gradients.

Tip Screen Shot

Topic $TipTopic

The left image is a continuous gradient created by Motion. The right image is a gradient created in Photoshop. Clearly, the Photoshop gradient is MUCH smoother.

If you need smooth gradients, for example, for blend modes, you are far better off creating them in Photoshop, saving them as a PNG or TIFF, and importing them into Motion.

Most of the time I use TIFFs, but PNGs should work equally well.


Please rate the helpfulness of this tip.

Click on a star to rate it!

… for Apple Motion

Tip #152: Motion Templates Speed New Projects

Larry Jordan – https://LarryJordan.com

A template is a master file with elements and animation already in place.

Tip Screen Shot

Topic $TipTopic

Let’s say you need to create a new open every week for a program. While each open has the same elements, a few things change. While you could simply copy and reuse an existing project, templates are a better way to work.

Why? Because they store all the elements you need and prevent you from accidentally saving a revised project with the wrong name, thus erasing the older project.

Here’s how this works.

  • Create a new project or work with an existing project.

NOTE: While you can change project settings in Motion at any time, it is always best to set the duration before adding any elements. Changing the duration after elements are added is surprisingly tricky.

  • Modify the project as necessary.
  • When you are done creating, save your work. This is the critical step, choose File > Publish Template. NEVER simply save a template, that only creates a Motion project.
  • Give the template a name, then, if the category you want does not exist, click New Category. (A category is essentially a folder which is displayed in the Project Browser sidebar.)
  • Finally, click Publish. That’s it. You’ve created a new Motion template.

NOTE: You can store multiple templates in the same category. You only need to create a category once.

To access a template, look in the Compositions section of the Project Browser when you create a new project for Motion. Double-click the template you want to use.

Done.


Please rate the helpfulness of this tip.

Click on a star to rate it!