… for Apple Motion

Tip #1593: How to View Motion Keyframes

Larry Jordan – LarryJordan.com

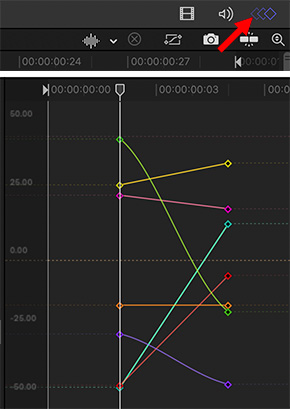
Each keyframe can be repositioned and modified from within the Timing Pane.

Keyframes displayed in the Timing Pane.

Topic $TipTopic

Most of the time, the mini-Timeline in Motion, combined with the Inspector, allows us to adjust keyframes without getting bogged down in too many details.

But, when you need to see all the keyframes associated with an elements, the Timing Pane is the answer.

To reveal it, choose Window > Show Timing Pane.

Then, to see keyframes, click the 3 Diamonds icon in the top right corner (red arrow in screen shot).

This opens the keyframe display where you can see and modify keyframes as necessary.

EXTRA CREDIT

Tip #1594 explains how to modify keyframes.


Please rate the helpfulness of this tip.

Click on a star to rate it!

… for Apple Motion

Tip #1594: What the Keyframe Controls Do

Larry Jordan – LarryJordan.com

The Timing Pane displays and edits keyframes for any selected element.

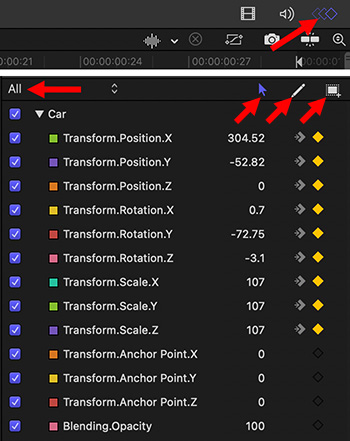
The Keyframes list in the Timing Pane. The three tools on the right add and modify keyframes.

Topic $TipTopic

Most of the time, we don’t need to access keyframes as a group. But, when we do, the Timing Pane has the tools you’ll need.

When you open the Timing pane, depending upon which display option you select, you can view all the keyframes that are associated with the selected element.

To view keyframes:

  • Select the element you want to review in the Layers pane.
  • Display the Timing Pane (Window > Show Timing Pane)
  • Click the “3 Diamonds” in the top right corner (top red arrow in screen shot).
  • Select All from the Untitled Set menu on the top left (left red arrow in screen shot). This reveals all keyframes associated with the selected element.
  • Arrow. Double-click a keyframe dot to edit its value or position.
  • Pencil. Sketch keyframes tool. Select a keyframe from the list on the left, then drag the Pencil to manually draw an animation curve for that setting.
  • Rectangle. Transform keyframes tool. Use the Transform Keyframes tool to drag a selection rectangle around multiple keyframes and then manipulate their positions by dragging the bounding box or adjusting its handles. Dragging the bounding box moves the selected keyframes in whatever direction you move.

Please rate the helpfulness of this tip.

Click on a star to rate it!

… for Apple Motion

Tip #1575: A Simple Layers Slider

Larry Jordan – LarryJordan.com

Click the icon, then drag the dot to change Layer panel scaling.

The Scale icon, bottom, and the Scale slider (dot at top).

Topic $TipTopic

Tucked into the bottom edge of the Layers pane is an icon of two rectangles. This “Scale slider” hides a useful function. Let me illustrate.

Click the Scale icon (red arrow) to reveal a pop-up set of three icons. Only the middle one moves.

Drag the middle dot left or right to change the scale of the elements displayed in the Layers panel.

As projects get more complex this is a fast way to cram more elements into less space. Or, conversely, expand elements to better see what you are working with.


Please rate the helpfulness of this tip.

Click on a star to rate it!

… for Apple Motion

Tip #1576: The Essential Write On Behavior

Larry Jordan – LarryJordan.com

The Write-on behavior animates lines to draw themselves on-screen.

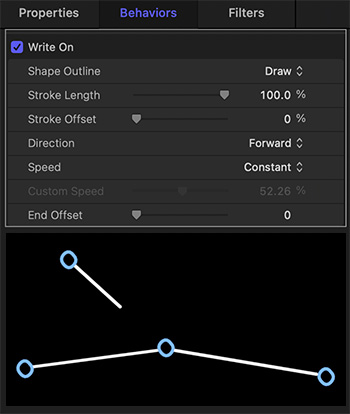
Write On settings (top) and a line animating itself on-screen (bottom)

Topic $TipTopic

Behaviors create animation without requiring keyframes; and one of the most essential behaviors is Write On.

The Write On behavior animates lines to draw themselves on-screen. It is located in Behaviors > Shape > Write On.

Be default, this effect animates (draws) a line on-screen, with the effect taking the entire duration of the project. Just as with all behaviors, you can change the speed of the draw by adjusting the In and Out of the effect.

But, a closer look at the settings for Write On shows a variety of interesting options that you may not have noticed.

  • Shape Outline. This draws, erases, or draws then erases a line.
  • Stroke Length. This changes a line into a pulse which starts at the beginning of the line, then travels along it to the end.
  • Stroke Offset. This moves the starting position of the line.
  • Direction. Forward or reverse.
  • Speed. This dials in acceleration and deceleration, as needed.

EXTRA CREDIT

Write On is the option of choice to watch a line draw on a map, an arrow travel through space, or a more complex shape animate itself into view.


Please rate the helpfulness of this tip.

Click on a star to rate it!

… for Apple Motion

Tip #1577: Sometimes You Just Want Stuff to MOVE!

Larry Jordan – LarryJordan.com

The Random Motion behavior causes any element to move.

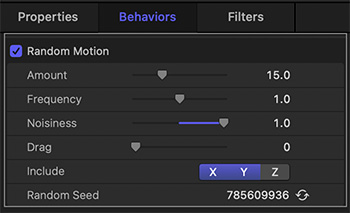
Random Motion behavior settings in the Inspector.

Topic $TipTopic

Sometimes, you just want something to move. Not a lot, but enough to catch the eye. Enter Random Motion. The Random Motion behavior applies a small amount of random movement to any selected element. This movement is never very big, but you have control over how much and in which direction.

For example, apply the behavior to an element, then go to Inspector > Behavior:

  • Amount. This determines the amount of movement. (Remember, if you need LOTS of movement, apply one of the Basic Motion behaviors.)
  • Frequency. How often this movement repeats during the effect.
  • Noisiness. The larger the number, the larger the movement.
  • Drag. Adds internal friction to the movement. Most of the time, you’ll leave this at zero.
  • Include. This determines the direction of the movement: side-to-side, up-and-down, or to-from the camera.
  • Random Seed. Click the icon to create different pattern of random behavior.

Good ways to use this include animating a logo, product name or phone number to keep re-attracting a viewer’s attention.


Please rate the helpfulness of this tip.

Click on a star to rate it!

… for Apple Motion

Tip #1553: Creating Imperfections: Droplets

Larry Jordan – LarryJordan.com

While this effect can be stationary, it will look better animated.

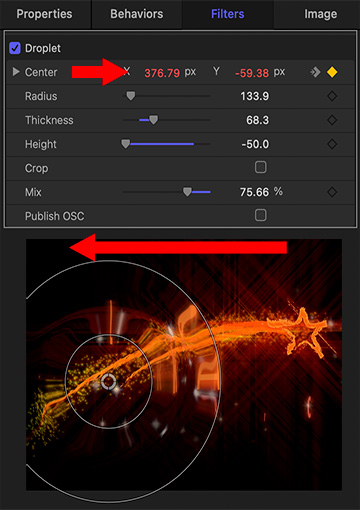
Droplet settings with keyframe (top) and animated results (bottom).

Topic $TipTopic

Sometimes, you don’t want things to look perfect. You’d rather they look a bit more “real.” Here, I opened an animated logo for my company that we created a few years ago. This week, I was playing with it to see what more I could do and discovered this trick.

Select something animated. While you can use any image, line drawings or other graphic images may work best.

Apply Filters > Distortion > Droplet.

Since we can’t apply Behaviors to filters, we need to use keyframes to change the location of the droplet.

In this example, I keyframed the Center settings (top screen shot) to have the droplet pass through the frame right-to-left as the star was flying from left-to-right.

Overall, Droplet adds an interesting – and eye-catching – shifting shape to the comet tail and the text that comes on screen shortly.


Please rate the helpfulness of this tip.

Click on a star to rate it!

… for Apple Motion

Tip #1554: Just Playin’ Around

Larry Jordan – LarryJordan.com

Don’t forget to adjust opacity or blend modes to help blend elements.

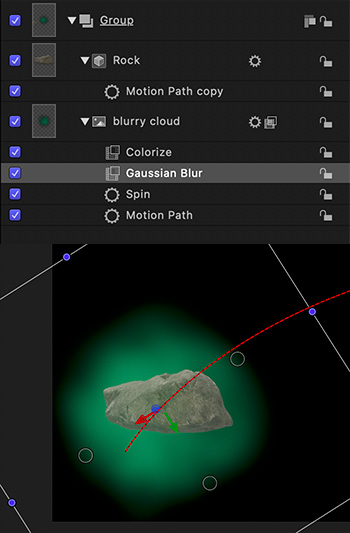
The “Flying Space Rock (and shadow)” along with the the Layers pane.

Topic $TipTopic

Here’s an interesting technique that creates synced movement using a copied motion path… and a flying space rock.

What, I wondered, would a flying space rock look like? Clearly, it needs to move and, because I could, I added a floating green cloud behind it – tracking it’s movements.

THE ROCK

The Rock is a 3D shape in the Motion Library (3D Objects).

  • Add it to the Viewer
  • Apply Basic Motion > Motion Track
  • Option-click the red motion track line to add a keyframe to the track and create a curve.
  • Change Inspector > Properties > Opacity to 80% to blend the Rock with the Cloud.

THE CLOUD

Blurry Cloud is in the Motion Library (Content > Particle Images).

  • Add it to the Viewer
  • Change Inspector > Properties > Opacity to 50% to soften and add translucency.
  • Change Properties > Scale to 300-400%; make it lots bigger.
  • Apply Filters > Color > Colorize and pick a color you like
  • Apply Behaviors > Basic Motion > Spin
  • Apply Filters > Blur > Gaussian Blur and make this much blurrier.
  • Option-drag the Motion Track from the Rock to the Blurry Cloud. This copies the effect from one element to the other.

TWEAK

Play this, then tweak things as much as you want. Consider adding Parameter behaviors to add jitter or oscillation to the movement.


Please rate the helpfulness of this tip.

Click on a star to rate it!

… for Apple Motion

Tip #1555: Spins Can Also Be 3D

Larry Jordan – LarryJordan.com

Video is always 2D, but particles and 3D objects are 3D.

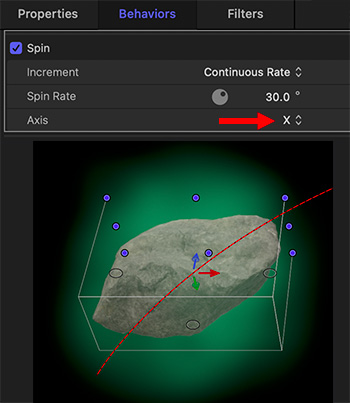
The tumbling Space Rock, and the Spin > Axis setting that makes it possible.

Topic $TipTopic

When we work with video in Motion, it is easy to overlook that the Spin behavior actually works in 3D. But it does.

In Tip #1554, I created the “Flying Space Rock.” But, the Rock itself needs to spin. Since this is a 3D object, it makes sense to show its 3D nature.

So, I added Behaviors > Basic Motion > Spin.

Then, while I could adjust this using the HUD, instead I used Inspector > Behaviors > Spin and changed the rotation Axis to X.

This made the rock tumble in a way we would not normally expect.

EXTRA CREDIT

You can achieve the same results by dragging the inner blue circle for the Spin behavior in the HUD.


Please rate the helpfulness of this tip.

Click on a star to rate it!

… for Apple Motion

Tip #1538: Working with PDFs in Motion

Larry Jordan – LarryJordan.com

Motion handles PDFs, but not well. Convert them to PNG first.

Topic $TipTopic

Motion handles PDFs differently from both Final Cut and Premiere. But, it still doesn’t handle them well.

Unlike Premiere, Motion supports importing a PDF.

Unlike Final Cut, it only imports the first page of a multiple page PDF. Worse, any white background is imported as transparent, which makes reading black text impossible.

Like Final Cut, though, Motion creates, essentially, a PNG of that first page of a PDF file that matches the size of your project. This means that if you scale the PNG, image quality quickly deteriorates.

Here are two workarounds that make using PDFs in a Motion project easier and with higher quality.

TWO WORKAROUNDS

If all you need to do is import the entire PDF page and fill all empty areas with white, use this workaround.

Workaround #1: Open the PDF in Preview, choose File > Export and set the export format to PNG. This exports the PDF at the size it was created and with a white background.

NOTE: Ignore the Resolution setting on export, even if you choose a higher number, the size and resolution of the exported image won’t change. I consider this a bug.

If you need to zoom into elements on the page – for example to provide closeups of an embedded image – this workaround is a better option:

Workaround #2: Open the file in Photoshop, or another image editing program. In the Page Options dialog (see screen shot) that appears: Set the Resolution to at least 400 Pixels/inch. This enlarges the image – while retaining image quality – so that you can easily zoom in or out of the PDF in the timeline.

EXTRA CREDIT

There are two types of PDFs: those that originated as bitmaps and those that originated as vectors.

Photos, scans and Photoshop documents will not scale very well, if at all. Text, Illustrator files or images created using musical notation should scale perfectly.

Please rate the helpfulness of this tip.

Click on a star to rate it!

… for Apple Motion

Tip #1539: Quickly Fill a Shape with a Gradient

Larry Jordan – LarryJordan.com

Who Knew… um, that this would work?

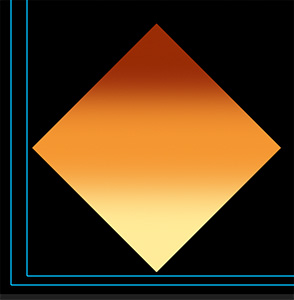
A shape filled with a gradient.

Topic $TipTopic

Here’s a very fast way to fill a shape with a gradient in Apple Motion.

Add a Library shape to the Viewer. (In the screen shot, I used a diamond.)

Then, from Library > Gradients, drag the gradient you want on top of the shape in the Viewer.

NOTE: You could also drag and drop the gradient on top of the element name in the Layer’s panel.

Poof! Done.

EXTRA CREDIT

You can change the gradient colors by selecting the shape in the Layers panel, then using Inspector > Shape > Fill to change the gradient.

Cool.


Please rate the helpfulness of this tip.

Click on a star to rate it!