… for Apple Motion

Tip #1406: Lighting Can Bog Down Your System

Larry Jordan – LarryJordan.com

Lighting is render-intensive. Here’s how to turn it off temporarily.

The Render menu, with the Lighting option highlighted.

Topic $TipTopic

(I discovered this tip while researching a recent PowerUP webinar illustrating Lighting Techniques of Apple Motion 5.5.)

Lighting in Apple Motion is very render-intensive, especially for older systems.

If you find yourself unable to play a Motion project, or it plays very slowly, turn off the lighting until you are ready to export.

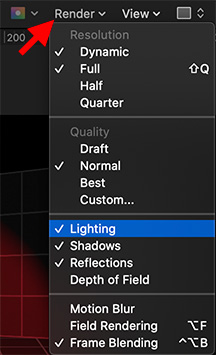
To do so, go to the Render menu in the top right corner of the Viewer (Canvas) and uncheck Lighting. This displays your project using a generic ambient light which any computer can display easily.

EXTRA CREDIT

If you export a file or still frame, even if rendering is turned off, Motion will render the file using the correct lighting.


Please rate the helpfulness of this tip.

Click on a star to rate it!

… for Apple Motion

Tip #1407: How to Enable Shadows from Lighting

Larry Jordan – LarryJordan.com

Shadows cast by lights are the most flexible and believable.

Shadow options for Directional, Point and Spot lights.

Topic $TipTopic

(I discovered this tip while researching a recent PowerUP webinar illustrating Lighting Techniques of Apple Motion 5.5.)

One of the big benefits to adding custom lights to a Motion project is the ability to easily create cast shadows.

NOTE: One of the benefits of creating shadows with lights is that the shape of these shadows changes based on the geometric relationship of the background to the foreground.

To enable shadows:

  • Select a custom light.
  • Go to Inspector > Lights and check the Shadows checkbox.
  • Click Show to reveal shadow options:
    • Opacity. The darkness of the shadow.
    • Softness. The blurriness of the shadow’s edge.
    • Uniform Softness. When checked, the edges of all shadows are equally blurry. When unchecked, shadows closest to the foreground object (say, text) are sharper than shadows farther from the casting object.
    • Color. The color of the shadow.

EXTRA CREDIT

All lights have the same shadow options, except for Ambient lights which do not cast shadows. Shadow settings can be key-framed.


Please rate the helpfulness of this tip.

Click on a star to rate it!

… for Apple Motion

Tip #1388: Learn Apple Motion In Depth

Larry Jordan – LarryJordan.com

In depth training in Apple Motion from beginning to the end.

The Apple Motion 5.5. logo.

Topic $TipTopic

You can learn Motion – if you take it in easy steps; and I have exactly the training you need.

I specifically created these six titles as a set to provide consistent content and coverage. These start at the very beginning, then keep adding more and more techniques until you are introduced to every major element in the program.

Apple totally revised the Apple Motion interface and its operation with version 5.3. Since then, the rate of change in the software has slowed down. This means that, while the videos are a bit older, the information is still accurate – and I can save you money

Special Offer: SAVE 50%! Buy Now!


This Motion bundle includes the following titles:

EXTRA CREDIT

This bundle also includes practice media and sample projects. Running time is slightly more than six hours.


Please rate the helpfulness of this tip.

Click on a star to rate it!

… for Apple Motion

Tip #1389: Move the Anchor Point for Better Zooms

Larry Jordan – LarryJordan.com

Scaling and rotation often look better when you move the Anchor Point.

The Anchor Point indicator (lower red arrow) and the Anchor Point Inspector settings.

Topic $TipTopic

I discovered this tip while researching a recent PowerUP webinar presenting “Advanced Techniques in Apple Motion 5.5.”

The Anchor Point is that position around which an image rotates or scales. (It is indicated by a plus sign – red arrow in the lower screen shot – whenever you select an image or video in the Layers pane.)

You adjust the position of the Anchor Point by selecting an element in the Layers pane, then modify Inspector > Properties > Anchor Point. (Red arrow in the top screen shot) Sadly, there’s no way to move the Anchor Point by dragging.

I find scaling or rotating an image looks MUCH more interesting when you move the Anchor Point to a corner, rather than the center.


Please rate the helpfulness of this tip.

Click on a star to rate it!

… for Apple Motion

Tip #1390: Put Text on a Curve

Larry Jordan – LarryJordan.com

Text paths are built into each text clip. You just need to turn them on.

Text on a curve in Motion, using five control dots.

Topic $TipTopic

I discovered this tip while researching a recent PowerUP webinar presenting “Advanced Techniques in Apple Motion 5.5.”

All curves in Motion are created using paths. While there are a variety of tools we can use to draw paths – the paint brush, pen and shape tools, for example – there is no “Text-on-a-Curve” tool.

That’s because text paths are built into the text clip itself. To create text on a curve:

  • Select the text tool and type some text in the Viewer.
  • Leave the Text tool active in the text and go to Inspector > Text > Layout and change Layout Method (under Layout Controls) to Path.
  • Under the text a horizontal path line appears with three dots:
    • Left dot. End point of text animation
    • Middle dot. The opportunity to create a Curve
    • Right dot. Start point of text animation
  • Drag each dot to create the path you want the text to follow.

EXTRA CREDIT

  • Add more control dots by Option-clicking anywhere along the path.
  • Control-click a dot (control point) to delete a dot or reveal handles you can drag to change the shape of the curve.
  • Animate text to move along the curve by keyframing Path Offset, lower in the Layout pane.

Please rate the helpfulness of this tip.

Click on a star to rate it!

… for Apple Motion

Tip #1377: Create a Reflection

Larry Jordan – LarryJordan.com

Reflections require a reflecting surface and a group that’s switched to 3D.

Reflecting surfaces can be any color or shape.

Topic $TipTopic

Philip asked: “How do I create a reflection in Motion?”

By default, all objects in Motion radiate light, meaning they can create a reflection. However, in order to see a reflection, you need a second object that catches the light from the first object and reflects it. THAT setting, to enable reflections, is turned off by default.

To enable reflections:

  • Create the object you want to reflect (the heart, in this screen shot)
  • Create a surface upon which you want the reflection to appear (the gold rectangle)
  • Be sure both objects are in the same group.
  • Switch the group from 2D to 3D by clicking the small icon of rectangles on the right of the group name in the Layers panel.
  • Select the rectangle.
  • Go to Inspector > Properties and enable (check) Reflection.
  • Adjust the angle of the rectangle to get the reflection you want.
  • Adjust the Inspector settings to get the look you want.

NOTE: 3D Objects do not create reflections.


Please rate the helpfulness of this tip.

Click on a star to rate it!

… for Apple Motion

Tip #1381: Precisely Control the Position of Anything

Larry Jordan – LarryJordan.com

Control Points provide precise position control for selected elements.

The Control Points settings for the Motion Path behavior.

Topic $TipTopic

Most of the time, when we drag objects into position in Motion they look fine. But, sometimes, you need more precise control. The Inspector makes that possible.

For example, when applying the Motion Path behavior, you may need it to be perfectly vertical, or go to very precise pixel positions. This is easy to do.

  • Select the object or behavior in the Layers panel that you need to adjust.
  • Depending upon what you have selected, go to Inspector > Behaviors or Inspector > Shape.
  • In that panel, at the bottom, you’ll find an option titled Control Points.
  • Twirl it down to see a list of all controls points needed to define or configure that object or behavior.
  • The left number sets the X position, the middle number sets the Y and the right number sets the Z. (If there are only two numbers, they represent the X and Y, with the X value on the left.)

NOTE: For horizontal objects or moves, the Y position should match. For vertical elements, the X positions should match.

Remember, the 0,0 position is the center of the frame, for movement, or the center of an element, for objects.


Please rate the helpfulness of this tip.

Click on a star to rate it!

… for Apple Motion

Tip #1382: Playing With Gradients

Larry Jordan – LarryJordan.com

Gradients can create the illusion of depth and/or roundness.

The Shape settings needed to create the 3D ball shape.

Topic $TipTopic

This tip started with me wondering: “Um, what happens if I change this?”

I started by drawing a circle.

  • In Inspector > Shape > Style, I switched the color fill from Color to Gradient.
  • Twirl down the Gradient triangle (to the left of the name) to reveal a whole flock of additional controls.
  • Set Type to Radial.
  • Change the Start and End positions to move the highlight off center.
  • Boost feathering a little bit to make the ball seem a bit more rounded.

Ta-DAH! A shape that looks a LOT more like a 3D ball than a simple 2D circle.

NOTE: Gradients which have only two colors work the best for this. Feel free to experiment with changing colors and see what looks best for you.

EXTRA CREDIT

You can keyframe the Start and End positions to make it look like the lighting around the ball is moving.


Please rate the helpfulness of this tip.

Click on a star to rate it!

… for Apple Motion

Tip #1363: Change Motion’s Project Properties

Larry Jordan – LarryJordan.com

All project properties can be modified – except frame rate.

The Project Properties panel.

Topic $TipTopic

Normally, you set essential Motion project properties when you create a project using the Project Browser. But, what happens if you need to change project settings after the project is created?

That’s where Project Properties come in.

  • To change them, select the Project in the Layers panel.
  • Then, go to Inspector > Properties and change what you need to change.

NOTE: A faster way to do this is to type Cmd + J.

This allows you to change all the technical settings of a project EXCEPT frame rate. If you need to change the frame rate, you’ll need to create a whole new project.

NOTE: Unlike Final Cut, even if the project is empty you can’t change frame rate once a project is created.

EXTRA CREDIT

Changing the project duration does not modify the timing of any elements already added to it.


Please rate the helpfulness of this tip.

Click on a star to rate it!

… for Apple Motion

Tip #1364: Change the Motion Background

Larry Jordan – LarryJordan.com

For full-screen projects, set the background to a solid color.

Background settings in Project Properties. Transparent is the default.

Topic $TipTopic

By default, the background in Motion is transparent, though it is displayed in the Viewer as black. However, you DO have options.

Also by default, the background color is black. This means that the Viewer displays black behind all elements, BUT it does not export this color.

To change the background, type Cmd + J, this displays the Project Properties panel.

  • Transparent. The background color does not export, though it does appear in the Viewer.
  • Solid. The background color appears in the Viewer and is exported as a solid color with your project.
  • Environment. The background color appears in the Viewer, exports with your project and interacts with elements in your project, for example, using blend modes..

EXTRA CREDIT

To change the background color in the Viewer, change the background color setting in Project Properties.


Please rate the helpfulness of this tip.

Click on a star to rate it!