… for Apple Final Cut Pro X

Tip #1514: Tilde Key Secrets

Larry Jordan – LarryJordan.com

Tilde overrides connections between clips.

Topic $TipTopic

The Tilde key (~) has two very useful – but obscure – functions in Final Cut Pro. Let me illustrate.

NOTE: The Tilde key is located immediately below the ESC key at the top left corner of the keyboard.

First, press Cmd + ~ to hide or display the Library list (called the “Sidebar”) to the left of the Browser.

Second, when you have audio connected to a clip in the Primary Storyline – for example, narration or a music clip – when you drag the clip in the Primary Storyline, all the clips attached to it move as well.

But, when tilde is pressed, the Primary Storyline clip moves without moving any of the connected clips.

The tilde key “overrides” connections, which is a very useful shortcut to know.


Please rate the helpfulness of this tip.

Click on a star to rate it!

… for Apple Motion

Tip #1482: Don’t Get Lost in 3D Space

Larry Jordan – LarryJordan.com

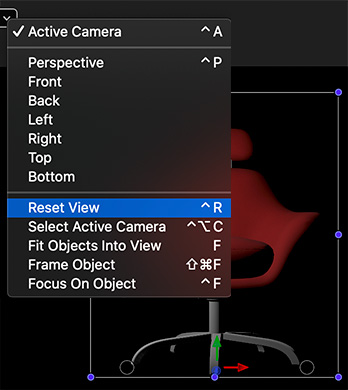
When you get lost in 3D space, choose Reset View.

Active Camera menu options, with Reset View used to restore the original view.

Topic $TipTopic

Once you add lights. cameras or sets to a Motion project, you move into 3D space. And that is a place where it is easy to get lost. Really, really lost.

Why? Because the background is black, the space is vast, we are moving in three dimensions, and there’s no floor.

NOTE: All three of these options change your view, but they don’t alter your Motion project.

To help you quickly get reoriented and find home, go to the Active Camera menu in the top left corner of the Canvas (Viewer).

  • Reset View (Shortcut: Control + R). This instantly brings you back to the 0,0,0 point. So, no matter how far you wander, you can always get home.
  • Fit Object into View (Shortcut: F). Select an element in the Layers pane. This option instantly fills the frame with the selected object. This is great way to quickly see small text or background elements.
  • Frame Object (Shortcut: Shift + Cmd + F). This rotates the selected element to the active camera’s point of view, centers it, then zooms until it fills the frame.

These options are even more useful when you are using other perspectives than Active Camera.

EXTRA CREDIT

Using Frame Object often means that you are seeing an element from a different perspective than the one displayed in the Active Camera menu.

Choose Reset View to get everything reset back to normal.


Please rate the helpfulness of this tip.

Click on a star to rate it!

… for Apple Motion

Tip #1466: 10 Motion Shortcuts I Wish I Knew Earlier

Larry Jordan – LarryJordan.com

Of these, moving elements up and down are SO helpful!

The Apple Motion logo.

Topic $TipTopic

Over the last four weeks, I presented a series of four webinars on Apple Motion. During that time, there were several features in Motion that I thought could only be done with a mouse. And it drove me nuts, because I kept wanting “a better way!”

There was. And, naturally, I found it AFTER my webinar series was complete. Sigh…

Here are ten keyboard shortcuts that make Motion a whole lot easier to use – and ones I wish I knew a month ago. These all apply to the Layers panel.

Shortcut What It Does
Shift + Cmd + N Create a new group
Cmd + ] Raise the selected element or group up one level
Cmd + [ Lower the selected elements or group down one level
Shift + Cmd + G Place selected Layers panel elements into a new group
Shift + F Display the selected element in the Media panel
Control + L Lock or unlock an element
Control + D Toggle a group between 2D and 3D
Control + T Make selected element visible or invisible
Control + S Solo the selected elements
Up/Down Arrow Move selection up ordown in the Layers panel

The shortcuts to move elements and groups up and down are the ones I’ve needed for a long time.


Please rate the helpfulness of this tip.

Click on a star to rate it!

… for Apple Final Cut Pro X

Tip #1495: Keyboard Shortcuts to Change Audio Levels

Larry Jordan – LarryJordan.com

Keyboard shortcuts to speed audio level changes.

Topic $TipTopic

(I discovered this tip while researching a recent PowerUP webinar presenting Audio in Apple Final Cut Pro.)

You know you can change audio levels for clips in the timeline by dragging the audio volume line up or down. Here are some keyboard shortcuts that make this process even faster.

Shortcut What It Does
Control + S Expand / Collapse audio clip from video
Cmd + drag Slows down level changes to improve precision.
Control + [minus] / [equals] Lower/Raise audio levels for selected clip(s)
Control + Option + L Adjust audio level across all selected clips TO a specific amount (Absolute adjustment)
Option + [Up] / [Down] Arrow Nudge value of selected keyframe up or down.

Please rate the helpfulness of this tip.

Click on a star to rate it!

… for Adobe Premiere Pro CC

Tip #1471: Four Faster Timeline Mouse Shortcuts

Larry Jordan – LarryJordan.com

Pressing different modifier keys changes behavior.

The Adobe Premiere Pro logo.

Topic $TipTopic

Here are four mouse shortcuts you can use in Premiere’s timeline to move around faster; plus one that you already know.

TIMELINE

  • Scroll wheel. Rolls the timeline up or down.
  • Option + scroll wheel. Zooms into, or out of, the current position of the cursor; not the playhead.
  • Cmd + scroll wheel. Move the timeline left or right.
  • Control + scroll wheel. Depending upon the position of the cursor, not the playhead, scrolls the video or audio tracks up or down.

TRACK HEADER

  • Option + scroll wheel. Enlarges or shrinks the vertical height of video or audio tracks, depending upon the position of the cursor, not the playhead.

Please rate the helpfulness of this tip.

Click on a star to rate it!

… for Adobe Premiere Pro CC

Tip #1224: Interesting – and Unassigned – Shortcuts

Larry Jordan – LarryJordan.com

Exploring for unassigned keyboard shortcuts is one of my favorite passtimes.

Topic $TipTopic

Here are several unassigned keyboard shortcuts that you may want to add to your toolkit.

Search for: Default

Shortcuts:

  • Apply Default Audio Transition to Playhead
  • Apply Default Video Transition to Playhead

Search for: Nudge

Shortcuts:

  • Nudge audio volumes up or down

Search for: Marker

Shortcuts:

  • Add Chapter marker

Plus, look at all the other existing marker shortcuts that you may not have known about.

EXISTING SHORTCUTS

Here are several exiting shortcuts you may also want to learn.

Search for: Trim

The one I find most useful is Toggle Trim Type (between Ripple, Roll and Trim). But the other six trim shortcuts are useful, too.


Please rate the helpfulness of this tip.

Click on a star to rate it!

… for Apple Final Cut Pro X

Tip #1188: Keyboard Shortcuts for Pasting Clips

Larry Jordan – LarryJordan.com

Six tips that move a clip from where it is to where you want it.

Topic $TipTopic

Warren Nelson suggested this tip:

I need to copy and paste a clip from the timeline to a layer above the timeline.

  • Using Cmd + V inserts the clip in the timeline.
  • I finally dug around and discovered that Option + V pastes the clip, copied from the timeline, at the playhead position above the timeline!

Cool tip, Warren! Here are four other shortcuts you can use to move clips from the Primary Storyline to a connected clip above it:

  • Edit > Lift from Storyline (Shortcut: Option + Cmd + Up arrow)
  • Edit > Overwrite to Primary Storyline (Shortcut: Option + Cmd + Down arrow)
  • Edit > Select > Up (Shortcut: Cmd + Up arrow) Selects the clip under the playhead on the higher layer.
  • Edit > Select > Down (Shortcut: Cmd + Down arrow) Selects the clip under the playhead on a lower layer.

Please rate the helpfulness of this tip.

Click on a star to rate it!

… for Adobe Premiere Pro CC

Tip #1110: Multicam Keyboard Shortcuts

Larry Jordan – LarryJordan.com

Multicam editing is all about efficiency. Keyboard shortcuts help.

Topic $TipTopic

Last week I presented a webinar on Multicam Editing in Adobe Premiere. As I was researching this, I discovered several little-known keyboard shortcuts that make multicam editing more fun. Here’s the list.

Multicam Keyboard Shortcuts

Shortcut What It Does
Shift + 0 Open/Close the Multicam Editor
E Jump the selected edit point to the playhead
1 – 9 If playhead is playing, cut between angles
1 – 9 If playhead is stopped, switch between angles
Control + 1 – 9 If playhead is stopped, cut between angles

Please rate the helpfulness of this tip.

Click on a star to rate it!

… for Apple Final Cut Pro X

Tip #1001: The Little Red Box

Larry Jordan – LarryJordan.com

To quickly reset a zoomed-in image, type Shift + Z.

The red box helps you navigate around a zoomed-in Viewer image.

Topic $TipTopic

Ever wonder what that red box is that appears periodically on the right side of the Viewer? Well, here’s the answer.

The red box appears whenever you are zoomed into an image in the Viewer (not the timeline) such that the entire image can’t be displayed.

The red box acts as a positioning control to move about the image. Drag inside the box to change the portion of the image displayed in the Viewer.

To remove the red box, type Shift + Z (which fits the entire image in the Viewer) or click the percent menu at the top right corner of the Viewer and change the percentage to Fit.


Please rate the helpfulness of this tip.

Click on a star to rate it!

… for Visual Effects

Tip #938: 10 Essential After Effects Tricks

Larry Jordan – LarryJordan.com

After Effects is filled with many different ways to work more efficiently.

Topic $TipTopic

This article first appeared in RocketStock.com. This is an excerpt.

These 10 quick and easy After Effects tricks are essential for any motion designer!

  1. Quick Pan. Hold down the space bar and drag.
  2. Build a RAM Preview. Control + O.
  3. Duplicate layers. Command + D.
  4. Adjust Render Quality. Select the dropdown menu at the bottom of the composition panel.
  5. Export Alpha Channels. Include both RGB + Alpha in the Output Module.
  6. The “Wiggle” Expression. Add the expression wiggle(10,10) into your expression editor.
  7. Save Frames. Composition > Save Frame As > File.
  8. See All Keyframes. U.
  9. Keyframe Scaling. Hold down option and drag a selection of keyframes.
  10. The Graph Editor. With keyframes selected, hit the small graph icon in the timeline.

The article link at the top includes detailed descriptions, illustration of each shortcut and links to more After Effects tips and tutorials.


Please rate the helpfulness of this tip.

Click on a star to rate it!