… for Codecs & Media

Tip #1286: Optimize RAIDs for SSDs

Larry Jordan – LarryJordan.com

Optimizing RAIDs for SSD drives will improve performance.

(Image courtesy of OWC.)

Topic $TipTopic

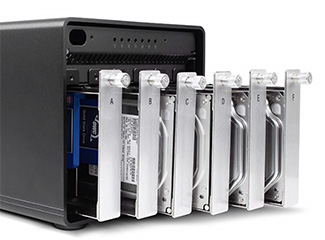
RAIDs (Redundant Array of Independent Disks/Drives/Devices) consist of a number of hard drives or SSDs grouped together into a single unit so that they appear to the computer as a single device. Because there is more than one hard drive in a RAID, they offer greater performance and storage.

As we continue shifting storage from spinning media, which holds a LOT, to SSDs, which are FAR faster and more flexible, we need to rethink how RAIDs are configured. This configuration is done using “levels.” There are different levels of RAIDs, identified by numbers:

NOTE: Another benefit to SSD-based RAIDs, is that there is no latency. Because there is no mechanical movement, data can be retrieved much more quickly.

  • RAID 0 – Fast, inexpensive, no data redundancy. Requires a minimum of two hard drives inside the RAID enclosure. The more drives you add, the faster the performance, as performance and storage capacity are the sum of all drives in the RAID. However, if you lose one drive, you’ve lost ALL your data. Most often used when speed combined with low cost are paramount.
  • RAID 1 – Complete data redundancy. Generally only uses two hard drives inside the RAID enclosure. Often called “mirroring,” each drive is a complete copy of the other. Most often used for backing up servers or when on-set for DIT media work. Has the speed and capacity of the slowest single drive in the system.
  • RAID 3 – Medium-fast, data redundancy. Requires a minimum of three drives, as one drive is reserved solely for parity data. Should one drive die, your data is safe. This technology is no longer in common use, replaced by the faster performance of RAID 4 or 5 systems.
  • RAID 4 – Very-fast, data redundancy. Similar to RAID 3, requires a minimum of three drives, as one drive is reserved solely for parity data. Should one drive die, your data is safe. This is the preferred RAID format for SSD drives because of how the data is stored on the drives. When compared to a RAID 5, RAID 4 with SSDs is about 25% faster on reads.
  • RAID 5 – Very fast, data redundancy. Requires a minimum of three drives and shares parity data across all drives. Most often found with four or more drives inside. If one drive goes down, your data is safe. This is the preferred choice for RAIDs containing spinning media (traditional hard disks). Used for both locally-attached storage and servers.
  • RAID 6 – Fast, extra data redundancy. Requires a minimum of four drives. This version protects your data in the event two hard drives die at the same time. More expensive than RAID 5, but, generally, the same physical size. Like the RAID 5 this is most often used connected to just one computer. Not as fast as a RAID 5.
  • RAID 10 (or 1+0) – VERY fast, totally redundant. Requires a minimum of four drives, but is more often created by combining two matched RAID 0’s into a RAID 1. This provides the speed equivalent of a RAID 0, with the data redundancy of RAID 1. As RAIDs continue to drop in price, this can be a less-expensive way to create systems that rival the performance of a RAID 50.
  • RAID 50 – VERY fast, data redundancy. Generally the domain of very large RAIDs, this format combines the speed of RAID 0 with the redundancy of RAID 5 by dividing the RAID into sections, where you can lose a drive in each section without losing data. These systems generally cost more than $10,000 and contain at least twelve drives. Generally used in network and server situations where multiple users need to access the same data.
  • RAID 60 – VERY fast, extra data redundancy. Generally the domain of very large RAIDs, this format combines the speed of RAID 0 with the redundancy of RAID 6 by dividing the RAID into sections, where you can lose two drives in each section without losing data. These systems generally cost more than $10,000 and contain at least twelve drives. Generally used in network and server situations where multiple users need to access the same data.

EXTRA CREDIT

RAID 4 is the preferred option for SSD-based RAIDs.


Please rate the helpfulness of this tip.

Click on a star to rate it!

… for Codecs & Media

Tip #1287: What is “Latency?”

Larry Jordan – LarryJordan.com

Hard drives have latency – SSDs do not.

(Image courtesy of Pexels.com.)

Topic $TipTopic

Latency is directly tied to spinning storage media – the traditional hard drive – and determines how quickly you can access your data. Latency is the average time for the data being accessed to rotate into position under the drive’s magnetic head, after a completed seek.

As PC Tech Guide.com writes:

Disk RPM is a critical component of hard drive performance because it directly impacts the latency and the disk transfer rate. The faster the disk spins, the more data passes under the magnetic heads that read the data; the slower the RPM, the higher the mechanical latencies. Hard drives only spin at one constant speed, and for some time most fast EIDE hard disks spin at 5,400 rpm, while a fast SCSI drive is capable of 7,200 rpm.

Mechanical latencies, measured in milliseconds, include both seek time and rotational latency. Seek Time defines the amount of time it takes a hard drive’s read/write head to find the physical location of a piece of data on the disk. Latency is the average time for the sector being accessed to rotate into position under a head, after a completed seek. It is easily calculated from the spindle speed, being the time for half a rotation.

A drive’s average access time is the interval between the time a request for data is made by the system and the time the data is available from the drive. Access time includes the actual seek time, rotational latency, and command processing overhead time.

EXTRA CREDIT

What makes SSDs so fast is that they don’t spin or have magnetic drive heads. This means that terms like latency and seek time no longer apply. Here’s the full PCTechGuide.com article to learn more.


Please rate the helpfulness of this tip.

Click on a star to rate it!

… for Codecs & Media

Tip #1289: Top Ten Tips of 2020 for Codecs & Media

Larry Jordan – LarryJordan.com

It is fascinating to see what readers find interesting!

Topic $TipTopic

During this last year, The Inside Tips published 975 tips and techniques covering six subject categories:

  • Adobe Premiere
  • Apple Final Cut Pro
  • Apple Motion
  • Codecs & Media
  • Random Media Weirdness
  • Visual Effects

Here are three “Top Ten Tips Lists:” The first shows the most popular tips covering Codecs & Media. The second list shows the Top Ten most read tips across all categories. The third list shows the highest rated tips across all categories sorted by votes.

TOP 10 INSIDE TIPS of 2020
FOR CODECS & MEDIA

  1. Tip #474: DNxHR vs. ProRes
  2. Tip #957: Apple Supports VP9 in macOS Big Sur
  3. Tip #416: Closed Caption Formats for Social Media
  4. Tip #561: Optimize Compression Settings for YouTube
  5. Tip #746: What is HDR Rec. 2020 PQ?
  6. Tip #458: Video Compression Settings for YouTube
  7. Tip #883: Don’t Turn Your Hard Disk Into a Camera
  8. Tip #866: A Better Way to Upscale Media
  9. Tip #591: In-Depth Overview of USB
  10. Tip #508: Pick the Best Audio Format for Editing

NOTE: Tips are sorted by views, most views listed first.


TOP 10 INSIDE TIPS of 2020
(Sorted by Views)

  1. Tip #479: Copy and Paste Masks in Premiere
  2. Tip #283: AAF vs. EDL vs. OMF Export
  3. Tip #413: Mask Multiple Clips with an Adjustment Layer
  4. Tip #474: DNxHR vs. ProRes
  5. Tip #329: Blurs and Mosaics are No Longer Safe
  6. Tip #592: Make Zooms More Interesting
  7. Tip #957: Apple Supports VP9 in macOS Big Sur
  8. Tip #1135: Boost and Smooth Dialog Levels
  9. Tip #715: How to Reset FCP X to Fix Problems
  10. Tip #342: Uses for Emoji in Final Cut Pro X

NOTE: Tips are sorted by views, most views listed first.


TOP 10 INSIDE TIPS of 2020
(Sorted by Ratings)

  1. Tip #742: The Best Advice to Keep Your Cool
  2. Tip #614: What is the Alpha Channel
  3. Tip #580: The History of Storyboards
  4. Tip #911: The Skin Tone Line is Your Friend
  5. Tip #515: Using the Active Camera Menu
  6. Tip #631: Get Freelance Work From Video Marketplaces
  7. Tip #1056: Move a Mix from Audition to Premiere
  8. Tip #624: Not All Captions Look Alike
  9. Tip #581: Create Colorful Lighting for 3D Text
  10. Tip #398: Use Watch Folders in AME for Automation

NOTE: Each tip was rated 5 out of 5. They are sorted by the number of votes each tip received, with most votes listed first.


Please rate the helpfulness of this tip.

Click on a star to rate it!

… for Codecs & Media

Tip #1273: What is an MKV File?

Larry Jordan – LarryJordan.com

MKV files, like QuickTime or MXF, are containers that hold media files.

Topic $TipTopic

This morning, a reader emailed me a question asking whether MKV files are supported in Big Sur. That got me thinking about what an MKV file is.

According to HowToGeek.com, “MKV files are actually multimedia container formats. An MKV container can incorporate audio, video, and subtitles into a single file—even if those elements use different types of encoding….
MKV container files were designed to be future proof, meaning that the files would not become outdated.”

Features of an MKV file include:

  • Fast seeking
  • Chapter, menu, and metadata support
  • Different selectable audio and video streams
  • Online streaming compatibility
  • Subtitle (hard-coded and soft-coded) support
  • Error recovery, which allows for playback of corrupted files

The MKV container itself also supports almost any audio and video format, making the format highly adaptive and easy to use. However, while the MKV file may not become outdated, the players that support them can. For example, QuickTime Player does not support MKV files.

Here’s a list, published by Wondershare, of the top 10 MKV players for Windows, Mac, iOS and Android devices.

So, as for compatibility, if your MKV player runs on Big Sur, the MKV files should play as well.


Please rate the helpfulness of this tip.

Click on a star to rate it!

… for Codecs & Media

Tip #1274: Where a QuickTime Movie Stores Timecode

Larry Jordan – LarryJordan.com

Timecode is a separate track stored inside the QuickTime movie container.

A typical timecode display.

Topic $TipTopic

We often think of a QuickTime movie as a file. But, it actually isn’t. It’s a container for multiple files – each of which can be different.

Timecode tracks, which are stored inside the QuickTime container, store external timecode information, such as SMPTE timecode. QuickTime provides a timecode media handler that interprets the data in these tracks to track each frame of video.

A movie’s timecode is stored in a timecode track. Timecode tracks contain:

  • Source identification information (this identifies the source; for example, a given videotape or digital file)
  • Timecode format information (this specifies the characteristics of the timecode and how to interpret the timecode information)
  • Frame numbers (these allow QuickTime to map from a given movie time, in terms of QuickTime time values, to its corresponding timecode value)

Apple has defined the information that is stored in the track in a manner that is independent of any specific timecode standard. The format of this information is sufficiently flexible to accommodate all known timecode standards, including SMPTE timecoding.

In essence, you can think of the timecode media handler as providing a link between the digital QuickTime-specific timing information and the original analog timing information from the source material.


Please rate the helpfulness of this tip.

Click on a star to rate it!

… for Codecs & Media

Tip #1275: How an AVCHD Folder is Organized

Larry Jordan – LarryJordan.com

The best way to handle AVCHD is to transcode it.

Typical AVCHD directory structure (Image courtesy of Vector15.com).

Topic $TipTopic

AVCHD (Advanced Video Coding High Definition) is a format for digital recording and playback of high-definition video developed jointly by Sony and Panasonic. An AVCHD file is actually not a single video file, but a hierarchical file structure derived from the file structure you would find on a Blu-ray disc, containing multiple video clips.

On OSX, the AVCHD folder is automatically viewed as a package (aka bundle). If you are not familiar with packages on OSX, a package is a file system folder that is normally displayed in the Finder as if it were a single file. A package can contain hundreds of other folders and files and such. An iPhoto Library is a package, for example. In addition, OSX further treats the BDMV folder as a package as well.

The problem is that macOS does not handle AVCHD files well, including limited QuickTime support, inability to rename the files in the AVCHD bundle, and extracting just the file you want to access.

Instead, it is better to simply copy the ENTIRE AVCHD folder to your hard disk, open it into your NLE and import just the clips you need for your edit.

Ideally, it would also be good to transcode that original AVCHD media (which uses the H.264 codec) into something easier to edit, such as ProRes 422.

Here’s an article from Vector15.com that describes AVCHD in more detail.


Please rate the helpfulness of this tip.

Click on a star to rate it!

… for Codecs & Media

Tip #1255: Criteria for Buying a Computer System

Larry Jordan – LarryJordan.com

The challenge is not the final export, but in assembling the pieces to create it.

Topic $TipTopic

Just a couple of minutes ago, I got this email:

“I need a [newer] system to work with now [while waiting for the new Apple silicon systems to be released]. What are your thoughts about using an external SSD with a 2019 mid level iMac 27?”

So, I sent this response:

“Smile…. Until you give me a clue about what you want to do with this gear, it’s pretty darn hard to offer an opinion.”

They then responded:

“Majority of work is for YouTube.”

I replied:

“Key criteria for any hardware purchase are: the speed you need to get things done, the NLE you are using, the frame size you are working in, and the codecs you are using. The distribution format is trivial.

“If you are at 4K and below, not emphasizing HDR and have reasonable deadlines, the 2019 27″ iMac is an excellent choice.”

I mention this conversation because it is a question that I get almost every day – and it’s the wrong question. When buying new gear, we need to have a reasonable idea of what we are using it for. In almost all cases, the end result is not where the work is – it’s in assembling and combining all the pieces.

A sports car, pickup truck and school bus are all potentially excellent vehicles, but only one will do a good job transporting 40 people from Point A to Point B.


Please rate the helpfulness of this tip.

Click on a star to rate it!

… for Codecs & Media

Tip #1256: What’s the “Ideal” Computer?

Larry Jordan – LarryJordan.com

It doesn’t have to be perfect, it simply needs to get the job done efficiently.

(Image courtesy of Pexels.com.)

Topic $TipTopic

My wife has a saying: “The perfect is the enemy of the good.” Nowhere is that more true than in technology; and it is driving us all nuts.

What this saying means is that we spend too much time looking for the perfect system, when a system that may be less than perfect is still more than adequate is enough. This is especially true when it comes to storage.

As an example, I’m in the process of upgrading my server for faster performance and greater capacity. However, last night, as I was exporting my weekly webinar, I measured how fast Final Cut creates a ProRes 4444 file: 85 MB/second. Even if I had storage that clocked in at NVMe speeds – 2500 MB/sec – my exports would not be any faster, because FCP X can only calculate these files so fast.

1080p media needs less than 40 MB/second to edit, while 4K media needs less than 70 MB/sec. Storage that goes 300 MB/second will edit at the same speed as storage that goes 2500 MB/second.

I’m not saying faster storage is a bad idea, clearly, multicam editing, HDR or larger frame rates require more horsepower than simple HD. However, what I am saying is that we need to ask ourselves a bigger question: Where will extra speed actually help? For example, if I only edit one project a week, spending a lot of money improving export speed is not meaningful compared to the time it takes to edit the project in the first place. Sadly, faster storage does not help me think any faster. I wish it did.

Another example was provided by Gloria. She owns a high-end 2019 Mac Pro. She’s worried that Thunderbolt 4, which hasn’t shipped yet, will make her system obsolete.

Well, ALL computers become obsolete at some point, but when it comes to performance, Thunderbolt 4 is the same as Thunderbolt 3. And, even when new gear is released, as it always is, all our current gear will still work exactly the same as it does now.

I get dozens of emails each week from editors happily editing on Mac Pro systems that are 10-12 years old. Clearly not state of the art, but fully capable of doing the work they need to get done – on time and on budget. I get even more emails from editors stressing over whether they need a 3.2 GHz or 3.3 GHz CPU.

My advice is stop trying for perfection – unless the search itself is something you enjoy. Instead find a system that meets your needs. Most of the time, good enough is also fast enough. And “future-proofing” is a fool’s errand.

Jan Frederickson, of WLS-TV, had a sign on her wall that I think about daily: “It’s better than perfect, it’s done.”

That is a reassuring statement.


Please rate the helpfulness of this tip.

Click on a star to rate it!

… for Codecs & Media

Tip #1257: Repair a Broken QuickTime Movie

Larry Jordan – LarryJordan.com

Here are a variety of tools you can use to convert, repair and play QuickTime files.

Topic $TipTopic

QuickTime is a very flexible media container, but, when it breaks, it breaks badly.  There are three big problems with video files that won’t play:

  • The file lacks an extension
  • The codec is no longer supported
  • The QuickTime movie itself is broken

The first problem generally shows up when you store media files on a server. Servers don’t use the Mac operating system, which means that all files on a server must use an extension. Sometimes, simply adding the correct extension – either .mov or .mp4 – will allow a movie to play.

A bigger problem with video files are codecs that are no longer supported. Apple removed support for 32-bit codecs in macOS Catalina, which means many early videos no longer play. Even my audio-only files, stored in early QuickTime movies, won’t play.

To play older files, I have several older computers that I’m not upgrading. As well, Kyno, from LessPain Software will convert older codecs, even if the movies won’t play on a current operating system.

The third problem, though is trickier. When dealing with QuickTime movies, the entire file needs to be perfect for the video to play. If one small part of a QuickTime movie is damaged, the entire movie is dead. For this reason, much though I love QuickTime, I’m also converting any movies that need future proofing into MPEG-4. Keep the bit rate high – 10 Mbps or above – to retain high image quality. Then, I have both a ProRes version and an MPEG-4 version. One of those should last.

If the media file is damaged, I’ve had great success using Wondershare UniConverter. While this hasn’t fixed all my files, it HAS fixed most of them. This software has a free trial that converts the first third of any video. If it can convert a third, the paid version (subscription or purchase) will convert all of it. I used this software to recover over 100 files that wouldn’t play.

As well, the folks at Digital Rebellion also have a family of QuickTime repair utilities called Pro Maintenance Tools. I’m hoping to give it a try in the next week or two. I have great respect for their developers!


Please rate the helpfulness of this tip.

Click on a star to rate it!

… for Codecs & Media

Tip #1236: Comparing ProRes 422 HQ, 422 vs. 422 LT

Larry Jordan – LarryJordan.com

Apple ProRes logo.

Topic $TipTopic

I got into a discussion recently about the differences between ProRes 422 and ProRes 422 HQ. After that, I did some research and here’s what I learned.

NOTE: This material was taken from Apple’s ProRes White Paper.

Apple ProRes 422 HQ: A higher-data-rate version of Apple ProRes 422 that preserves visual quality at the same high level as Apple ProRes 4444, but for 4:2:2 image sources. With widespread adoption across the video post-production industry, Apple ProRes 422 HQ offers visually lossless preservation of the highest-quality professional HD video that a single-link HD-SDI signal can carry. This codec supports full-width, 4:2:2 video sources at 10-bit pixel depths, while remaining visually lossless through many generations of decoding and re-encoding. The target data rate of Apple ProRes 422 HQ is approximately 220 Mbps at 1920 x 1080 and 29.97 fps.

Apple ProRes 422: A high-quality compressed codec offering nearly all the benefits of Apple ProRes 422 HQ, but at 66 percent of the data rate for even better multistream, real-time editing performance. The target data rate of Apple ProRes 422 is approximately 147 Mbps at 1920 x 1080 and 29.97 fps.

Apple ProRes 422 LT: A more highly compressed codec than Apple ProRes 422, with roughly 70 percent of the data rate and 30 percent smaller file sizes. This codec is perfect for environments where storage capacity and data rate are at a premium. The target data rate of Apple ProRes 422 LT is approximately 102 Mbps at 1920 x 1080 and 29.97 fps.

Which would I use personally?

  • ProRes 422 HQ. Only if the camera recorded source footage in this format.
  • ProRes 422. Anything shot by a non-HDR camera.
  • ProRes 422 LT. All review copies sent to clients or collaborators to decrease file size.

I’m interested in your comments.


Please rate the helpfulness of this tip.

Click on a star to rate it!