… for Codecs & Media

Tip #1237: An Overview of GoPro Cineform

Larry Jordan – LarryJordan.com

The Cineform logo.

Topic $TipTopic

One of the long-standing intermediate codecs for Adobe Premiere Pro is GoPro Cineform.

As Adobe writes: The GoPro CineForm codec is a cross-platform intermediate codec designed for editing high-resolution footage.

An intermediate codec can be best described as a video encoding format designed for professional video editing. You typically use an intermediate codec to pass media files from one application to another in a post-production workflow.

The GoPro CineForm codec is optimized for encoding video content with 4K and higher resolution, including support for smart rendering. You can also render and transcode files in mixed formats into a single GoPro CineForm codec to archive, or share with other teams and systems.

A distinct advantage of using the GoPro CineForm codec is the minimal loss in quality even after multiple encodes.

As GoPro writes: CineForm, first developed in 2001, was the first of its type to focus on speed, while supporting higher bit depths for image quality. More recent examples would be Avid DNxHD and Apple ProRes, although both divide the image into blocks using DCT. The full frame wavelet has a subjective quality advantage over DCTs, so you can compress more without classic ringing or block artifact issues.

It supports compression ratios between 10:1 and 4:1, greater ranges are possible. CineForm is a constant quality design, bit-rates will vary as needed for the scene.

This link – though it looks intimdating at the start – contains a useful description of the codec, along with it’s history and what makes it different from DNx or ProRes. Scroll down, past the developer information at the top.


Please rate the helpfulness of this tip.

Click on a star to rate it!

… for Codecs & Media

Tip #1238: An Overview of Alpha Channels

Larry Jordan – LarryJordan.com

Alpha channels are the magic that make compositing and most effects possible.

Viewing the alpha channel: White is opaque, black is transparent & gray is translucent.

Topic $TipTopic

The process of adding an alpha channel to an image – as a developer – is highly complex. Fortunately, we don’t need to understand how the channel is added to take advantage of it.

Just as the red, blue and green channels describe the amount of red, blue or green in each pixel, the alpha channel describes the amount of transparency in each pixel. An alpha channel provides a way to store images and their transparency information in a single file without disturbing the color channels.

Many file formats can include an alpha channel, including Adobe Photoshop, ElectricImage, TGA, TIFF, EPS, PDF, and Adobe Illustrator. ProRes, AVI and QuickTime (saved at a bit depth of Millions Of Colors+), also can contain alpha channels, depending upon the codecs used to generate these file types.

Alpha channels store transparency information in files in one of two ways: straight or premultiplied. Although the alpha channels are the same, the color channels differ.

With straight (or unmatted) channels, transparency information is stored only in the alpha channel, not in any of the visible color channels. With straight channels, the effects of transparency aren’t visible until the image is displayed in an application that supports straight channels.

With premultiplied (or matted) channels, transparency information is stored in the alpha channel and also in the visible RGB channels, which are multiplied with a background color. The colors of semitransparent areas, such as feathered edges, are shifted toward the background color in proportion to their degree of transparency.

Some software lets you specify the background color with which the channels are premultiplied; otherwise, the background color is usually black or white.

Straight channels retain more accurate color information than premultiplied channels. While premultiplied channels are compatible with a wider range of programs, such as Apple QuickTime Player.

Often, the choice of whether to use images with straight or premultiplied channels has been made before you receive the assets to edit and composite. Premiere Pro and After Effects recognize both straight and premultiplied channels, but only the first alpha channel they encounter in a file containing multiple alpha channels.

Use ProRes 4444 when you need to create or transfer clips with alpha channels.

Alpha channels are supported in all NLEs, and there are dozens of articles on the web detailing how to work with them to create a variety of different effects.


Please rate the helpfulness of this tip.

Click on a star to rate it!

… for Codecs & Media

Tip #1209: I Need Your Help

Larry Jordan – LarryJordan.com

The Inside Tips encourages reader-contributed tips. Please share yours with us.

We don’t know what we don’t know until we learn it from someone else.

Topic $TipTopic

I want to encourage you to submit a tip or two for “The Inside Tips.” We all benefit when we take the time to share what we know.

The Inside Tips for Codecs & Media is a Tip Letter focused on the technical aspects of media and compression. This is a large topic – far more than any single person can master.

Each of us, during our career, has benefited by learning from others – sometimes in a formal setting, more often in the course of daily work.

For this reason, it would be great if you could contribute a tip or two from your own experience. The Inside Tips are read in every state in the US, as well as 50 countries around the world.

Even the “simple things” only seem simple after we learn them.

Click this link to submit a tip…. And thanks!


Please rate the helpfulness of this tip.

Click on a star to rate it!

… for Codecs & Media

Tip #1210: Tips for Faster Video Compression

Larry Jordan – LarryJordan.com

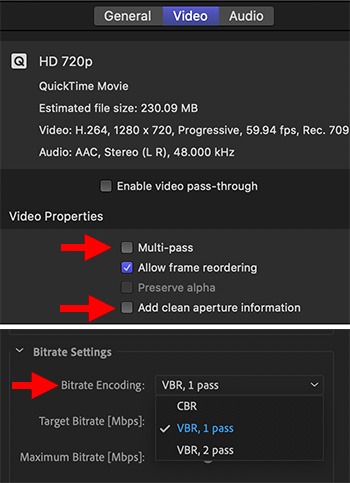
These settings can disable hardware acceleration, without benefitting the image.

Apple Compressor (top) and Adobe Media Encoder. Preferred settings are shown.

Topic $TipTopic

Last week, I wrote about the hardware acceleration provided by both the T-2 and M-1 chips in Apple computers Tip #1190. As well, most current Intel CPUs also support hardware acceleration of 8-bit H.264 and HEVC media.

However, it is possible to accidentally turn OFF hardware acceleration by changing one setting in either Apple Compressor or Adobe Media Encoder.

NOTE: I can’t think of a single good reason to do this, so, um, don’t do it.

SETTING 1 – COMPRESSOR

Hardware acceleration is always single pass. Enabling multi-pass turns off hardware acceleration. (The top screen shot illustrates this setting in Apple Compressor.)

SETTING 2 – ADOBE MEDIA ENCODER

AME has two Bit Rate settings that can turn off hardware acceleration: CBR and VBR 2-pass. For fastest compression be sure to always select VBR 1-pass.

EXTRA CREDIT

In the past, we used 2-pass software compression because it looked better. Based on my observations, using today’s CPUs, hardware-accelerated compression looks as good as, or better than, media compressed using software.

And, it finished a WHOLE LOT faster, as well.

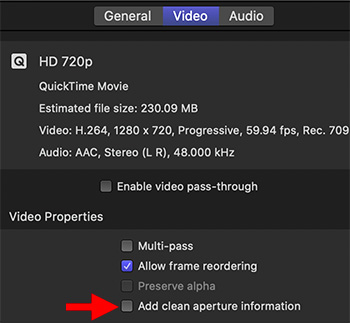
In Apple Compressor, for digital images, you can also turn off Clean Aperture. Tip #1211 explains why.


Please rate the helpfulness of this tip.

Click on a star to rate it!

… for Codecs & Media

Tip #1211: What Is “Clean Aperture?”

Larry Jordan – LarryJordan.com

Clean Aperture is most helpful for images transferred from analog tape.

The Clean Aperture option in Compressor > Video Properties panel. It

Topic $TipTopic

You may have seen this “Clean Aperture” checkbox in Apple Compressor and wondered what it does and when to use it. Apple has it On by default.

Here’s what Apple’s Help Files say:

“Select this checkbox to define clean picture edges in the output file. This property adds information to the output file to define how many pixels to hide, ensuring that no artifacts appear along the edges. When you play the output file in QuickTime Player, the pixel aspect ratio will be slightly altered. This process doesn’t affect the actual number of pixels in the output file—it only controls whether information is added to the file that a player can use to hide the edges of the picture.”

In general, if you have an image recorded from analog tape, you’ll have this problem. Most current digital images don’t need this.

While it is on by default, I generally turn this off.


Please rate the helpfulness of this tip.

Click on a star to rate it!

… for Codecs & Media

Tip #1190: Faster H.264 and HEVC Compression

Larry Jordan – LarryJordan.com

Compression is getting faster due to new chips supporting hardware acceleration.

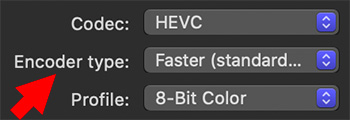
The Encoder type menu option in Apple Compressor 4.5.

Topic $TipTopic

As I was preparing this week’s webinar on media compression in Apple Compressor (link) I learned the following:

The new M1 chip from Apple (part of the three new Macs launched last week) can accelerate encoding of H.264, 8-bit HEVC, and 10-bit HEVC using hardware. This vastly speeds compression of these codecs.

NOTE: HDR media requires using a 10-bit codec, which is why compressing 10-bit HEVC quickly is important.

To enable hardware acceleration, be sure to select Faster for the Encoding type.

As well, recent Intel-based Mac computers can use the T2 chip to hardware accelerate 8-bit HEVC and 10-bit HEVC encoding. Again, the Faster Encoding type option should be selected.

NOTE: Selecting Multi-pass switches to software-based encoding. Given the speed and quality of today’s hardware-accelerated compression, there are very few reasons to use this option.


Please rate the helpfulness of this tip.

Click on a star to rate it!

… for Codecs & Media

Tip #1191: Create Watermarks That Move

Larry Jordan – LarryJordan.com

Moving watermarks can be created in Motion, then added using Compressor.

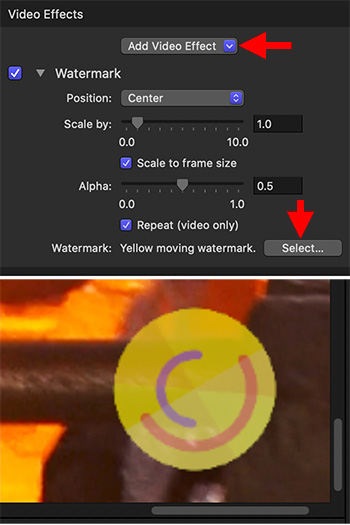
Watermark effects settings (top) and the inserted watermark (bottom)

Topic $TipTopic

We are all used to video watermarks, those small images in the lower right corner of a video that identify the source of the video. But, did you know those watermarks can move? If you use the right watermark, it can.

In Motion, create a project the same size as the video it will be added to. Position the watermark at both the size and position you want. Remember this video will loop so be sure the first and last frame match.

Motion automatically creates motion graphics with alpha channels, which means it will key into any video perfectly.

NOTE: I generally set watermarks to sit right at the lower-right corner of Title Safe.

  • Add a video to Compressor, then apply a compression setting to the clip.
  • Select the compression setting, then scroll to the bottom of the Video Inspector.
  • In the Add Video Effects menu, select Watermark (top red arrow).
  • At the bottom of the Watermark effect, click the Select button (bottom red arrow) and select the moving watermark you just created in Motion.
  • At the top of the Watermark effect, change Position to Center. This matches the framing of the watermark to the video.
  • If the watermark and the video are created at different frame sizes, check Scale to Frame Size to get them to match.
  • Finally, because the video needs to loop for the duration of your video, click Repeat (video only) to create the loop.

EXTRA CREDIT

Any application that creates video with an alpha channel can be used to create moving watermarks.


Please rate the helpfulness of this tip.

Click on a star to rate it!

… for Codecs & Media

Tip #1192: What Are Compression Artifacts?

Larry Jordan – LarryJordan.com

Compression artifacts are blurry rectangles in a compressed image.

A source image (top) compared to an image with severe artifacts.

Topic $TipTopic

Compression artifacts are caused by a compression data rate that is too low. These are most often seen as blurry rectangles that randomly “crawl” around an image.

In this screen shot, the source image is on top. The compressed image, with severe artifacts, is on the bottom.

Look at the lost detail in their hair, the “stair-steppy” edges along both girl’s shoulders and ugly blotches throughout their skin.

Artifacts most often show up in regions of similar color – skin, hair, sky, sand…

These can only be removed by recompressing your video at a higher (faster) bit rate.


Please rate the helpfulness of this tip.

Click on a star to rate it!

… for Codecs & Media

Tip #1170: Free Media Compression Webinars

Larry Jordan – LarryJordan.com

All Larry’s webinars are free.

Topic $TipTopic

Many editors have questions about media compression – how to get the best results with the smallest files, or how to make projects look good on social media.

Larry Jordan is offering two free webinars to answer your questions: one covering Apple Compressor and the other Adobe Media Encoder.

Both webinars have similar content:

  • Basic compression terms
  • Explore the interface
  • How to create a custom location
  • How to compress a file for social media
  • How to modify an existing compression setting
  • How to create a new compression setting
  • How to automate compression
  • Explore special compression settings

Here’s the link to sign up for any of these four webinars – Wednesday at 9 AM or 12 PM.


Please rate the helpfulness of this tip.

Click on a star to rate it!

… for Codecs & Media

Tip #1173: What is ProRAW?

Larry Jordan – LarryJordan.com

ProRAW is a pre-processed raw still image format designed to improve image quality.

(Image courtesy of Pexels.com.)

Topic $TipTopic

Apple ProRAW is a new still image raw format that is coming to the iPhone 12 Pro and iPhone Pro Max later in 2020.

According to TomsGuide.com: “ProRAW, in a nutshell, will capture RAW images but apply some image processing on top. This includes merging frames from several shots captured by the cameras on the iPhone 12 Pro, using Apple’s Deep Fusion and Smart HDR tech, or applying noise reduction.”

According to Tom’s Guide: “This new imaging format has been designed to tap into the upgraded triple rear camera array on both the iPhone 12 Pro and iPhone 12 Pro Max, which also feature a LiDAR sensor to gather more image information.”

“Think of it like this:,” Tom’s Guide wrote, “producing a finished image from RAW is like cooking a meal from scratch, including prepping all the ingredients. JPEG images on the other hand are the cooked meal. So using this analogy, ProRAW is like cooking a meal, only you have all the ingredients that are measured out and ready to use. Effectively, ProRAW provides base processing on an image for people to then [more easily] edit into final photographs.”

Here’s the link to the Tom’s Guide article.


Please rate the helpfulness of this tip.

Click on a star to rate it!