… for Codecs & Media

Tip #430: Compressing 10-Bit HEVC Media

Larry Jordan – LarryJordan.com

Windows will, generally, compress 10-bit HEVC faster than a Mac.

Comparing color spaces between Rec.709 and Rec. 2020. (Image courtesy of Intel.)

Topic $TipTopic

A reader asked this week why it took so long to compress 10-bit HEVC media. At first, I thought it was because Intel CPUs did not support hardware acceleration, but the answer is more complex than that.

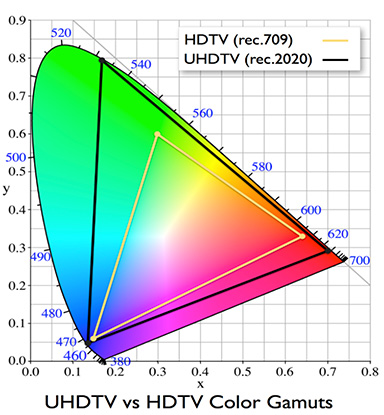
7th generation Intel Xeon and Core processors support the BT. 2020 (also known as Rec. 2020) standard in 10-bit HDR and more. This screen shot compares the color spaces of Rec. 709 (HD) with Rec. 2020 (HDR). The BT.2020 represents a much larger range of colors than previously used in BT.709.

NOTE: Dynamic range is the ratio between the whitest whites and blackest blacks in an image. HDR video interprets better dynamic range than conventional Standard Dynamic Range (SDR) video, which uses a non-linear operation to encode and decode luminance values in video systems.

High Efficiency Video Coding (HEVC), also known as H.265, is a video compression standard, a successor to the widely successful H.264/AVC standard. HEVC 10-bit hardware acceleration for both decoder and encoder with HEVC/H.265 Main 10 Profile is supported in 7th generation Intel processors; released in 2017 or later.

However, the tools to create 10-bit HEVC that Intel supplies only support Windows. So, assuming a Windows developer implements Intel’s HEVC SDK (Software Development Kit), they can access faster compression speeds using hardware acceleration.

Here’s an article from Intel that describes this in more detail.


Please rate the helpfulness of this tip.

Click on a star to rate it!

… for Codecs & Media

Tip #414: What is a Container Format?

Larry Jordan – LarryJordan.com

Containers hold stuff – like media.

Topic $TipTopic

QuickTime and MXF are often described as media “containers.” But, what is a container?

A “container,” also called a “wrapper,” is a metafile (analogous to a folder) whose specification describes how the different elements inside it are stored. Similar to a Keynote file or a Library in Final Cut Pro X, a container is a file that holds files, but still acts like a single file. Unlike a folder, when you double-click it, a container opens the files inside it.

By definition, a container could contain anything, but, generally, they focus on a specific type of data – most often involving media. Containers can hold video, audio, timecode, captions, and metadata that describes the contents of the container.

Popular containers include:

  • Both AIFF and WAV are containers, but only hold audio.
  • TIFF is a container for still images.
  • QuickTime, MXF and MPEG-2 Transport stream are containers for audio, video and related files.

The big benefit to containers is that they are not tied to a single codec, but allow us to use a single container for mutiple codecs, thus hiding the underlying technology inside a familiar format.


Please rate the helpfulness of this tip.

Click on a star to rate it!

… for Codecs & Media

Tip #415: Everything Starts With an IFF

Larry Jordan – LarryJordan.com

All our media starts as a “chunk.”

Topic $TipTopic

Back in WWII, an “IFF” was a radar signal used for “identification friend or foe.” But, in the media world, IFF has an entirely different meaning – one that we use everyday.

The Interchange File Format (IFF) is a generic container file format, invented in 1985 by Jerry Morrison at Electronic Arts, along with engineers at Commodore, to simplify transferring data between computers.

Common IFF formats include:

  • AIFF (Audio IFF file)
  • TIFF (Tagged IFF file)
  • PNG (a modified form of IFF)
  • FourCC (a Windows media format)
  • QuickTime also has IFF elements as part of its structure

An IFF file is built up from chunks, small pieces of data containing media and information about that media, similar to an Ethernet packet.

Each type of chunk typically has a different internal structure, which could be numerical, text or raw (unstructured) data.

The benefit to using IFF files is that it become easy to move files from one program or computer to another. An even better benefit is that IFF, like Ethernet, does not require us to understand how it works in order to use it.


Please rate the helpfulness of this tip.

Click on a star to rate it!

… for Codecs & Media

Tip #416: Closed Caption Formats for Social Media

Larry Jordan – LarryJordan.com

As you might expect, there’s no one subtitle format that works everywhere.

Topic $TipTopic

Erin Myers, at Rev.com, summarized the closed caption formats used by social media. Here’s her article. This is an excerpt.

Closed caption file formats vary depending on which site you’re using to host your videos and which platform you use to obtain the closed caption transcripts.

Adobe Premiere supports:

  • Scenarist (.scc)
  • MacCaption (.mcc)
  • XML (.xml)
  • Spruce Subtitle File (.STL).

Apple Final Cut Pro X supports:

  • iTunes Timed Text (.iTT)
  • SubRip (.srt)
  • SCC (CEA-608 format)

YouTube recommends Scenarist (.scc) format. But is compatible with:

  • SubRip (.srt)
  • WebVTT (.vtt)
  • DFXP/TTML (.dxfp)
  • Scenarist (.scc)
  • SAMI (.sami)

Vimeo recommends WebVTT (.vtt) but is compatible with:

  • SubRip (.srt)
  • DXFP/TTML (.dxfp)
  • Scenarist (.scc)
  • SAMI (.SAMI)

Facebook recommends the SubRip (.srt) format.

Netflix has two recommended formats. The EMA Closed Captions Working Group has identified Scenarist (.scc) as a preferred format due to its status as the de facto standard for CEA-608 and CEA-708 data.  SMPTE-TT is also recommended as, under the applicable laws, it is considered safe if captions are compliant. It is also compatible with:

  • SubRip (.srt)
  • Scenarist (.scc)
  • Timed Text (.ttml)
  • DXFP (.dxfp)
  • WebVTT (.vtt)
  • Cheetah CAP (.cap)
  • MacCaption (.mcc)
  • Quicktime Subtitle (.qt.txt)
  • Spruce Subtitle File (.stl).
  • XML (.xml)

Amazon Video Direct requires closed captions on all new videos uploaded to the service, but has not recommended a favorite. It supports:

  • Scenarist (.scc)
  • SMPTE-TT (.xml)
  • EBU-TT (.xml)
  • DFXP Full/TTML (.dfxp)
  • iTunes Timed Text (.iTT)

iTunes asks for a Scenarist-formatted file (with an .scc extension), or a QuickTime file with a closed captioning track. Compatible formats:

  • Scenarist (.scc)
  • DFXP Full/TTML (.dfxp)
  • iTunes Timed Text (.iTT)

Please rate the helpfulness of this tip.

Click on a star to rate it!

… for Codecs & Media

Tip #397: What Do Compressor Frame Sizes Mean

Larry Jordan – LarryJordan.com

Don’t scale images larger than 100%

The Frame Size selector in Apple Compressor.

Topic $TipTopic

The Frame Size setting in Apple Compressor determines precisely how your images are scaled during compression. Here’s what the settings mean.

Automatic. This outputs a compressed file at the same frame size as the source file.

Category: Up to…

This creates a compressed frame size that is the same size as the source file UNLESS the source file is larger than the “Up to” amount.

For example, if Up to was set to 1280 x 720, a 480 x 270 clip would be scaled to 480 x 270, while a 1920 x 1080 clip would be scaled to 1280 x 720.

Category: Manual

This scales a compressed frame size to exactly this frame size, regardless of the frame size of the source file.

For example, if Manual was set to 1280 x 720, a 480 x 270 clip would be scaled to 1280 x 720, while a 1920 x 1080 clip would also be scaled to 1280 x 720.

Category: Constrained

This allows scaling a compressed file to any frame size, provided it remains within the defined aspect ratio.

For example, choosing Custom 16:9, would allow scaling any 16:9 master to any frame size, as long as it retains the 16:9 aspect ratio; say 960 x 540.


Please rate the helpfulness of this tip.

Click on a star to rate it!

… for Codecs & Media

Tip #398: Use Watch Folders in AME for Automation

Larry Jordan – LarryJordan.com

Watch Folders automate media compression.

A sample Watch Folder in Adobe Media Encoder, with settings applied.

Topic $TipTopic

If you are creating lots of movies that always get the same compression settings or want to automatically compress and transfer files to social media – using Watch Folders in Adobe Media Encoder can make your life a lot easier.

A Watch Folder is a specific location on your computer – either on an internal, external or network drive – into which you drop files to be compressed.

As long as Adobe Media Encoder is running – and this won’t work if it isn’t – once a file is copied into a Watch Folder location you specify, AME will compress it based on the settings applied to that folder.

For example, in this screen shot, within a few seconds after a file is copied into a folder named: “Compress for YouTube,” AME will compress it using the “YouTube 1080p Full HD” preset compression settings.

When compression is complete, the master file will be moved to the Source folder inside this Watch folder, while the compressed file is moved to the Output folder.

Automatically

EXTRA CREDIT

You can apply multiple settings to the same Watch Folder, for example to create and transfer files to YouTube, Facebook and Vimeo. Each of these settings will automatically transfer the compressed file up to your account on each service.

I used Watch Folders a lot when the Digital Production Buzz covered NAB. We were regularly dropping 5-8 files an hour into this folder, then posting them as soon as they showed up in the Output folder. This saved us precious minutes for each show compared to compressing each file manually.


Please rate the helpfulness of this tip.

Click on a star to rate it!

… for Codecs & Media

Tip #399: Add Metadata to your Movies

Larry Jordan – LarryJordan.com

Annotations add information to the file itself.

The Metadata panel in Apple Compressor.

Topic $TipTopic

You can embed metadata labels into files transcoded using the Apple Devices, Apple ProRes, MP3, MPEG-4, and QuickTime settings in Apple Compressor. Use metadata to annotate a media file with information that’s important for your workflow or for the person viewing your output file. You can add any of the annotation fields provided in Compressor, or import metadata that’s used in another media file (like a QuickTime movie).

Add Metadata Manually

  1. In the Compressor batch area, select the job that contains the media file you want to annotate.
    (Tip: To select the job, rather than an output row under the job, click the source filename at the top of the job area.)
  2. In the Metadata area of the Job inspector, click the Add Job Annotation pop-up menu, choose an annotation type, enter text in the field that appears, then press Return (or click in another metadata text field).
    (Note: If you don’t press Return or click in another metadata text field, your text won’t be saved.)
  3. Repeat step 2 for each annotation type you want to add.
  4. The annotations you added are shown in fields below the pop-up menu.

Import Metadata Automatically

You can import metadata annotations into Compressor from an external QuickTime movie or from an XML dictionary property list, a text file used in macOS, iOS, and iPadOS programming frameworks to store metadata categories and values (keys and strings).

View Annotations After Transcoding

After Compressor transcodes a media file that has metadata, there are several ways to see the annotations:

  • In the Finder, select the transcoded media file, choose File > Get Info, then in the info window click the disclosure triangle next to More Info.
  • Open the media file in QuickTime Player, then choose Window > Show Movie Inspector.
    QuickTime Player displays several (but not all) categories of Compressor metadata at the top of the inspector.
  • After importing the media file into Final Cut Pro, select the clip and open the Info inspector.

EXTRA CREDIT

You’ll find more information in the Compressor User Guide. Search for “metadata.”


Please rate the helpfulness of this tip.

Click on a star to rate it!

… for Codecs & Media

Tip #350: Isaac Newton’s Color Wheel

Larry Jordan – LarryJordan.com

The Color Wheel is almost 400 years old!

A modern color wheel, modeled after Sir Isaac Newton’s initial work.

Topic $TipTopic

I was reading Blain Brown‘s excellent book, Digital Imaging, earlier this week and discovered that the color wheel that we use virtually every day was invented by Isaac Newton in 1666.

It started with Newton passing light through a prism to reveal the spectrum of light. While the spectrum of light is linear, Newton’s insight was to connect the two ends to form a circle. This made it much easier to see the relationships between primary (red, green and blue) colors with secondary (yellow, cyan, and magenta) colors.

His experiments led to the theory that red, yellow and blue were the primary colors from which all other colors are derived.  While that’s not entirely true, it’s still influential in the color wheels developed in the early 1800s as well as the color wheel currently used today. Add to his initial work the secondary colors of violet, orange and green—those which result from mixing the primary colors—and the color wheel begins to take shape.

EXTRA CREDIT

The secondary colors – yellow and cyan – exist in the color spectrum and are formed by combining two primary colors. While magenta is formed by combining red and blue, they are at opposite ends of the color spectrum, which means that magenta, while a color, is not in the color spectrum!


Please rate the helpfulness of this tip.

Click on a star to rate it!

… for Codecs & Media

Tip #374: Constant Bitrate vs. Constant Quality

Larry Jordan – LarryJordan.com

Two new encoding options for Blackmagic RAW media.

Topic $TipTopic

This article, written by Lewis MaGregor, first appeared in PremiumBeat. Let’s take a quick look at the two new encoding options in Blackmagic RAW.

  • Constant Bitrate. This makes sure your file sizes remain predictable and manageable because your media is never going to surpass the selected data rate. While Constant Bitrate is a surefire setting, to make sure the file sizes and quality will remain as advertised, it may cause issues when the footage being captured could do without the extra compression, ensuring that all details of a busy scene are clear.
  • Constant Quality. This has a variable bitrate with no upper data limit. This means if you’re filming a wedding and the guests start throwing confetti and rice, and more objects enter into focus, the bitrate will adjust to account for the increase in complex frame information, maintaining the overall quality of the entire image. Of course, this comes with larger file sizes that you can’t predict.

Please rate the helpfulness of this tip.

Click on a star to rate it!

… for Codecs & Media

Tip #380: Apple Compressor vs. Adobe Media Encoder

Larry Jordan – LarryJordan.com

Adobe Media Encoder is still the fastest.

AME (green) is faster than Compressor (blue) in 2 out of 3 compression formats. (Shorter bars are faster.)

Topic $TipTopic

Recently, I compared the compression speed of Adobe Media Encoder with Apple Compressor, both running on the same 27″ iMac (i5) and macOS Catalina. Here’s what I learned.

  • In general, Catalina is a shade slower for both apps than Mojave for compression, ranging from 0% to 14% slower, depending upon the task.
  • HEVC 10-bit compression is still extremely slow because it is not hardware-accelerated in either app.
  • Compressed file sizes are the same for both apps between Mojave and Catalina.

As you can see from the chart, while Media Encoder and Compressor are the about the same speed for HEVC 8-bit, Media Encoder is much faster for H.264 (50%) and HEVC 10-bit (180%).

EXTRA CREDIT

Read the full article with all the details here.


Please rate the helpfulness of this tip.

Click on a star to rate it!