… for Adobe Premiere Pro CC

Tip #771: Add Keyboard Shortcuts for Marker Colors

Larry Jordan – LarryJordan.com

These shortcuts can add new markers or change existing ones.

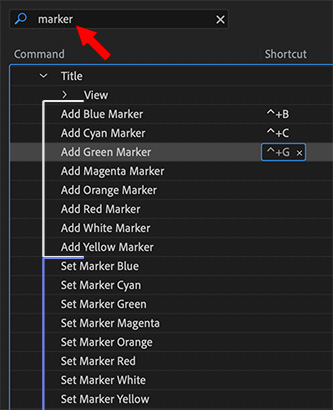
The Add and Set marker color options in the keyboard shortcuts panel.

Topic $TipTopic

A new feature in the May, 2020, update for Premiere is the ability to add keyboard shortcuts for marker colors. This means that we can easily color-code new or existing markers to help us organize our projects.

However, by default, these keyboard shortcuts are not assigned. Here’s how to enable them.

  • Open the Keyboard Shortcuts panel.
  • Search for “marker”
  • Scroll down to the Title section.
  • Add keyboard shortcuts for the colors you want to use.
    • Add [color] Marker. Changes the marker color and adds a marker with that color at the position of the timeline.
    • Set [color] Marker. Changes the marker color of an existing – and selected – marker.

Please rate the helpfulness of this tip.

Click on a star to rate it!

… for Apple Motion

Tip #720: Motion Path vs. Throw

Larry Jordan – LarryJordan.com

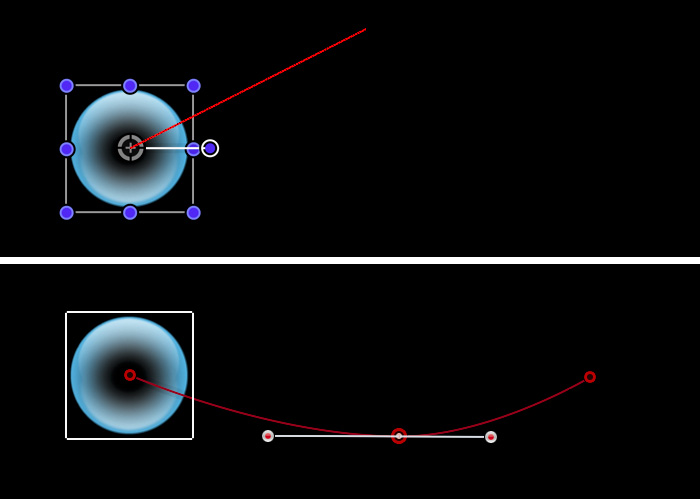
Throw is straight-line movement. Motion Path offers more complexity.

The Throw behavior, top, versus Motion Path, bottom.

Topic $TipTopic

Apple Motion has two behaviors that seem to do the same thing: Throw and Motion Path. What’s the difference?

The Throw behavior (Basic Motion > Throw) moves the selected object in a straight line, based upon settings in the HUD.

The Motion Path behavior (Basic Motion > Motion Path) provides a fixed starting point, a fixed ending point and the ability to add curves along the path.

NOTE: To add a curve to a Motion Path, double-click the red line, then adjust the two white curve controls.

As with all Motion effects, the speed of the effect is based upon its duration in the timeline (or mini-timeline).


Please rate the helpfulness of this tip.

Click on a star to rate it!

… for Random Weirdness

Tip #716: 3-2-1 Backup Rule

Larry Jordan – LarryJordan.com

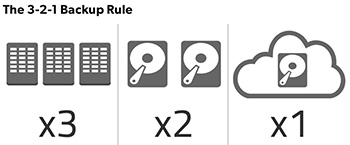
3 copies – 2 different media – 1 different location.

3 copies – 2 different media – 1 different location.

Topic $TipTopic

This article, written by Trevor Sherwin, first appeared in PetaPixel.com. This is an excerpt.

Whether you take your photos professionally or for fun, how many of you out there can truly say you’re are happy with your photo backup strategy? If a drive were to fail, will you lose any photos? If you have a house fire or were to be burgled, do you have a copy elsewhere?

Getting your backup processes in place is a bit boring and not very creative but the more seriously you take your photography, the more you need to have a robust workflow in place.

Put simply, the 3-2-1 backup strategy provides an easy-to-remember approach to how many copies of your data you should have and where those copies should be stored in order to protect against the most likely threats to your photos.

  • 3 (copies of your data)
  • 2 (different media or hard drives)
  • 1 (copy of your photos in another location)

The article, linked above, has more details, include a sample workflow on how to safely and efficiently backup your data.


Please rate the helpfulness of this tip.

Click on a star to rate it!

… for Codecs & Media

Tip #731: What is a Watermark?

Larry Jordan – LarryJordan.com

Watermarks are used to deter theft and trace stolen images.

Topic $TipTopic

Video watermarks are used for branding, identification and to deter theft. Most of us are familiar with the watermarks that are burned into the lower right corner of a video. However, there are actually two types of watermarks:

  • A still or moving image burned into your image
  • A digital code embedded into the media file itself

The first option is easy, but does nothing to prevent piracy. The second is much harder and, while it can’t prevent theft, it can help determine where in the distribution pipeline the theft occurred.

All NLEs and most video compression software allows burning watermarks into video during compression.

A digital watermark is a kind of marker covertly embedded in a noise-tolerant signal such as audio, video or image data. It is typically used to identify ownership of the copyright of such signal. Digital watermarks may be used to verify the authenticity or integrity of the carrier signal or to show the identity of its owners. It is prominently used for tracing copyright infringements and for banknote authentication.

Since a digital copy of data is the same as the original, digital watermarking is a passive protection tool. It just marks data, but does not degrade it or control access to the data.

One application of digital watermarking is source tracking. A watermark is embedded into a digital signal at each point of distribution. If a copy of the work is found later, then the watermark may be retrieved from the copy and the source of the distribution is known. This technique reportedly has been used to detect the source of illegally copied movies.

EXTRA CREDIT

In case you were wondering, Section 1202 of the U.S. Copyright Act makes it illegal for someone to remove the watermark from your photo so that it can disguise the infringement when used. The fines start at $2500 and go to $25,000 in addition to attorneys’ fees and any damages for the infringement.

Here’s a Wikipedia article to learn more about digital watermarking.

Please rate the helpfulness of this tip.

Click on a star to rate it!

… for Visual Effects

Tip #692: 10 Tips for Shooting Media for VFX

Larry Jordan – LarryJordan.com

Ten Ideas to Improve VFX Source Footage

Topic $TipTopic

This tip, written by Tihomir Lazrov, first appeared in fstoppers.com. This is a summary.

Visual effects are not software magic that works with any footage. With video you have lots of still images per second and the process of making a composite needs to be automated as much as possible. Working on a frame by frame basis is avoided as much as possible. Here are 10 quick tips on the importance of shooting appropriate video content to help create realistic visual effects more easily.

  1. Include Camera Motion
  2. Shoot to Avoid Motion Blur
  3. Know the Camera Settings for the Footage
  4. Put Tracking Markers in the Shot
  5. Shoot on a Tripod If There’s Nothing to Track
  6. Avoid Fast Camera Moves
  7. Shoot a Blank Background Plate
  8. Shoot a 360° Environmental Map
  9. Use the Sky as a Blue-Screen
  10. Use Foreground and Background Objects for Tracking

EXTRA CREDIT

The article, linked above, has lots of details on these ten tips.


Please rate the helpfulness of this tip.

Click on a star to rate it!

… for Visual Effects

Tip #693: 3 Quick Motion Tracking Tips

Larry Jordan – LarryJordan.com

Camera moves – Shutter speed – Depth-of-Field

Topic $TipTopic

Ever have trouble getting good motion tracks for your visuals? The problem usually lies in the camera settings!

Here are three simple steps to follow to improve the quality of the source footage for a motion track:

  1. Make sure camera moves are not too complex and pay attention to parallax.
  2. Shutter speed heavily affects motion blur. Higher shutter speeds minimize motion blur and improve the image quality of visual effects. The recommendation is 1/200th or faster.
  3. Decrease aperture to increase the depth of field. This helps the computer track contrast points.

Please rate the helpfulness of this tip.

Click on a star to rate it!

… for Apple Final Cut Pro X

Tip #638: Store One Clip in Multiple Events

Larry Jordan – LarryJordan.com

This tip gives you options…!

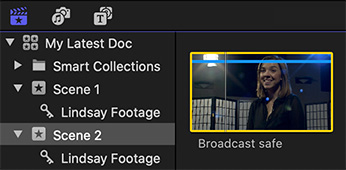
The same clip of Lindsay in stored in two different events.

Topic $TipTopic

Here’s a fast – but hidden – way to store the same clip in more than one event. This is a very useful technique to help organize shots that may span multiple scenes.

Normally, Final Cut only allows storing a clip in one Event. If you drag it into a different event, the clip is moved from one event to the other.

However, if you select a clip (or group of clips ), start to drag it into a new event, then, while dragging, press and hold the Option key until you drag them into a new event, you’ll copy the clip into the new event.

This process does not duplicate media, it only copies the link to the media; which means that you are not using extra storage to make a copy. Also, these to copies are not clones. Whatever you do to one clip does not affect the other.

NOTE: This works best if you start to drag, then press and hold the Option key until the clips are fully dragged into the new event.


Please rate the helpfulness of this tip.

Click on a star to rate it!

… for Random Weirdness

Tip #580: The History of Storyboards

Larry Jordan – LarryJordan.com

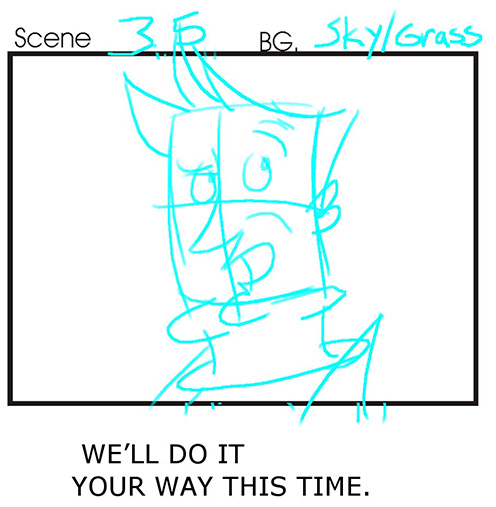
Storyboards are designed to help plan the story before production starts.

Image source: https://www.flickr.com/photos/tmray02/1440415101/
A storyboard for “The Radio Adventures of Dr. Floyd” episode #408 drawn by Tom Ray.

Topic $TipTopic

A storyboard is a graphic organizer that consists of illustrations or images displayed in sequence for the purpose of pre-visualizing a motion picture, animation, motion graphic or interactive media sequence. The storyboarding process, in the form it is known today, was developed at Walt Disney Productions during the early 1930s, after several years of similar processes being in use at Walt Disney and other animation studios.

The first storyboards at Disney evolved from comic book-like “story sketches” created in the 1920s to illustrate concepts for animated cartoon short subjects such as Plane Crazy and Steamboat Willie, and within a few years the idea spread to other studios.

Many large budget silent films were storyboarded, but most of this material has been lost during the reduction of the studio archives during the 1970s and 1980s. Special effects pioneer Georges Méliès is known to have been among the first filmmakers to use storyboards and pre-production art to visualize planned effects.

Disney credited animator Webb Smith with creating the idea of drawing scenes on separate sheets of paper and pinning them up on a bulletin board to tell a story in sequence, thus creating the first storyboard. Furthermore, it was Disney who first recognized the necessity for studios to maintain a separate “story department” with specialized storyboard artists (that is, a new occupation distinct from animators), as he had realized that audiences would not watch a film unless its story gave them a reason to care about the characters.

Gone with the Wind (1939) was one of the first live-action films to be completely storyboarded.

EXTRA CREDIT

Here’s a Wikipedia article to learn more.


Please rate the helpfulness of this tip.

Click on a star to rate it!

… for Visual Effects

Tip #510: 10 Tips for Shooting Visual Effects

Larry Jordan – LarryJordan.com

The underlying point of these is to be sure you can work with your shots later in post.

Topic $TipTopic

The CGGeek posted a YouTube video presenting “10 Tips for Filming Visual Effects.” While I don’t agree with all of them, especially because his entire video was shot out of focus, I do agree with most of them.

They are:

  1. Take your camera off the tripod and shoot with camera motion. (This, I think, needs to be taken with a grain of salt, depending upon how much tracking and rotoscoping will be needed.)
  2. Shoot at a high shutter speed for fast moving VFX shots, above 1/500th of a second.
  3. Write down the camera settings: focal length, shutter and frame rate.
  4. Use lots of high-contrast camera markers to simplify motion tracking later.
  5. Lock your camera on a tripod, then add motion later in post.
  6. Avoid pans, zooms and fast camera motion when doing camera tracking.
  7. Always shoot a flat, background plate in case you need to garbage mask your actors.
  8. Take a 360° environmental photo to show the overall scene.
  9. Use the sky as a blue-screen background.
  10. Track both foreground and background, the extra depth improves the results of a camera track.

Please rate the helpfulness of this tip.

Click on a star to rate it!

… for Apple Final Cut Pro X

Tip #519: Use XML to Archive FCP X Projects

Larry Jordan – LarryJordan.com

Data stored in libraries, projects, events and clips can all be exported using XML.

Data stored in Libraries, projects, events and clips can all be exported using XML.

Topic $TipTopic

Most of the time, the easiest way to move media, projects and data in Final Cut Pro X from Point A to Point B is to copy the library. However, there are four main reasons to use an XML file instead:

  • To archive a project. The only way to future-proof your projects is to export and save an XML file.
  • To move a project from FCP X to another NLE, for example, Premiere Pro CC.
  • To send project data to or from a media asset management system.
  • To transfer a project online between editors. Provided both editors have the same media, XML files are tiny compared to a library file and transfer very quickly.

Why use XML? First, XML is an open standard – like HTML for the web – that allows us to describe the specifications of a media file, metadata, event, project or library. It is ideal for moving media files between different software or systems. Second, Apple has always considered its Final Cut Pro file formats proprietary; without FCP X you can’t open them. XML provides the best way to archive and/or share your projects for the future.

The process is simple, here’s how it works.

EXPORT AN ENTIRE LIBRARY

To export the entire contents of a library – generally for archiving purposes – select the library, then choose File > Export XML.

In the Export dialog, notice that the Source indicates it’s the entire Library. Give this XML file a name and location, then select the highest version of XML this dialog supports and click Save.

This creates a portable XML file that can be read by a number of different software in case you ever need to access this library in the future.

NOTE: XML files do not include media. That needs to be archived separately.

EXTRA CREDIT

  • Here’s a link to my website that details different ways to export libraries and projects for archiving.
  • Here’s a link to my website that details different ways to export Browser clips and events for media asset management, note taking and archiving.

Please rate the helpfulness of this tip.

Click on a star to rate it!