… for Codecs & Media

Tip #308: Archive Active Versions of Compressor

Larry Jordan – LarryJordan.com

Archives allow future access to earlier versions.

Apple Compressor logo
The file icon for Apple Compressor.

Topic $TipTopic

It is often necessary, especially if you are working with different clients, to have earlier versions of Compressor available to you. However, only one version of Compressor can be active on your system at a time. Recently, I read an Apple KnowledgeBase article that explained how to create archives.

NOTE: While this won’t get you access to earlier versions of Compressor, it does mean that you’ll have access to all versions going forward.

To back up the currently installed Compressor application:

  1. Create a new folder in the Applications folder, and name it after the application (for example, “Compressor 4.4.6”). To check your version of Compressor, open the application and choose About Compressor from the Compressor menu.
  2. Select the Compressor application in the Applications folder. Choose File > Compress “Compressor.” It will take a few minutes to compress.
  3. Move the resulting “Compressor.zip” file into the folder you created in step 1.
  4. Move the folder containing the .zip file to a backup drive.

EXTRA CREDIT

These ZIP files can be stored anywhere, but I generally try to keep all my program archives in the same place. Remember, before you revert back to an earlier version, archive or delete the version of Compressor currently stored in your Applications folder.

Also, if you revert to an earlier version of Compressor, it may also require an earlier version of the macOS, so keep a note of which version of Compressor uses which version of the macOS.


Please rate the helpfulness of this tip.

Click on a star to rate it!

… for Apple Final Cut Pro X

Tip #306: Archive Active Versions of FCP X

Larry Jordan – LarryJordan.com

Archives allow future access to earlier versions.

Topic $TipTopic

It is often necessary, especially if you are working with different clients, to have earlier versions of Final Cut Pro X available to you. However, only one version of FCP X can be active on your system at a time. Recently, I read an Apple KnowledgeBase article that explained how to create archives.

NOTE: While this won’t get you access to earlier versions of Final Cut Pro X, it does mean that you’ll have access to all versions going forward.

To back up the currently installed Final Cut Pro X application:

  1. Create a new folder in the Applications folder, and name it after the application (for example, “Final Cut Pro X 10.4.8”). To check your version of Final Cut Pro X, open the application and choose About Final Cut Pro X from the Final Cut Pro X menu.
  2. Select the Final Cut Pro X application in the Applications folder. Choose File > Compress “Final Cut Pro X.” It will take a few minutes to compress.
  3. Move the resulting “Final Cut Pro X.zip” file into the folder you created in step 1.
  4. Move the folder containing the .zip file to a backup drive.

EXTRA CREDIT

These ZIP files can be stored anywhere, but I generally try to keep all my program archives in the same place. Remember, before you revert back to an earlier version, archive or delete the version of Final Cut Pro X currently stored in your Applications folder.

Also, if you revert to an earlier version of Final Cut Pro X, it may also require an earlier version of the macOS, so keep a note of which version of Final Cut Pro X uses which version of the macOS.
[Thanks, and a tip of the hat to Mark Spencer for telling me about this.]


Please rate the helpfulness of this tip.

Click on a star to rate it!

… for Apple Motion

Tip #307: Archive Active Versions of Motion

Larry Jordan – LarryJordan.com

Archives allow future access to earlier versions.

Apple Motion logo
The file icon for Apple Motion.

Topic $TipTopic

It is often necessary, especially if you are working with different clients, to have earlier versions of Motion available to you. However, only one version of Motion can be active on your system at a time. Recently, I read an Apple KnowledgeBase article that explained how to create archives.

NOTE: While this won’t get you access to earlier versions of Motion, it does mean that you’ll have access to all versions going forward.

To back up the currently installed Motion application:

  1. Create a new folder in the Applications folder, and name it after the application (for example, “Motion 5.4.5”). To check your version of Motion, open the application and choose About Motion from the Motion menu.
  2. Select the Motion application in the Applications folder. Choose File > Compress “Motion.” It will take a few minutes to compress.
  3. Move the resulting “Motion.zip” file into the folder you created in step 1.
  4. Move the folder containing the .zip file to a backup drive.

EXTRA CREDIT

These ZIP files can be stored anywhere, but I generally try to keep all my program archives in the same place. Remember, before you revert back to an earlier version, archive or delete the version of Motion currently stored in your Applications folder.

Also, if you revert to an earlier version of Motion, it may also require an earlier version of the macOS, so keep a note of which version of Motion uses which version of the macOS.


Please rate the helpfulness of this tip.

Click on a star to rate it!

… for Apple Final Cut Pro X

Tip #285: Tips for Library Management

Larry Jordan – LarryJordan.com

The Library is the master container for all Final Cut projects.

Final Cut Pro X Project Properties settings displayed in the Inspector.

Topic $TipTopic

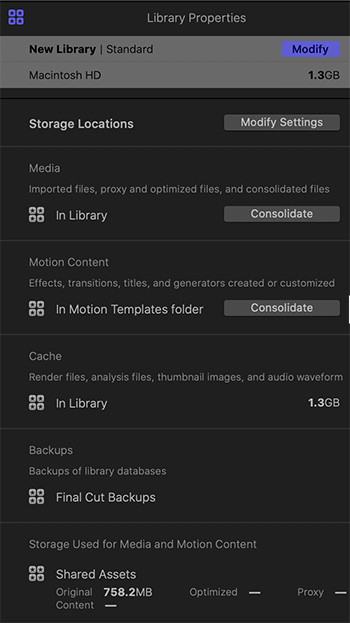
The Library in Final Cut is the master container that holds everything related to a specific set of projects. However, what you may not know is that you have a lot of control over where FCP X actually stores files for that library – and many of them don’t even need to be in the Library!

To see your options, select a Library in the Library list on the left side of the interface. The Inspector then displays the image shown on this screen shot.

These options include:

  • Media Storage Locations. This allows you to specify where media, Motion templates, work files and Library backups are stored. All but backups can be stored in the Library, however, you can choose to store them wherever you want.
  • Motion Content. If you have Motion templates scattered across different locations, this allows you to consolidate them into the location specified in the Media Storage Location, above.

The next three segments are display only:

  • Cache files. The amount of space occupied by render, analysis and other work files.
  • Backups. Displays the location of Library backups.
  • Storage used. Displays the volumes where media for this project is stored and how much space is involved.

Overall, Library Properties provides you the control you need to know how much space your project takes, where files are stored and the ability to move them if needed.


Please rate the helpfulness of this tip.

Click on a star to rate it!

… for Random Weirdness

Tip #039: A Project Code System to Organize Media

Larry Jordan – LarryJordan.com

Here’s a system I borrowed from Hollywood

Topic $TipTopic

Years ago, when I was editing behind-the-scenes documentaries for Hollywood DVD releases, I noticed a consistent project and media naming system from one of the studios. While the studio version was more complex than necessary for independent or corporate work, I modified the system to share with my students.

If you have a system to help you track your media, great! If not, use mine until you can develop your own. ANY system is better than no system when it comes to tracking media. Because the worst thing for any editor is losing a shot that you were sure you had.

Here’s a sample folder name to explain how this system works:

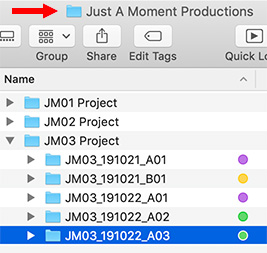
JM03_191022_A03

Translation:

  • JM. A two-letter code that represents the name of the client. (For example: “Just a Moment Productions”)
  • 03. A two-number code that represents the project number for this client. (For example, this is the third project we’ve done for Just a Moment.)
  • 191022. The shoot date, in YearMonthDay format. Most often, scripts and other production notes will indicate when a particular scene was shot. This date ties the folder back to the script. Using this date format means all folders will sort in the correct date order.
  • A. The camera on a multi-camera shoot. (For example, “A” or primary camera, “B” or “C” cameras)
  • 03. The number of the camera card or hard disk shot by that camera for that day. (For example, this is the third camera card we shot that day.)

To implement this, on my media storage system, I start by creating a master folder for that client (i.e. “Just a Moment Productions”). Then, inside that Master folder, I create folders for each project for that client. Next, inside the Project folder I create a Media folder. Then, finally, inside the Media folder, I create a folder for each camera card that I shoot.

Most of the time, we can’t rename individual clips on the camera card because renamed files will break on import. So, I use this system to name the folders that I store the camera card media into rather than individual shots.

The good news is that, just by reading the folder name, you know the client, project, shoot date and camera angle of the media it contains.


Please rate the helpfulness of this tip.

Click on a star to rate it!

… for Visual Effects

Tip #176: 3 Better Chroma Key Tips

Larry Jordan – LarryJordan.com

These tips improve how your actors look

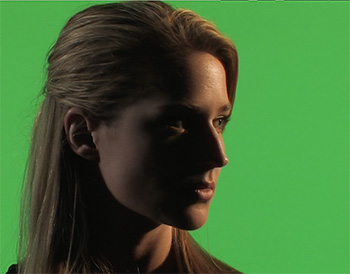
A green-screen example.
As long as the background is evenly lit, you can light talent however you want.

Topic $TipTopic

This tip first appeared in Screencast-o-Matic.com.

It is impossible to over-state how important flat, even and well-exposed lighting is to creating a clean chroma-key. However, these three other tips also need to be considered.

  • Use separate lights for talent and background. The background needs to be bright and evenly lit top to bottom and side to side. The talent can be lit however your story requires. Never try to use the same light for both talent and background.
  • Avoid fly-away hair. Each strand catches green, which makes it flicker in the key. Bundle hair or put a hat on your talent.
  • Avoid wearing colors that match the background, unless you are looking for that “hollow body” look. Also, avoid clothing with closely arranged stripes or patterns. Herringbone and pinstripes are both no-nos.

Please rate the helpfulness of this tip.

Click on a star to rate it!

… for Visual Effects

Tip #101: What’s the Difference Between Color Grading and Color Correction?

Larry Jordan – LarryJordan.com

Both involve color, but in different ways.

Topic $TipTopic

The short answer is that color correction fixes problems, while color grading gives images a “look.”

Typical color correction involves:

  • Removing color casts
  • Setting proper highlight and shadow levels
  • Controlling any excessive highlights (speculars)

For example, the top image was color corrected to boost highlights and increase saturation.

Color grading, on the other hand, takes what we have done in color correction and tweaks the color and grayscale levels to match the story. For example:

  • Boosting saturation for a romantic comedy
  • Decreasing saturation for dystopian scifi
  • Removing color for a film noir

And so on.

Generally, you fix problems first, then create looks second.


Please rate the helpfulness of this tip.

Click on a star to rate it!

… for Adobe Premiere Pro CC

Tip #223: What Do Render Bar Colors Mean

Larry Jordan – LarryJordan.com

Premiere is fast, but sometimes not fast enough.

Different render bar colors in Adobe Premiere Pro CC.
Render bar colors indicate what needs to be rendered before playback.

Topic $TipTopic

Most of the time, Premiere can play back your sequence in real-time displaying high-quality, full frame-rate images by harnessing the power of the Mercury Playback Engine.

However, every so often, you’ll create an effect that is so complex, it needs to render for optimum playback.

DEFINITION: Render means to calculate. But “calculate” is a very boring word. “Render” is much sexier. To render an effect means we are calculating the effect and turning it into video.

How can you tell if rendering is necessary? By the color of the render bar at the top of the Timeline.

  • No bar. Everything is playing perfectly. No rendering is necessary.
  • Yellow. An unrendered section that is complex, but may not need to be rendered in order to play back the sequence in real-time and at the full frame-rate.
  • Red. An unrendered section that needs to be rendered in order to play back the sequence in real-time and at the full frame-rate.
  • Green. A fully-rendered section of the sequence.

EXTRA CREDIT

To render some or all of a sequence, select the clips you want to render, then choose Sequence > Render Selection. A dialog appears showing the render status.


Please rate the helpfulness of this tip.

Click on a star to rate it!

… for Adobe Premiere Pro CC

Tip #222: Offline Does Not Mean Inaccessible

Larry Jordan – https://LarryJordan.com

Organize clips without needing media.

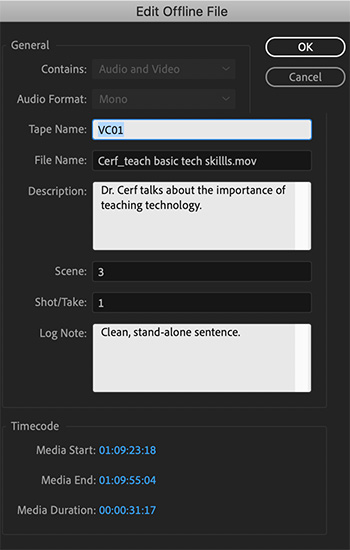
The Edit Offline File window
This window allows adding metadata to any offline clip.

Topic $TipTopic

NOTE: This tip originated in the days of capturing media from video tape, but it can still be helpful in working with today’s huge media files.

Normally, when we think of “offline clips,” we think of media that is inaccessible. While it is true that we can’t edit or playback offline clips, we can still organize them.

For example, Control-click an offline clip and this menu appears, which allows us to add metadata (labels) to any offline clip. Then, the next time these clips are either connected or relinked, all this information remains available because it is stored in the project file, not with the clip itself.

The benefit of using this screen is that you can transfer a project to another computer – say a laptop – to add this information, without having to copy and carry all the media files as well.

EXTRA CREDIT

The Metadata panel in Premiere (Window > Metadata) has far more fields available, which can also be used for both online and offline clips.


Please rate the helpfulness of this tip.

Click on a star to rate it!

… for Codecs & Media

Tip #108: Speed Test: i5 vs. i7 CPUs for Video Compression

Larry Jordan – https://LarryJordan.com

Conventional Wisdom says bet on the i7

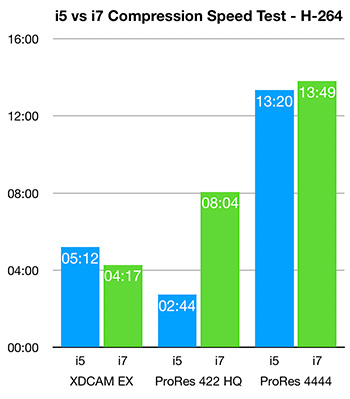
A chart comparing i5 vs. i7 CPU speeds for video compression
Speed comparison of i5 vs. i7 CPUs running Apple Compressor.

Topic $TipTopic

In a series of tests that I ran comparing the speed of Apple Compressor 4.4.5 running on a 3.8 GHz i5 vs. a 3.2 GHz i7, I discovered that you can’t predict which processor will be faster.

Testing involved XDCAM EX, ProRes 422 HQ and ProRes 4444 media and compressing it into H.264, 8-bit HEVC and 10-bit HEVC. (The three test files had different durations, so we can’t compare speed between formats.)

H.264 and HEVC 8-bit are hardware-accelerated. HEVC 10-bit is not. I used the same compression settings for each test.

  • When compressing media for H.264, the i7 is faster 33% of the time (2 out of 6).
  • When compressing media for HEVC 8-bit, the i7 is faster 66% of the time (4 out of 6).
  • Both CPUs running Apple Compressor were unable to successfully compress a ProRes 4444 file into 10-bit HEVC.

Based upon these tests with the latest version of Compressor, I would say the speed is a wash. Some tasks are faster, some are slower.

However, if you are doing any HEVC compression – 8-bit or 10-bit – based on my full suite of tests, Adobe Media Encoder is consistently and significantly faster than Apple Compressor.

EXTRA CREDIT

Here’s the full report.


Please rate the helpfulness of this tip.

Click on a star to rate it!