… for Adobe Premiere Pro CC

Tip #216: Determining “Indeterminate”

Larry Jordan – https://LarryJordan.com

The unknown is not unknowable.

The Premiere Pro CC Media preference panel.
The Media preference panel sets the timebase for still images.

Topic $TipTopic

“Indeterminate” sounds pretty squishy. But, when it comes to Premiere, it is a fancy word for still images, or any other file that doesn’t have a definite duration. Hence – “indeterminate.”

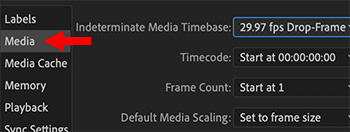
Go to Premiere Pro > Preferences > Media (Windows: Edit > Preferences > Media).

At the top of this panel, you can specify the timebase of all imported still images, the starting timecode for each still image clip, and whether the frame count should start at 0 or 1.

Since still images are timecode-free, my recommendations are:

  • Set the timecode to match the timecode of your sequence.
  • Set the timecode to start at 00:00:00:00
  • Set the frame count to start at 1

Please rate the helpfulness of this tip.

Click on a star to rate it!

… for Apple Final Cut Pro X

Tip #194: What is Audio Skimming?

Larry Jordan – https://LarryJordan.com

Audio skimming provides a high-speed preview of clip audio.

Click this icon to enable audio skimming in FCP X.

Topic $TipTopic

I have a love/hate relationship with skimming. I love using it in the Browser because it allows me to quickly review clips, but hate using it in the Timeline because it always seems to get in my way.

NOTE: You can toggle skimming on or off by typing S.

However, there’s a special form of skimming that you may not know about: audio skimming.

NOTE: The Blade, Trim and Range tools all act as skimmers when they are active.

By default, when you turn on skimming, you can quickly see the video, but not hear the audio. To turn on audio skimming, either click this icon so it turns blue, or type Shift + S.

Now, when you drag over audio, you’ll hear it. (And even if you drag quickly, FCP X compensates for the speed and pitch adjusts the audio so it sounds normal.)

EXTRA CREDIT

Taking this one step further, you can turn on clip skimming, which allows you to hear the audio from one clip, but not the entire mix. For example, to hear dialog, without also hearing audio from the B-roll above it.

To enable clip skimming, first turn on audio skimming. Then, choose View > Clip Skimming (shortcut: Option + Cmd + S). Now, when you drag across a clip, you’ll just hear that clip.


Please rate the helpfulness of this tip.

Click on a star to rate it!

… for Apple Final Cut Pro X

Tip #191: What’s In An FCP X Library Backup?

Larry Jordan – https://LarryJordan.com

Backups, like saving, are automatic.

FCP X automatic library backups, stored by project.

Topic $TipTopic

We all know that Final Cut Pro X automatically saves anything we do in the app the instant we do it. In fact, I’ve had beta builds of FCP X crash a fraction of a second after I made an edit, yet, when I restarted the app, everything I had done was saved.

Which is very cool.

But did you know that FCP X also saves a backup copy of your Library, just in case…?

NOTE: You can see all backups, grouped by project name, in [User Directory] > Movies > Final Cut Backups. The backup location can be changed using File > Library Properties.

To access a backup copy, for example, to go back in time to an earlier edit, open Final Cut, then choose File > Open Library > From Backup. Next, select the date and time of the version you want to open from the menu.

NOTE: Opening a backup will not affect the currently open Library. Instead, FCP X makes a copy of the backup, stores it in the Movies folder and attempts to link it with the original media.

EXTRA CREDIT

As you can see from the file sizes in this screen shot, you need to know that these backups are ONLY of the library database. Any media stored in the library is not backed up. For this reason, while Library backups will preserve your edits, you are still responsible for backing up all your media separately; even media stored in a Library.


Please rate the helpfulness of this tip.

Click on a star to rate it!

… for Apple Final Cut Pro X

Tip #193: When Can Audio Levels Exceed 0 dB?

Larry Jordan – https://LarryJordan.com

Audio levels must NEVER exceed 0 dB, except…

Increasing clip audio levels to +12 dB in FCP X.

Topic $TipTopic

When can audio levels exceed 0 dB? Smile… this is a trick question. Why? Because there are two types of audio levels: Relative and Absolute.

When we adjust the levels of a clip, we are adjusting the audio levels of the clip relative to the level at which it was recorded. Most dialog is recorded at lower levels to prevent distorting the audio during the original performance. Music, which is highly processed, is mastered within a few tenths of a dB of 0. So, we generally boost levels for dialog and reduce levels for music.

Unlike clips, the levels displayed by the audio meters are the absolute audio level of your project.

So, the answer to this question is that when we adjust audio levels on a clip, we often go far above 0 dB. However, during export, audio levels displayed on the audio meters must never exceed 0 dB, or the audio on the master file will distort.


Please rate the helpfulness of this tip.

Click on a star to rate it!

… for Adobe Premiere Pro CC

Tip #143: What Do These Audio Track Header Icons Do?

Larry Jordan – https://LarryJordan.com

Track Headers provide more control when editing a sequence

Tip Screen Shot

Topic $TipTopic

(See Tip #134 for an explanation of the video track headers.)

Looking at the audio track headers (located on the extreme left side of the timeline), here’s what each of these icons mean:

  • Blue A1 (far left). This icon indicates the “active track.” When you edit a clip into the timeline using a keyboard shortcut, the audio goes into the track at the position of the playhead with the blue highlight. (Adobe calls this “Source Patching.”)
  • Lock. This locks a track so you can’t make changes. However, be careful with this because if you lock the audio, but don’t lock the video (or vice-versa) you can easily move the unlocked track out of sync.
  • Blue V1 (middle). When you copy a clip, the clip will paste into the LOWEST NUMBERED track with a blue highlight. Drag the blue to change track location, click it to turn it on or off. (Adobe calls this “Track Targeting.”)
  • Sync lock. Normally, when doing an insert edit, you want everything to shift down with the inserted media. This is the default setting. However, turning sync locks off means that when you insert a clip, any clips on tracks where sync lock is turned off will not move. This can be a powerful feature when you want to insert a video clip, but not break the audio tracks.
  • Mute. When clicked it makes all audio clips on this track inaudible.
  • Solo. When clicked, it makes all audio clips on all non-soloed tracks inaudible.
  • Microphone (far right). This instantly enables a track for voice over recording and begins recording according to the current voice over settings. (See Tip #136).

BONUS

Watch what happens when you click one of these controls while pressing Shift, Option or Cmd. These modifier keys allow you to control groups of these switches.


Please rate the helpfulness of this tip.

Click on a star to rate it!

… for Codecs & Media

Tip #107: Speed Test: Apple Compressor vs. Adobe Media Encoder

Larry Jordan – https://LarryJordan.com

You need to get work done. Which is faster?

Tip Screen Shot

Topic $TipTopic

In a recent series of tests between Apple Compressor (v.4.4.5) and Adobe Media Encoder 2019 (AME), I discovered that, in almost all cases, Adobe Media Encoder is faster at compressing a file into either H.264 or HEVC. (Both these formats are commonly used for social media.)

In fact, the speed differences averaged 38% faster for AME compressing files into H.264; as you can see in this chart.

The results were even more dramatic when compressing different codecs into HEVC. Compressor was 45% faster, on average, when compressing into 8-bit HEVC, but AME was 75% faster when compressing into 10-bit HEVC. In fact, Compressor was unable to successfully compress a ProRes 4444 file into 10-bit HEVC; consistently failing during multiple tests.

If speed is your goal, AME is generally the better choice.


Please rate the helpfulness of this tip.

Click on a star to rate it!

… for Adobe Premiere Pro CC

Tip #134: What Do These Video Track Header Icons Do?

Larry Jordan – https://LarryJordan.com

Track Headers provide control when editing a sequence.

Tip Screen Shot

Topic $TipTopic

(See Tip 143 for an explanation of the audio track headers.)

Looking at the video track headers (located on the extreme left side of the timeline), here’s what each of these icons mean:

  • Blue V1 (far left). This icon indicates the “active track.” When you edit a clip into the timeline using a keyboard shortcut, the video goes into the track at the position of the playhead with the blue highlight. (Adobe calls this “Source Patching.”)
  • Lock. This locks a track so you can’t make changes. However, be careful with this because if you lock the video, but don’t lock the audio (or vice-versa) you can easily move the unlocked track out of sync.
  • Blue V1 (middle). When you copy a clip, the clip will paste into the LOWEST NUMBERED track with a blue highlight. Drag the blue to change track location, click it to turn it on or off. (Adobe calls this “Track Targeting.”)
  • Sync lock. Normally, when doing an insert edit, you want everything to shift down with the inserted media. This is the default setting. However, turning sync locks off means that when you insert a clip, any clips on tracks where sync lock is turned off will not move. This can be a powerful feature when you want to insert a video clip, but not break the audio tracks.
  • Eye (far right). This make the entire contents of a track visible or invisible. I generally use this when I’m working with a multi-layer composite and I want to see what’s underneath a clip.

BONUS

Watch what happens when you click one of these controls while pressing Shift, Option or Cmd. These modifier keys allow you to control groups of these switches.


Please rate the helpfulness of this tip.

Click on a star to rate it!

… for Codecs & Media

Tip #104: Why Is a Smooth Audio Fade Called +3 dB?

Larry Jordan – https://LarryJordan.com

Audio is a Strange Beast

Tip Screen Shot

Topic $TipTopic

Unlike video, audio levels are logarithmic. For example, whenever the audio level increases (or decreases) by around 10 dB, the perceived volume is doubled (or cut in half). These log values also have an impact in cross-fading between clips.

A +3 dB transition adds a 3 dB increase in volume to both clips in the middle of a cross-fade. If the software did not, the audio would sound like it is getting fainter in the middle of a transition, then louder at the end.

When fading to or from black, a straight-line (linear) transition is best. When cross-fading between two clips, both of which have audio, a +3 dB transition is best.

EXTRA CREDIT

Some software allows you to change the shape of the curve manually. These rules still apply, but manual adjustments allow much greater control over how the transition sounds.

The general rule is: Whatever sounds the best to you IS the best.


Please rate the helpfulness of this tip.

Click on a star to rate it!

… for Codecs & Media

Tip #067: Which Files Should Be Copied From a Camera Card?

Larry Jordan – https://LarryJordan.com

“Pick-and-Choose” is the wrong option for best results.

Tip Screen Shot

Topic $TipTopic

All of them.

Select the entire contents of the card, even the folders and files that you don’t recognize, and copy the entire contents of the camera card into its own folder on your hard disk.

One folder per camera card. Always.

Why? Because, depending upon the codec, different parts of your media are stored in different folders on the card; especially metadata. Copying everything from the card into its own folder on your local storage means that whichever NLE you use for editing is able to assemble all the pieces and assemble all your media and related metadata without any problems.

BONUS

Copying each card into its own folder allows you to create meaningful folder names for tracking and importing media.


Please rate the helpfulness of this tip.

Click on a star to rate it!

… for Codecs & Media

Tip #099: Benefits of working with 4K in 1080

Larry Jordan – https://LarryJordan.com

4K has benefits aside from increased resolution.

Tip Screen Shot

Topic $TipTopic

I was reading Jason Boone‘s blog on the Benefits of Working with 4K Footage in a 1080 Sequence.

First, while it could be argued that we can’t actually SEE 4K in most situations, that hasn’t stopped distributors from requesting it. Still, even if you don’t plan to deliver 4K, there are benefits to shooting it, as Jason outlines:

  • Reframe a shot. 4K provides so many extra pixels to choose from, you can convert a wide shot into a close-up. However, cutting into the frame won’t change depth of field, so the image won’t look the same as if you had zoomed (or dollied) in.
  • Use the same take multiple times. Using the same take for both wide shots and close-ups makes it seem as though you have two cameras. The benefit is that where talent is looking doesn’t change. The disadvantage is that background and depth of field won’t change either.
  • Create camera moves. Using keyframes you can create movement where there was none in the original shot. However, like moves on a still, elements won’t change position as they would if you used a dolly on set.
  • Stabilize your footage. This is powerful. Stabilization always zooms into a shot. By having lots of extra pixels to work with, the image won’t lose detail or sharpness.
  • Adjust the image for graphics. There’s nothing worse than graphics you can’t read. 4K gives us extra pixels for scaling and repositioning.

4K may not be visible to the eye, but it can be a BIG benefit in post.


Please rate the helpfulness of this tip.

Click on a star to rate it!