360° Video stabilization is a single button – nothing to adjust.
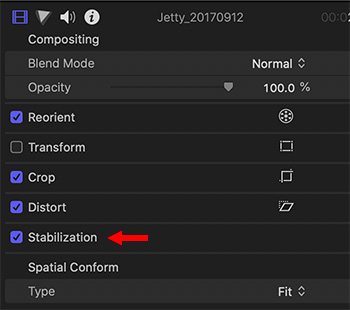
The Stabilization checkbox in the Video Inspector.
New with the 10.4.9 update is the ability to stabilize 360° video which involves clicking a single button – there’s nothing to adjust.
To stabilize your footage, select it in the timeline (you can’t do this in the browser), then go to the Video Inspector and check the Stabilization checkbox.
Done.
EXTRA CREDIT
Unlike normal film, 360° video can easily cause motion sickness, especially when an audience member is wearing a headset.
The best way to shoot 360 is to use a tripod. For those situations where you can’t, stabilizing footage is essential.
Please rate the helpfulness of this tip.
Click on a star to rate it!
https://www.theinsidetips.com/wp-content/uploads/2019/09/Tips-Logo-700x150.jpg00Larry Jordanhttps://www.theinsidetips.com/wp-content/uploads/2019/09/Tips-Logo-700x150.jpgLarry Jordan2020-09-28 01:30:002020-09-26 10:22:01Tip #1040: New! Stabilize 360° Video
RAW is always better, but takes more time to get the image to look right.
This illustrates what happens to a JPEG image when saved multiple times.
The folks at NightSkyPix.com looked at RAW vs. JPEG from the point of view of astrophotography. However, this also applies to shooting video more down to earth.
This is an excerpt.
Loosely speaking, a RAW image is the digital equivalent of a film negative. In reality, a RAW file is not an image that can be visualized with classic software, but must be developed before using RAW editors such as Adobe Camera Raw.
The JPEG image format is arguably the most common standard format for digital images, and the name stands for “Joint Photographic Expert Group”.
The JPEG format uses lossy and compressed image data to create an image file that is both lightweight and readily usable with any software and device able to visualize graphics.
JPEG is easier to use and view, but RAW is the better choice.
The article provides additional details, pros and cons, and illustrates these ideas with screen shots. It’s worth spending time reading.
EXTRA CREDIT
For us video folks, JPEG is similar to H.264, and RAW is similar to raw or log files.
Please rate the helpfulness of this tip.
Click on a star to rate it!
https://www.theinsidetips.com/wp-content/uploads/2019/09/Tips-Logo-700x150.jpg00Larry Jordanhttps://www.theinsidetips.com/wp-content/uploads/2019/09/Tips-Logo-700x150.jpgLarry Jordan2020-09-22 01:30:002020-09-19 09:32:32Tip #1025: RAW vs. JPEG: Which is Better?
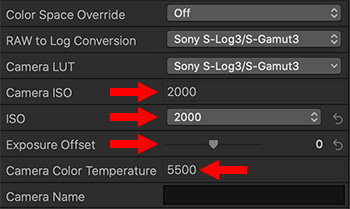
New ISO and white point settings are now available for ProRes RAW in FCP X 10.4.9.
Info Inspector > Settings. These new settings (red arrows) only appear for ProRes RAW.
A new feature in the 10.4.9 update to Final Cut Pro X is the ability to adjust ISO and, for some cameras, the white point. Apple now supports changing the ISO setting (essentially, video gain) and white point for ProRes RAW media when edited natively.
NOTE: These settings only appear for ProRes RAW media and don’t appear when FCP X is in proxy mode.
To access these, select a ProRes RAW clip in the timeline (not the browser), then go to the Info Inspector and switch the menu at the bottom left from Basic to Settings. The red arrows in the screen-shot indicate the new settings with this update:
Camera ISO. The ISO setting at which the media was recorded.
ISO. A menu allowing you to change the ISO setting from 50 to 25,600.
Exposure Offset. This slider provides finer control in adjusting the ISO. The range is one stop lower to one stop higher.
Camera Color Temperature. The white point setting at which the video was recorded.
EXTRA CREDIT
For some cameras, Final Cut also supports changing the white point. Here is the current list of cameras supporting these new features.
Please rate the helpfulness of this tip.
Click on a star to rate it!
https://www.theinsidetips.com/wp-content/uploads/2019/09/Tips-Logo-700x150.jpg00Larry Jordanhttps://www.theinsidetips.com/wp-content/uploads/2019/09/Tips-Logo-700x150.jpgLarry Jordan2020-09-21 01:30:002020-09-19 09:12:03Tip #1018: New! Adjust ISO for ProRes RAW
NewBlue Stream is software designed to simplify live streaming with advanced graphics.
(Screen shot courtesy of NewBlueFX.com)
The folks at NewBlueFX announced a new program specifically designed for live streaming, with graphics integration: NewBlue Stream.
Here’s how NewBlue describes it: “Our philosophy with NewBlue Stream is simple – make it as easy as possible to produce live broadcasts, give you tools to make them engaging and interactive, and do it in one elegant solution that’s priced right. The result is a lightweight streaming and broadcast solution paired with dynamic, data-driven graphics that you won’t find anywhere else.”
NewBlue is a long-time effects developer – especially on Windows – with strong credentials for effects and titles.
“Cast stunning and technically sophisticated live video productions with multiple audio and video inputs, switching, and an unlimited number of programmable, data-driven, 3-D animated graphics, including lower thirds, crawls, motion bugs, transitions, titling, and more.”
The system provides image capture, content creation, and streaming; supporting Facebook Live, YouTube Live, Twitch, and any RTMP end point.
The software supports Windows and Mac. Pricing starts at $13.99 per month and a 14-day free trial is available.
After Effects is intimidating. This article can help get you started.
(Image courtesy of PremiumBeat.com)
This article, written by Joe Frederick, first appeared in PremiumBeat.com. This is a summary.
Adobe After Effects is an exceptionally versatile piece of software. If you’re just starting out with it in 2020, here are five things to learn ASAP.
Terminology. Before I started my motion graphics journey, my experience was limited to Final Cut Pro X. That meant I was faced with a whole new set of terms upon opening After Effects the first time, some of which were attached to features and concepts I knew by other names in other programs. For instance, a Project in FCPX is a Sequence in Premiere Pro is a Composition in AE.
Keyframes. Keyframes mark the point in time where you specify a value for a layer property. Using them effectively is a linchpin of motion graphics work.
Motion Blur. Motion blur is an absolute game-changer! When animating an asset, it’s important to prevent said asset’s movements from looking mechanical, twitchy, and, well, like it was slapped together in a computer program. That’s where motion blur comes in.
Dynamic Link. If you’re planning to work with both Adobe Premiere Pro and After Effects on the same project, then you’re going to love this. Thanks to the dynamic link, you can avoid all of that potentially confusing, definitely time-sucking nonsense and import your AE comps straight into Premiere.
Pre-Composing. If you’re used to terms like “nesting” or “compound clip,” you’ll be familiar with creating pre-compositions. Simply select the layers of your choice, right-click, and select Create Pre-composition in order to put these layers into their own mini comp. They’ll now be represented in your main timeline by just one layer. If you double-click this layer, you can go into it to make changes that’ll now be visible when you return to your main composition.
The link above has additional tutorial videos, images and links for more information.
Please rate the helpfulness of this tip.
Click on a star to rate it!
https://www.theinsidetips.com/wp-content/uploads/2019/09/Tips-Logo-700x150.jpg00Larry Jordanhttps://www.theinsidetips.com/wp-content/uploads/2019/09/Tips-Logo-700x150.jpgLarry Jordan2020-09-16 01:30:002020-09-12 14:22:29Tip #1009: Getting Started with After Effects
MediaCentral extends collaboration from Avid to Adobe video editors.
The Avid logo.
With the June, 2020, update to Avid MediaCentral, Premiere Pro editors can now connect and collaborate with Avid Media Composer editors—no matter where they are located.
MediaCentral is Avid hardware and software that provides the remote collaboration, media management, and integration large post-production facilities and in-house post teams need to prep, complete, and deliver projects on time and on budget.
The June update provides a dedicated MediaCentral pane for Adobe Premiere making it easy to browse, search or, locate, and access clips and sequences across MediaCentral databases for editing—without leaving Premiere. And the built-in chat enables you to communicate with other editors and collaborators across the platform—on premises or remotely.
Existing MediaCentral users can now connect Premiere Pro editors into their production environment. Premiere users get the same level of access and real-time collaboration power as Avid editors. As well, MediaCentral provides more tool flexibility to fit specific needs and budget. In addition, Premiere editors can access rundowns and scripts for news editing linked to stories.
Update feature faster file transfers, better FCP X integration and more security.
The Frame.io logo.
Last week, Frame.io announced a new version and several new features, along with updated support for Final Cut Pro X 10.4.9, released the same day. These new features include:
Version 3.7 – focused on speed, precision and security
The Frame.io Transfer app
Improvements to the Final Cut Pro X workflow extension
The ability to display HDR media during playback on iOS devices
Improved iOS player controls
Improved Admin controls for enterprise accounts
Quoting from the Frame.io press release:
Frame.io Transfer provides more customizable control over how users move creative assets. The control center for effortlessly moving creative assets, Transfer now lets users upload and download large files, entire folders—or entire projects—effortlessly, with a single click. Use Transfer to monitor progress updates, prioritize transfer job order, and configure bandwidth for even more flexibility.
EXTRA CREDIT
Here’s a news article from my website that describes the update in more detail.
Please rate the helpfulness of this tip.
Click on a star to rate it!
https://www.theinsidetips.com/wp-content/uploads/2019/09/Tips-Logo-700x150.jpg00Larry Jordanhttps://www.theinsidetips.com/wp-content/uploads/2019/09/Tips-Logo-700x150.jpgLarry Jordan2020-09-04 01:30:002020-09-04 01:30:00Tip #973: Frame.io Announces Big Updates
Photoshop can create LUTs that work in Premiere, Resolve or Final Cut Pro X.
Save LUT settings in Photoshop using the CUBE format.
LUTs are a great way to take log or RAW images and convert them into something pleasing to look at. You can even use this technique for Rec. 709 media, which we use every day in HD projects.
Here’s a technique that creates LUTs that work in Premiere, After Effects, Final Cut, Motion or DaVinci Resolve.
In Photoshop, import a still frame from the video that you want to create a LUT for.
NOTE: This image needs to retain detail in the highlights. TIFF or PNG are the best export formats to use.
Select the layer containing the image and choose Layer > New > Background from Layer. (This change is important.)
Add at least one Adjustment layers, then adjust Levels and other settings to the adjustment layer to create the look you want.
NOTE: Do not adjust the image, only modify the adjustment layer.
Here’s the magic part – as long as you convert the image into a background and use adjustment layers, you can take your look and convert it into a LUT which can be opened in a variety of applications.
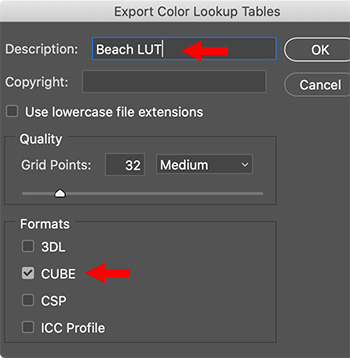
In Photoshop, choose File > Export > Color Lookup Tables.
Give the file a description that makes sense to you. Then, and this is a KEY step, select the CUBE format. This format is required by all our NLEs.
Click OK, give it a name and location, then save it.
Switch over to your editing application and import your new custom LUT and apply it to your footage.
Done. This LUT can be used across multiple projects and multiple NLEs.
EXTRA CREDIT
Here’s an article from my website that walks you through all these steps in more detail.
Please rate the helpfulness of this tip.
Click on a star to rate it!
https://www.theinsidetips.com/wp-content/uploads/2019/09/Tips-Logo-700x150.jpg00Larry Jordanhttps://www.theinsidetips.com/wp-content/uploads/2019/09/Tips-Logo-700x150.jpgLarry Jordan2020-09-02 01:30:002020-09-02 01:30:00Tip #977: Create a LUT in Photoshop
The updates add significant new features to FCP X, Motion and Compressor.
The Apple Final Cut Pro X logo.
Last week, Apple continued the evolutionary growth of Final Cut Pro X releasing its 33rd free update – to version 10.4.9 – along with updates for Motion and Compressor. While none of these features are revolutionary, all are useful and include:
Proxy workflow enhancements
Automated tools for social media cropping
Editorial workflow improvements
Motion now supports 3D models in USDZ format, and include 66 new 3D models in the Motion Library
Motion adds a new Stroke filter which quickly outlines objects using its alpha channel
Compressor now supports custom LUTs
These free updates are accessed through the Mac App Store.
EXTRA CREDIT
The Pro Video codecs were also updated. To upgrade these, go to System Preferences > Software Update. All updates are free.
https://www.theinsidetips.com/wp-content/uploads/2019/09/Tips-Logo-700x150.jpg00Larry Jordanhttps://www.theinsidetips.com/wp-content/uploads/2019/09/Tips-Logo-700x150.jpgLarry Jordan2020-08-31 01:30:002020-08-31 01:30:00Tip #962: Apple Updates Final Cut Pro X
Blackbird embodies the shift into remote editing workflows.
The Blackbird logo.
Recently, I’ve been getting a lot of emails about this software and wanted to share their description with you. The following text is from Blackbird.
Blackbird is the world’s fastest, most powerful professional cloud video editing and publishing platform. Enabling remote editing, Blackbird provides rapid access to video content for the easy creation of clips, highlights and longer form content to multiple devices and platforms.
A fully-featured editor accessed through any browser, easy to learn and needing only limited bandwidth to use, Blackbird powers significant productivity and efficiency benefits for any enterprise organisation working with video.
Blackbird was developed specifically for the browser and thereby supports remote production, Blackbird delivers unbeatable speed, scalability and richness of editing features and video output.
Blackbird is unique. The platform allows you to manage your video like no other solution – enabling lightning-fast video viewing, editing and publishing – anywhere, any time, by anyone.
If you haven’t heard of this application before, here’s the link to learn more.
We may request cookies to be set on your device. We use cookies to let us know when you visit our websites, how you interact with us, to enrich your user experience, and to customize your relationship with our website.
Click on the different category headings to find out more. You can also change some of your preferences. Note that blocking some types of cookies may impact your experience on our websites and the services we are able to offer.
Essential Website Cookies
These cookies are strictly necessary to provide you with services available through our website and to use some of its features.
Because these cookies are strictly necessary to deliver the website, refuseing them will have impact how our site functions. You always can block or delete cookies by changing your browser settings and force blocking all cookies on this website. But this will always prompt you to accept/refuse cookies when revisiting our site.
We fully respect if you want to refuse cookies but to avoid asking you again and again kindly allow us to store a cookie for that. You are free to opt out any time or opt in for other cookies to get a better experience. If you refuse cookies we will remove all set cookies in our domain.
We provide you with a list of stored cookies on your computer in our domain so you can check what we stored. Due to security reasons we are not able to show or modify cookies from other domains. You can check these in your browser security settings.
Google Analytics Cookies
These cookies collect information that is used either in aggregate form to help us understand how our website is being used or how effective our marketing campaigns are, or to help us customize our website and application for you in order to enhance your experience.
If you do not want that we track your visit to our site you can disable tracking in your browser here:
Other external services
We also use different external services like Google Webfonts, Google Maps, and external Video providers. Since these providers may collect personal data like your IP address we allow you to block them here. Please be aware that this might heavily reduce the functionality and appearance of our site. Changes will take effect once you reload the page.
Google Webfont Settings:
Google Map Settings:
Google reCaptcha Settings:
Vimeo and Youtube video embeds:
Other cookies
The following cookies are also needed - You can choose if you want to allow them:
Privacy Policy
You can read about our cookies and privacy settings in detail on our Privacy Policy Page.