… for Adobe Premiere Pro CC

Tip #566: Vintage Software, NLEs and Mac OS

Robert Withers – http://cinesouvenir.com

The best option for FCP 7 or Premiere CS6 is an older Mac Pro with older OS.

Topic $TipTopic

I decided to keep a vintage MacBook Pro running Mac OS 10.8.5 (Mountain Lion) so I can access FCP 7 and a vintage project edited in the first Premiere Pro CC (2013) It is too late to buy Premiere CS6, the last pre-rent Premiere; now a Creative Suite on Ebay sells for $2,000.

A friend is editing a experimental documentary on FCP 7 on a vintage machine, similar to what Bong Joon-ho did Parasite in 2019.

There’s one function that doesn’t work, which is the Project Manager, but I understand many have had problems with this in other versions.

On my 2018 MacBook Air Premiere Pro doesn’t really run but DaVinci Resolve 15 seems to require much fewer computer resources. It loads in a third of the time of Premiere and I can do basic cuts-only editing of pieces up to about 40 minutes.

I would like to get an iMac but B&H can’t tell you what OS is installed and I don’t want to test Catalina. I understand if you get a machine that was designed to run Mojave you can reinstall it from a drive.

Larry adds: Robert, you might consider getting an older Mac Pro – say around 2012 – which may come with an older OS and will run FCP 7/Premiere Pro CS6 perfectly. Option 2 is to convert your FCP 7 project to Resolve and edit it there. That would be done with a XML transfer.


Please rate the helpfulness of this tip.

Click on a star to rate it!

… for Random Weirdness

Tip #545: 10 Quick Tips to Spot Fake Gear

Larry Jordan – LarryJordan.com

If the quality is missing the gear is probably fake.

Topic $TipTopic

This article, written by Caleb Ward, first appeared in PremiumBeat.com. This is an excerpt.

Not sure if that equipment is legit? Does that deal feel too good to be true? Avoid getting scammed and learn to spot counterfeit camera gear with these ten quick tips, provided by Canon.

1. Look for Misspellings

Misspellings, whether intentional or unintentional, are an immediate sign that your equipment is fake. Give your equipment a quick look. If there’s something misspelled, it’s a fake.

2. Where Are You Buying It From?

Buying from a reputable seller is everything. Look for reviews and ratings regarding your seller. The following video posted by Fstoppers shows us that even items purchased on Amazon can be fake.

3. Instruction Manuals

Fake equipment almost always comes by itself in a box. So, if there’s a printed out manual included in the box, it’s a good sign that the product is real. This also applies to equipment purchased online. Sure… someone could probably fake a manual, but scammers likely won’t make the effort.

4. Look for a Warranty

Almost every piece of new equipment comes with a one year warranty included in its box. If a warranty isn’t in the box, you can bet your lens it’s a fake. It’s also important to note that boxes are easy to fake. Just because your equipment is in official-looking boxes doesn’t make it legit.

5. Serial Numbers

Most professional equipment comes with a serial number located somewhere on the exterior. If your piece of equipment doesn’t come with a serial number, then there is a good chance that it’s fake.

6. Does it Fit?

Official equipment such as lenses, adapters, and rigs will be incredibly snug. If you hear things moving around when you lightly shake your equipment, there’s a problem. This is especially true when buying camera lenses or adapters. Good adapters should fit lens mounts perfectly with no slippage.

7. “Too Good to Be True” Prices Usually Are

The online camera market is incredibly competitive, so it’s no surprise that online stores are always trying to undercut each other in terms of price. However, if you find a piece of equipment for half the normal retail cost, it’s probably a fake or, even worse, an empty box!

8. Holograms

Most of the popular camera manufacturing brands have “official” stickers that feature holograms. These stickers are hard to replicate, so they’re great indicators of official equipment.

9. Clear Printing

Printed information on genuine equipment is almost always incredibly sharp and easy-to-read. Counterfeit equipment, on the other hand, tends to be lower in quality – including written content. You won’t see illegible text on official equipment.

10. Test the Equipment

Test the gear! If you’re buying a piece of camera equipment in person, you should always test the gear before you buy. If the seller won’t let you test the camera – that should be a huge red flag. Even if you’re wanting to buy your equipment online, it’s good practice to go to your local camera store and test the camera to make sure it is a good fit for you.

EXTRA CREDIT

The link at the top of this tip includes a video from Canon on how to spot fake gear.


Please rate the helpfulness of this tip.

Click on a star to rate it!

… for Random Weirdness

Tip #534: What is Shutter Angle?

Larry Jordan – LarryJordan.com

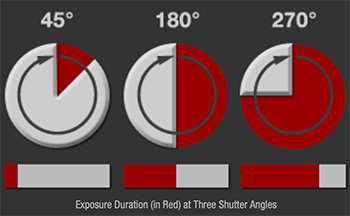
Motion blur increases as shutter angle increases.

Source: Red.com.
Greater shutter angles equal more motion blur.

Topic $TipTopic

This is an excerpt from RED.com. The advent of digital cinematography has opened up new creative possibilities for how motion is captured. This article explores the influence of shutter angle along with how it can be used as a creative tool for accomplishing one’s artistic goals.

CONCEPT

The “shutter angle” is a useful way of describing the shutter speed relative to the frame rate. This term is a conceptual relic of rotary shutters, where a disc with an angled opening would spin and let in light once per revolution to expose each frame. The larger the angle, the slower the shutter speed, all the way up to the limit of 360°, where the shutter speed could become as slow as the frame rate. At the other extreme, the shutter speed can be made arbitrarily fast by decreasing the angle.

APPEARANCE

By far the most common setting for cinema has been a shutter angle near 180°, which equates to a shutter speed near 1/48 of a second at 24 fps. Any larger, and motion appears more smeared since the end of blur in one frame extends closer to the start of blur in the next frame. Any smaller, and the motion appears more stuttered and disjointed since the blur gap increases, causing frames to become more like discrete images.

DISCUSSION

Although many film cameras were capable of only certain shutter angle ranges, digital cameras provide many exciting new possibilities. Just as focal length and aperture have been used as creative tools for controlling sense of scale and depth of field, shutter angle has the potential to do the same for motion.

The optimal setting will ultimately depend on other factors, such as the speed of subject movement within the frame, or the creative intent of the cinematographer. For example, one might wish to use a larger shutter angle to increase the exposure time and reduce image noise in low-light, or to give the impression of softer and more fluid motion. Alternatively, with fast action one might place more importance on depicting crisp details in each frame by using a smaller shutter angle.

Another consideration might be the film era one desires to emulate. Shutter angles much less than 180° more closely mimic the style of old 1950’s newsreels, for example, and a shutter angle of 180° will typically give footage a standard cinematic style.

EXTRA CREDIT

Here’s a link from Red.com to learn more.


Please rate the helpfulness of this tip.

Click on a star to rate it!

… for Random Weirdness

Tip #520: Tips for Using Shotgun Mics

Larry Jordan – LarryJordan.com

Think of shotgun mics as “lenses for sound.”

This is the symbol of a low-cut filter.

Topic $TipTopic

These tips are taken from this Audio-Technica video. Link. There’s no “perfect” mic, but shotgun mics are ideally suited for video production. Here are some tips on how to use them.

  • The length of a shotgun mic is analogous to a lens: short shotguns are wide angle, long shotguns are for closeups.
  • Short dynamic shotguns sound best when placed 2-3 feet from the mouth of the speaker.
  • Placing the mic above or below the speaker’s mouth does not alter the sound, but pointing the mic down tends to minimize room noise.
  • Always use a foam windscreen indoors to guard against wind noise. Outdoors, invest in a soft, furry blimp to minimize wind noise.
  • If your mic has a low-frequency cut-off switch, use it. (The screen shot illustrates the low-frequency roll-off switch.) This minimizes traffic rumble, wind noise and some handling vibration by removing frequencies below human speech. A low-cut filter also improves the clarity of dialog.
  • Condenser shotguns tend to sound better with richer sound than dynamic shotguns. Condenser shotguns will also pickup good sound up to 6 feet away from the talent.
  • Long shotguns are the best choice for exterior shots. They can pick up clean sound up to nine feet away from the talent, but they are extremely directional and can only be pointed while wearing headsets.
  • While long shotguns are good outside, inside they tend to pickup excess reverberation.
  • With any shotgun indoors, noise from the side is generally less of a problem than echo. For this reason, short condenser shotguns tend to be preferred because their design minimizes echo.
  • Regardless of length, any shotgun will sound better as it gets closer to the talent, up to a limit of about 2-3 feet.

In short, there’s no one perfect mic. Understanding how shotguns work can help assure you record the best sound possible.


Please rate the helpfulness of this tip.

Click on a star to rate it!

… for Visual Effects

Tip #512: Animate With a Multi-Plane Camera

Larry Jordan – LarryJordan.com

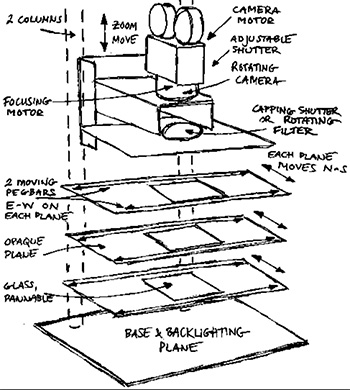
Multiple planes allows changes in depth, focus and perspective.

Image courtesy of Wikipedia.
Sketch of a 4-plane multiplane camera showing the glass plates and different motions.

Topic $TipTopic

When photographing traditional cell animation, all elements are painted onto a single cell. The problem is that you can’t create a sense of depth through movement. The multiplane camera fixes this.

First used by Lotte Reiniger for her animated feature The Adventures of Prince Achmed in 1926, the concept was further developed by Ub Iwerks for the Walt Disney Studios in 1933.

The multiplane camera is a motion-picture camera used in the traditional animation process that moves a number of pieces of artwork past the camera at various speeds and at various distances from one another. This creates a sense of parallax or depth.

Various parts of the artwork layers are left transparent to allow other layers to be seen behind them. The movements are calculated and photographed frame by frame, with the result being an illusion of depth by having several layers of artwork moving at different speeds: the further away from the camera, the slower the speed. The multiplane effect is sometimes referred to as a parallax process.

An interesting variation is to have the background and foreground move in opposite directions. This creates an effect of rotation. An early example is the scene in Walt Disney’s Snow White and the Seven Dwarfs where the Evil Queen drinks her potion, and the surroundings appear to spin around her.

The most famous multiplane camera was invented by William Garity for the Walt Disney Studios for the production of Snow White and the Seven Dwarfs. The camera was completed in early 1937. Disney’s multiplane camera, which used up to seven layers of artwork (painted in oils on glass) shot under a vertical and moveable camera, allowed for more sophisticated uses than the Iwerks version and was used prominently in Disney films such as Pinocchio, Fantasia, Bambi, The Adventures of Ichabod and Mr. Toad, Cinderella, Alice in Wonderland, Peter Pan, Sleeping Beauty and The Jungle Book.

EXTRA CREDIT

Here’s a link to Wikipedia to learn more.

Here’s a link to a video of Walt Disney in 1967 illustrating how a multiplane camera works.


Please rate the helpfulness of this tip.

Click on a star to rate it!

… for Random Weirdness

Tip #494: Pick the Right Microphone

Larry Jordan – LarryJordan.com

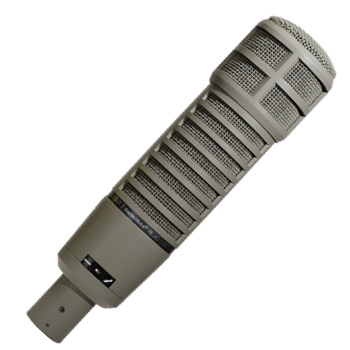
The right microphone, more than any other audio component, determines the quality of your audio.

The ElectroVoice RE-20 dynamic microphone.

Topic $TipTopic

This article, written by Chuck Crosswhite, first appeared in PremiumBeat.com. This is an excerpt.

There are three basic microphone types:

  • Ribbon
  • Dynamic
  • Condenser

Ribbons were the original microphone and, because they are seriously fragile, are only used in highly-controlled studio environments.

Dynamic microphones are durable, moisture resistant, resilient mics that are great for capturing loud sounds. These mics are a mainstay at live music venues. These microphones don’t require any external power, so plug it in and get to rocking some sweet vocal tracks. This is a great option for anyone podcasting on the road in unpredictable settings and weather.

Condenser microphones, on the other hand, thrive in controlled environments such as studios. They tend to be much more sensitive than dynamic microphones and have a louder output. These microphones do require an external power source, so you’ll want to check out an interface or mixer with phantom power to supply these mics with electricity. Condenser microphones are also normally much more fragile and expensive, so be sure to treat them well. This should definitely be your microphone choice if you want to achieve a higher-end production value on your podcast.

The article goes on to recommend mics for beginning, semi-pro and professional podcasters. While I prefer Shure SM-58s as a dynamic all-purpose mic and ElectroVoice RE-20s for studio work, I don’t significantly disagree with his suggestions.


Please rate the helpfulness of this tip.

Click on a star to rate it!

… for Random Weirdness

Tip #457: Low-Tech Perfomance Boost

Brian Thomas

Dust is the enemy, keep your gear clean.

Topic $TipTopic

My 2015 MacBook Pro was no longer smoothly handling anything; its performance was a fraction of what it was. It felt hot and the fans were racing.

I investigated and followed all the advice, eventually reinstalling everything and resetting the rest. That seemed to help a bit but it never completely solved the problem.

Then, I had a brainwave! I carefully opened up the back and practically choked on the dust and fluff! A couple of minutes of carefully hoovering [vacuuming] the debris has completely taken care of the problem.


Please rate the helpfulness of this tip.

Click on a star to rate it!

… for Apple Final Cut Pro X

Tip #392: How to Use a Second Display with FCP X

Larry Jordan – LarryJordan.com

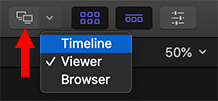
The Secondary Monitor display menu only appears when you have a second monitor connected.

Topic $TipTopic

This tip is from an Apple KnowledgeBase article. This is an excerpt.

Final Cut is programmed to support two computer monitors. But, the controls are hidden. When you connect a second computer display to your Mac, controls appear that allow you to move the viewer, browser, or timeline to the second display.

Make sure that the second display is connected to your Mac and turned on. When they are, the Secondary Display button and pop-up menu appear in the toolbar at the top of the Final Cut Pro window. (See screen shot)

To choose which area of the Final Cut Pro interface you want to move to the second display, do one of the following:

  • Click the Secondary Display pop-up menu and choose Timeline, Viewer, or Browser.
  • Choose Window > Show in Secondary Display > [item].

The area you chose moves to the second display, and the other areas of the Final Cut Pro window are adjusted on the primary display.

NOTE: Video scopes can be displayed on a second monitor along with the Viewer. Scopes can’t be displayed separately.


Please rate the helpfulness of this tip.

Click on a star to rate it!

… for Codecs & Media

Tip #430: Compressing 10-Bit HEVC Media

Larry Jordan – LarryJordan.com

Windows will, generally, compress 10-bit HEVC faster than a Mac.

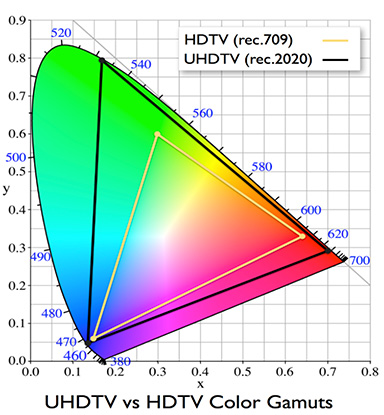
Comparing color spaces between Rec.709 and Rec. 2020. (Image courtesy of Intel.)

Topic $TipTopic

A reader asked this week why it took so long to compress 10-bit HEVC media. At first, I thought it was because Intel CPUs did not support hardware acceleration, but the answer is more complex than that.

7th generation Intel Xeon and Core processors support the BT. 2020 (also known as Rec. 2020) standard in 10-bit HDR and more. This screen shot compares the color spaces of Rec. 709 (HD) with Rec. 2020 (HDR). The BT.2020 represents a much larger range of colors than previously used in BT.709.

NOTE: Dynamic range is the ratio between the whitest whites and blackest blacks in an image. HDR video interprets better dynamic range than conventional Standard Dynamic Range (SDR) video, which uses a non-linear operation to encode and decode luminance values in video systems.

High Efficiency Video Coding (HEVC), also known as H.265, is a video compression standard, a successor to the widely successful H.264/AVC standard. HEVC 10-bit hardware acceleration for both decoder and encoder with HEVC/H.265 Main 10 Profile is supported in 7th generation Intel processors; released in 2017 or later.

However, the tools to create 10-bit HEVC that Intel supplies only support Windows. So, assuming a Windows developer implements Intel’s HEVC SDK (Software Development Kit), they can access faster compression speeds using hardware acceleration.

Here’s an article from Intel that describes this in more detail.


Please rate the helpfulness of this tip.

Click on a star to rate it!

… for Visual Effects

Tip #339: Inexpensive Green-screen Kits

Larry Jordan – LarryJordan.com

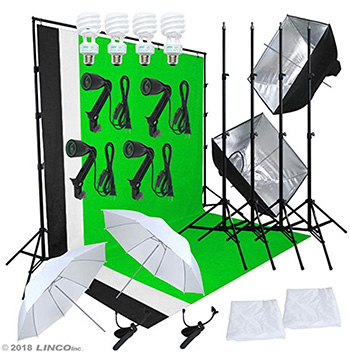
Do-It-Yourself is possible, but this kit is better.

This illustrates the contents of the Linco lighting kit.

Topic $TipTopic While there are tons of articles on the web about creating Do-It-Yourself green screen kits, what you save in money, you more than waste in post-production trying to pull a clean key from a cheap background. Instead, consider a green-screen background kit.

Here are three to look at.

There are many others to choose from. With these three, though, for less than $150, you get everything you need to create and light a background.

While the Emart kit is the least expensive, what I like about the other two kits is that they include softlights for the talent, as well.

The key to a successful key is an absolutely smooth and flat-lit background. Then, use separate lights to light the talent. Any of these kits can help.


Please rate the helpfulness of this tip.

Click on a star to rate it!