… for Random Weirdness

Tip #811: Talent & Location Releases – What’s Needed?

Larry Jordan – LarryJordan.com

Nothing ruins a great production like a lack of releases.

Topic $TipTopic

This article first appeared in MotionArray.com. This is an excerpt.

Picture this, you just had the best video shoot ever. You hired the perfect actress to play a part in your commercial. She was a natural in every way. The setting was outdoors on a perfect day, and you got exactly what you needed. You have two days to edit everything together and deliver the spot to the client.

The day before it’s due, you get a call from the talent who says they no longer want to be a part of the commercial. And you never got them to sign the proper release. Guess what? You are in big trouble.

It may seem like when someone says they are in, then everything will be fine. But without the proper legal documents, you have no power when it comes to release and usage. And you won’t realize what a headache this can be until it happens to you.

Getting proper talent and location releases signed by the right people is one of the most important and often overlooked aspects of any video or film shoot. So, don’t let it slip through the cracks while you are busy working on shot composition or directing talent.

This article explains what talent and location releases are, when you need them and links to get forms for your next project.


Please rate the helpfulness of this tip.

Click on a star to rate it!

… for Random Weirdness

Tip #779: Why a Lens is Worse at f/22 than f/8

Larry Jordan – LarryJordan.com

The smaller the aperture, the greater the diffraction.

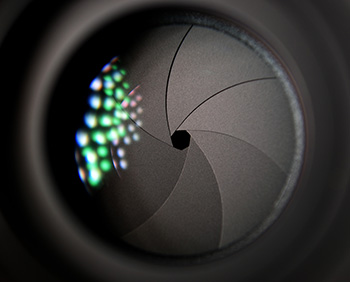
Lens aperture is determined by the iris setting.

Topic $TipTopic

This article first appeared in PetaPixel.com. This is an excerpt.

It’s common knowledge that most lenses are at their best (i.e. sharpest) between f/5.6 and f/8, depending on the lens. But why? The reason a lens is softer at f/22 than it is at f/8 is due to a phenomenon called diffraction.

Two interesting points worth highlighting are:

  • Lenses get sharper as you stop down because stopping down reduces aberration, even while it increases diffraction.
  • It’s only when the “blurry points” caused by diffraction become bigger than an individual pixel that you’ll begin to see the effect in your images.

This has two consequences that are actually noticeable in the real world:

  • All other things being equal, a higher-resolution sensor will show the effects of diffraction sooner, because the individual pixels are smaller.
  • A really well-corrected lens will begin showing the negative effects of diffraction earlier.

EXTRA CREDIT

The link at the top includes more details and a video illustrating diffraction in real life.


Please rate the helpfulness of this tip.

Click on a star to rate it!

… for Random Weirdness

Tip #790: Why Use Fluid Tripod Heads

Larry Jordan – LarryJordan.com

Fluid heads support smooth pans, tilts and tracking.

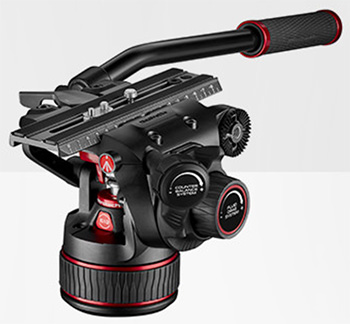
A Manfrotto fluid tripod head

Topic $TipTopic

This article first appeared in Better Digital Photo Tips.com. This is a summary.

What is a fluid tripod head exactly, do you really need a fluid tripod head and how does this kind of tripod head work? Here are some answers.

A fluid head is designed to create smooth pans, tilts and tracking. If you shoot stills, it isn’t truly necessary, but for video, it’s essential. These heads, made for tripods and monopods, contain a fluid chamber within its design, to dampen the sudden movements and vibrations of the camera, in order to get smooth video pans and smooth tracking.

A friction head is not the same as, though cheaper than, a fluid head. Friction heads use a series of plastic washers to smooth the movement.

Here are a few features of fluid head tripods that you need to be aware of.

  • COUNTERBALANCE. A system in a fluid head that allows your camera to remain at the angle you leave it set.
  • FLUID DRAG. Grease or oil material, that is trapped between plates within a sealed pack, that acts as torque dampers instead of using friction to create drag.
  • HANDLE LENGTH. The longer the handle, the easier it is to make subtle, smooth movements. One trick to make a cheaper head work better is to slide a small PVC or other light-weight pipe over the handle to extend its length.
  • TENSION CONTROL. The ability to adjust both panning tension and tilting tension
  • WEIGHT. Heavier heads can handle heavier cameras. It’s that simple.

The article, linked above, includes multiple videos illustrating the difference fluid heads make, along with details on what to look for when buying one.


Please rate the helpfulness of this tip.

Click on a star to rate it!

… for Random Weirdness

Tip #791: Tips for Better Battle Scenes

Larry Jordan – LarryJordan.com

Creating visceral battles only requires emphasizing basic tenets of filmmaking

(Image courtesy of Pexels.com)

Topic $TipTopic

This article, written by Jourdan Aldredge, first appeared in PremiumBeat.com. These are the highlights.

If you think about it, every battle scene comes down to one thing: one side wants something that the other side doesn’t want to give up — the high ground. A beach. A prisoner, information, or maybe a way home.

Fortunately, creating visceral battles in smaller film projects only requires some of the most basic tenets of filmmaking — world-creating, empathetic storytelling, safely performed stunts, and lots of simulated explosions.

Here are some tips:

  • Create an Accurate World. When it comes to classic battle scenes, you can’t do much better than the harrowing, large-scale sequences found in the Francis Ford Coppola horrors-of-war epic Apocalypse Now. And, while it’s a bit dated (released in 1979), its world building is by far the standard for great battles and impressive set pieces.
  • Long Takes Add Realism. Shoot long sequences that keep your viewers on the edge of their seats, trying not to blink. The long take sequence is a hallmark of many notable action, adventure, and war movies like Saving Private Ryan and The Raid: Redemption.
  • Compositing Stunts. Compositing action sequences in post is a great way to create highly technical stunts in a safe and controlled manner. This approach is perfect for anyone with limited production resources who needs battle, fight, and action sequences on a budget.
  • Explosion Sounds and Visual Effects. War and battle scenes have only grown more over the top over the years. However, an alternative for DIY filmmakers is working with explosive elements in the edit.
  • The Importance of Your Soundtrack. Background music highlights cinematic elements and heightens the narrative stakes. The right background music elevates individual scenes and adds an undeniable high-production-value sheen to your entire project. Don’t sleep on your soundtrack.

EXTRA CREDIT

The full article, linked above, has videos and links that illustrate this in much more detail.


Please rate the helpfulness of this tip.

Click on a star to rate it!

… for Random Weirdness

Tip #767: Import Media From an iPhone – FAST!

Larry Jordan – LarryJordan.com

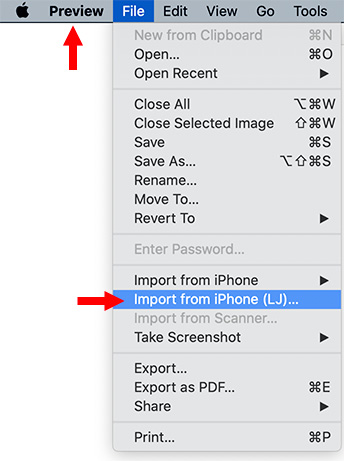
Importing media from an iPhone is fast and easy with Preview.

The File menu for Preview on a Mac.

Topic $TipTopic

Importing media from an iPhone into a Mac is fast and easy … if you know the secret.

OK, I’ll tell you.

  • Connect your iPhone to a Mac using a Lightning > USB cable.
  • Unlock your phone.
  • Open Preview (the app) on the Mac.
  • Go to File > Import from iPhone.

Preview then displays a directory of all the images and video on your phone. Simply drag the files you want from this window to your desktop – or wherever you want them stored.

This method, unlike Air Drop, allows you to easily select multiple files to transfer and copies them at a much faster rate. When you are done, simply unplug the cable. Nothing to eject or shut down.

Very, very easy – if you know the secret.


Please rate the helpfulness of this tip.

Click on a star to rate it!

… for Random Weirdness

Tip #773: Add Atmosphere to Your Shots

Larry Jordan – LarryJordan.com

Light needs something to bounce off – atmosphere provides it.

(Image courtesy of Pexels.com)

Topic $TipTopic

This article, written by Tanner Shinnick, first appeared in PremiumBeat.com. This is an excerpt.

If you do a quick search on cinematography blogs, you’ll find that one of the most common questions is How do I create the texture of blinds on a wall? There are two parts to the equation: a hard light source and atmosphere.

The DF-50 Hazer is the industry standard. You’ll find it at every rental house, and it’s a breeze to use. Typically, it creates an oil-based haze. This formula helps the haze hang in the air for longer, so you’re not constantly re-hazing the scene. While it’s not the cheapest rental, it’s consistent, and you’ll find it on most professional sets.

A Halloween (or party fog machine) is a cheap and efficient option. In fact, you can purchase a fog machine for roughly the same price as the hazer rental. You can find them at most party stores, especially around Halloween. However, there are some drawbacks. The fog they create is water-based, so it doesn’t hang in the air quite as long as the fog from an oil-based hazer.

If you’re on a budget (or working as a one-man band), Atmosphere Aerosol is a great alternative. The compact cans fit right into your camera bag, which is great to keep around for whenever you need fog in a pinch.


Please rate the helpfulness of this tip.

Click on a star to rate it!

… for Random Weirdness

Tip #774: The Best A-cam and B-cam Combos

Larry Jordan – LarryJordan.com

Three high-quality, lower-cost camera combos.

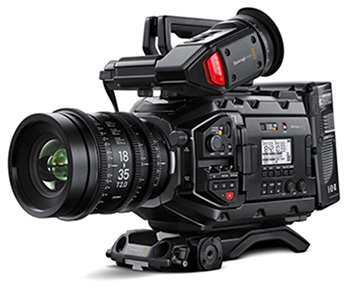
The Blackmagic Design URSA Mini Pro camera.

Topic $TipTopic

This article, written by Jourdan Aldredge, first appeared in PremiumBeat.com. This is an excerpt.

Speaking from experience, when I worked in-house with a video production company, there were often times when I needed at least a couple of cameras for a shoot. In many cases, these are A-camera and B-camera setups, where your A-cam is your high-end option for the majority of your filming, while your B-cam is usually your slightly lower-end camera, used for off-angle coverage and pickup shots.

Here are three combos to consider.

  • Blackmagic URSA Mini Pro and the BMPCC 4K. While the URSA Mini Pro has been a solid A-camera (4.6K, ProRes 444 + 422 recording) cinema workhorse since 2017, the real variable in this equation is Blackmagic’s new Pocket Cinema Camera 4K, which is a popular B-camera companion that boasts many of the same specs but at a fraction of the price.
  • Canon C300 and the Canon 5D. I spent years shooting on the Canon C300 — and both the Canon 7D and Canon 5D. Most of my career has been run-and-gun videography (and sometimes photography, to boot), so a reliable camera like the 5D or 7D has been invaluable. Meanwhile, Canon’s C300 has been a very solid cinema A-camera offering — a favorite of documentary filmmakers and corporate video producers (also for its reliability and favorable color science).
  • Sony FS7 and Sony A7 III. Going full Sony for your A-camera/B-camera setup may be your best image capture option. The Sony FS7, with its Super 35mm-sized CMOS sensor, is one of the most diverse and multi-functional A-cams on the market. Combined with the full-frame Sony A7 III (or perhaps the Sony A7S II), you should get the best of Sony’s sharp and crisp color science, and superior low-light performance, for more uncontrolled and vérité-style shoots.

EXTRA CREDIT

This article also includes more specs, pricing and links for more information.


Please rate the helpfulness of this tip.

Click on a star to rate it!

… for Random Weirdness

Tip #760: 6 Categories of Documentary Films

Larry Jordan – LarryJordan.com

Which category does your doc best fit?

Topic $TipTopic

This article, written by Jourdan Aldredge, first appeared in PremiumBeat.com. This is an excerpt.

Documentary filmmaking is a cinematic style dating back to the earliest days of film. For film and video professionals looking to work in documentary filmmaking, it’s important to understand a bit of its history, as well as the different documentary types.

While there’s a lot of variation within, these are the six main categories of the genre into which all documentary films can be placed.

  • Poetic Documentaries. First seen in the 1920s, poetic documentaries are very much what they sound like. They focus on experiences, images, and showing the audience the world through a different set of eyes. Abstract and loose with narrative, the poetic sub-genre can be very unconventional and experimental in form and content. The ultimate goal is to create a feeling rather than a truth.
  • Expository Documentaries. These are probably closest to what most people consider “documentaries.” Those looking for the most direct form of documentary storytelling should explore the straightforward expository style. It’s is one of the best ways to share a message or information.
  • Observational Documentaries. These attempt to give voice to all sides of an issue by offering audiences firsthand access to some of the subject’s most important (and often private) moments and allow the audience to observe the world around them.
  • Participatory Documentaries. These include the filmmaker within the narrative. There’s some debate in the documentary community as to just how much filmmaker participation it takes to earn a documentary the label of “participatory.” In fact, some argue that, due to their very nature, all documentaries are participatory. Regardless, this style might be one of the most natural for those just starting off.
  • Reflexive Documentaries. These are similar to participatory docs in that they often include the filmmaker within the film. However, unlike participatory, most creators of reflexive documentaries make no attempt to explore an outside subject. Rather, they focus solely on themselves and the act of making the film.
  • Performative Documentaries. these are an experimental combination of styles used to stress subject experience and share an emotional response with the world. They often connect and juxtapose personal accounts with larger political or historical issues. This has sometimes been called the “Michael Moore-style,” as he often uses his own personal stories as a way to construct social truths (without having to argue the validity of their experiences).

EXTRA CREDIT

The article link above has examples and reference videos for all these categories. It is worth reading in full.


Please rate the helpfulness of this tip.

Click on a star to rate it!

… for Random Weirdness

Tip #761: 5 Tips to Make Your Deadlines

Larry Jordan – LarryJordan.com

No time like the present to get yourself organized.

(Image courtesy of pexels.com)

Topic $TipTopic

This article first appeared in MotionArray.com. This is an excerpt.

Deadlines are the bane of every video creator’s existence — but often the only way we can get our work done. But the worst feeling an artist or producer can have is when they miss a deadline. Often it’s not even their fault, but various circumstances cause deadlines to be missed every day.

Here are five ways to avoid missing those deadlines and having angry clients breathing down your neck.

  1. Make Fake Deadlines. Work expands to fill the time. If you know you have a deadline coming up in five days, you’ll likely take five days to get the work done. Instead, set false deadlines a few days before the actual deadline. This will alleviate the feeling of impending doom that surrounds deadlines because you’ll always be ahead of schedule and you’ll always have time to fix issues.
  2. Hold Clients Accountable. Many times deadlines are missed because of clients. To eliminate this problem, set up a detailed timeline for your projects that includes dates and times for client feedback. Get them to sign off on the feedback calendar ahead of time.
  3. Get Organized. The easiest way to miss a deadline is to forget to make a change until the last minute or altogether. Clients can sometimes be unclear with notes. They may give you some notes on a call, and others in an email (or several). With information coming from all directions, it’s easy to miss something. Figure out an organization method for changes that work for you.
  4. Make Friends. Sometimes we miss deadlines because we take on more than we can handle. Network with other professionals who can make up for your weaknesses. When possible, hire them to help you out so that you deliver above your client’s expectations and on time. Templates are another great way to get things done quickly and to help you cover for certain skills you may lack.
  5. Learn to Say No. One thing is for sure, if you start missing deadlines, your clients won’t come back. Taking on a job that you don’t have time for, or is above your skill set can do more damage than good. Let the client know that you’d love to help them, but you just won’t be able to get it done as proposed. They’ll thank you for it.

EXTRA CREDIT

The article linked above has more details, along with links to software, templates and other tools that can help you stay on track.


Please rate the helpfulness of this tip.

Click on a star to rate it!

… for Random Weirdness

Tip #762: How Lens Focal Length Affects a Video Image

Larry Jordan – LarryJordan.com

Too wide and too tight are both poor choices for lens angle.

Topic $TipTopic

This article, written by Mike Wilkinson, first appeared in fstoppers.com. This is an excerpt.

We can learn a lot from studying what happens to an image at different focal lengths. Here, I’ll discuss the visual effects created when choosing a wide versus telephoto lens for documentary-style interview productions.

While using wide-angle lenses can be helpful when working in tight spaces, especially when filming B-roll for a project, rarely are they an ideal choice for capturing interviews.

With a focal length of less than 28mm, not only will you have to stand very close to the subject, but if the subject approaches the edges of the frame, it’s quite possible that barrel distortion or keystoning may happen to parts of their body. Facial features can become exaggerated, and that’s usually not desirable.

Another byproduct of using wide-angle lenses is how much more apparent the background becomes. It can appear further away, and your viewer will be able to see much more of the surrounding location

Focal lengths between 35mm and 50mm can be a “safer” choice when you still want to include some of the background, or don’t have a large space to work in.

My go-to choice for most documentary style interviews is usually between the range of 70mm and 110mm, depending on the space and how much background I want to show.

I find that for a 2-camera interview shoot, my lens kit will include a 24-70, 70-200, and an 85mm prime. These lenses should provide me with all of the options I need for both a medium shot and a closeup.

EXTRA CREDIT

The article includes more lens detail, as well as photos illustrating the author’s production process.


Please rate the helpfulness of this tip.

Click on a star to rate it!