… for Random Weirdness

Tip #740: 5 Affordable Fisheye Lenses

Larry Jordan – LarryJordan.com

Here are five affordable options for fisheye lenses.

The Pentax 10-17mm F/3.5-4.5 (Image courtesy of Pentax.)

Topic $TipTopic

This article, written by Jourdan Aldredge, first appeared in PremiumBeat.com. This is an excerpt.

The fisheye look has been a go-to staple of cinema for ages. And while fisheye lenses can stylistically express both openness and containment, as well as distort perceptions of height, size, and importance, wide-angle lenses also have a very practical purpose. They’re great for filming in small, tight places.

Here are five affordable options.

  • Altura Photo 8mm F/3.0. The first option on our list is the Altura Photo 8mm F/3.0, which is one of the least-expensive fisheye lenses on the market. While wide-angle lenses are perhaps more popular in the photography world than in videography, lenses like the Altura Photo 8mm work great for both.
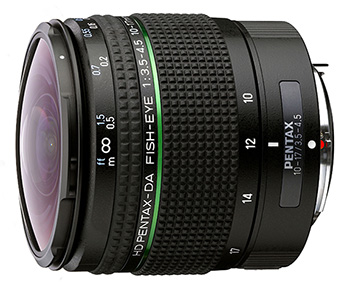
  • PENTAX 10-17mm F/3.5-4.5. A surprisingly affordable wide-angle zoom (and a great option for DSLR or mirrorless cameras), the PENTAX DA 10-17mm is actually an offshoot of the first fisheye zoom ever created. As a zoom, this PENTAX gives you solid coverage when navigating in tight spaces where you might need to tweak your framing and composition a bit.
  • Rokinon 8mm T3.8. Unlike the fisheye lenses above, the Rokinon RK8MV-C 8mm T3.8 Cine Fisheye Lens is tailor-made for film and video. This means better design quality for a videographer’s needs, with a focus on ease of use for aspects like focus pulling and smooth motion.
  • Samyang 12mm F/2.8. One of the best options for full-frame videographers, the Samyang Optics 12mm F/2.8 ED AS NCS Fisheye is a great manual focus lens, with flexibility for filming from both short and long distances. The Samyang 12mm is also one of the best low-light options for those really looking to cut the edge with some beautiful shallow-depth-of-field shots.
  • Tokina 10-17mm F/3.5-4.5. Another solid hybrid offering that’s on the higher end of our affordability chart, the Tokina AT-X 107 F/3.5-4.5 DX Fisheye (10-17mm) is a strong APS-C format wide-zoom for those looking to utilize the fisheye look with more options and control.

EXTRA CREDIT

The link at the top provides more tech specs and links for each of these lenses.


Please rate the helpfulness of this tip.

Click on a star to rate it!

… for Random Weirdness

Tip #742: The Best Advice to Keep Your Cool

Larry Jordan – LarryJordan.com

Don’t argue – just address the note.

Topic $TipTopic

This article, written by Todd Blankenship, first appeared in PremiumBeat.com. This is an excerpt.

NOTE: This is an OUTSTANDING article on dealing with clients. Click the link above to read all of it.

It’s funny how a simple conversation can change everything. A colleague or a friend says something that just sticks. You probably don’t realize the power of the moment while you’re in the moment, but then, even years later, their words pop into your head when you’re driving or working or in the shower.

I was working on a project with a producer from L.A. who had produced a ton of actual television shows. He had definitely earned the right to tell me what to do. Alas, the young and obnoxious creative that I was at the time, I argued with him. I didn’t want to make his changes. I thought my ideas were the only possible way things should go. I thought his input would absolutely ruin the project. It was the wrong call.

I pleaded my case. I explained to him why his ideas wouldn’t work and how my way was the better way. Instead of firing me on the spot, he said three simple words: “Address the note.”

I stared at him, wondering what he meant. He continued:

Just address the note — that’s all you need to do. You don’t have to do it exactly as I said it, just make me happy. I’m not a cinematographer, I’m a producer — you’ll know better what to do, specifically. My specific way may not be the best, but now you know something that’s bothering me as a producer and all you gotta do is find a way to address it and make me happy. Just address the note.

Wow.


Please rate the helpfulness of this tip.

Click on a star to rate it!

… for Random Weirdness

Tip #743: 3-Step Pricing Formula for Videographers

Larry Jordan – LarryJordan.com

Pricing is hard – but it isn’t cookie-cutter either.

Topic $TipTopic

This article first appeared in MotionArray.com. This is an excerpt.

Ask any freelancer what part of their job they hate the most and chances are a good chunk of them will point to the inescapable chore that is pricing. Pricing your own services is awkward, confronting, and much like breaking up with a partner, you just wish someone else could just step in and do the dirty work for you.

But luckily for all you free agents out there, we have a quick little formula that’ll help you tackle this supremely uncomfortable task so you can quit stressing and get back to doing what you love most—making video magic!

As you’ve probably realized by now, no two video productions are the same, which means the fees you charge for them shouldn’t be either. Tailoring your prices to each project is key.

  1. Calculate Your Outgoing Expenses. The first thing you’re going to want to do is make a list of all the expenses you’re going to incur throughout the course of your project. This includes everything from the planning phase all the way through to post-production. We’re talking equipment rental, location hire, set props, actors and crew personnel, transportation costs, stock music licenses, the whole kit and kaboodle.

    Now repeat after me: All of these expenses are things that my client and, not me—repeat: NOT ME—will be covering.

  2. Calculate Your Time and Effort. Next, you’ll need to make a list of all the tasks you personally will need to undertake to see the project through to completion and how long you estimate each one to take.

    This will include any client meetings and phone calls, scripting or storyboarding, logistical planning, the total number of hours spent on set, as well as any post-production work you’ll be required to do or oversee.

  3. Decide How Much Profit You Want to Make. Lastly, you’ll need to decide how much money you’d like to walk away from the project with. To help you do this, go back to step two and take into account all of the time and effort you estimate you’ll be putting into the project and try and place a figure on what you think it’s worth.

Once you’ve decided what you’d like your profit to be, add it to your total sum of project expenses and voilà: there you have your complete project fee!


Please rate the helpfulness of this tip.

Click on a star to rate it!

… for Random Weirdness

Tip #716: 3-2-1 Backup Rule

Larry Jordan – LarryJordan.com

3 copies – 2 different media – 1 different location.

3 copies – 2 different media – 1 different location.

Topic $TipTopic

This article, written by Trevor Sherwin, first appeared in PetaPixel.com. This is an excerpt.

Whether you take your photos professionally or for fun, how many of you out there can truly say you’re are happy with your photo backup strategy? If a drive were to fail, will you lose any photos? If you have a house fire or were to be burgled, do you have a copy elsewhere?

Getting your backup processes in place is a bit boring and not very creative but the more seriously you take your photography, the more you need to have a robust workflow in place.

Put simply, the 3-2-1 backup strategy provides an easy-to-remember approach to how many copies of your data you should have and where those copies should be stored in order to protect against the most likely threats to your photos.

  • 3 (copies of your data)
  • 2 (different media or hard drives)
  • 1 (copy of your photos in another location)

The article, linked above, has more details, include a sample workflow on how to safely and efficiently backup your data.


Please rate the helpfulness of this tip.

Click on a star to rate it!

… for Random Weirdness

Tip #729: 4 Top-Quality Prime Lenses Less than $1K

Larry Jordan – LarryJordan.com

Prime lenses are faster, crisper and less expensive than zooms.

Sigma 35mm f/1.4 DG HSM Art Lens (Image courtesy of Sigma.)

Topic $TipTopic

This article, written by Logan Baker, first appeared in PremiumBeat.com. This is an excerpt.

Capture beautiful images with these high-quality, low-cost prime lenses. Let’s look at some prime lenses that land in the high-quality/low-price sweet spot, all of them available right now for under $1,000.

  • Rokinon Cine 35mm T1.5 Cine DS Lens. Rokinon Cine series lenses might be the best deal in the industry right now. Each lens is fast, sharp, and priced to move, and pulling focus is about as smooth as it can be for glass this size.
  • Sigma 35mm f/1.4 DG HSM Art Lens. These lenses have skyrocketed in popularity over the past three years or so — and for good reason. First of all, they’re built like tanks and have a brag-worthy super-sharp 1.4 aperture. Plus, decent auto-focus capabilities make them a solid choice for filmmaking and photography.
  • SLR Magic MicroPrime CINE 25mm T1.5. If I was allowed only one word to describe this lens and, really, the entire line of SLR Magic lenses, that word would be underrated. For the price, the lenses are superb. Even if you take the price out of the equation, these lenses are superb.
  • Rokinon 14mm f2.8 ED AS IF UMC Series. This lens is the cheapest option on this list. Frankly, it’s also the simplest. And it’s 100% worthy of a spot in your filmmaking bag. It’s super wide and super sharp.

EXTRA CREDIT

In the link at the top are more details and videos illustrating each lens.


Please rate the helpfulness of this tip.

Click on a star to rate it!

… for Random Weirdness

Tip #730: Tips to Control Depth of Field

Larry Jordan – LarryJordan.com

Big aperture = small f/number = small depth of field

Shallow depth-of-field. (Image courtesy of Pexels.com.)

Topic $TipTopic

This article, written by Brian Auer, first appeared in PictureCorrect.com. This is an excerpt.

Depth of field (DOF) is one of the most important factors in determining the look and feel of an image. You should know how to utilize this effect.

Depth of field refers to the distance (depth) from the focus point that a photo will be sharp, while the rest becomes blurry. A large, or wide, depth of field results in much of the photo in focus. A small, or narrow, depth of field results in much more of the photo out of focus.

There are four main factors that control depth of field: lens aperture, lens focal length, subject distance, and sensor size. Your sensor is pretty well set, so you won’t have much luck changing that. Your focal length and distance to the subject are usually determined by your choice of composition. So the lens aperture is your primary control over depth of field.

Before I get to the tips, let’s get a few things straight:

  • BIG APERTURE = SMALL F-NUMBER = SMALL DEPTH OF FIELD
  • SMALL APERTURE = BIG F-NUMBER = BIG DEPTH OF FIELD

Large apertures (small f-numbers) cause a narrow DOF, while small apertures (large f-numbers) cause a wide DOF.

If you want to bring an entire scene into focus and keep it sharp, use a small aperture. But be careful not to go too small. Lens sharpness starts to deteriorate at the smallest apertures.

The DOF extends behind and in front of the point of focus. It usually extends further behind than in front, though. So keep this in mind when choosing your focus point; you’ll want to focus about a third of the way into the scene rather than halfway.

Your focal length is usually determined by your choice of composition, but you should know how it affects your depth of field. Longer focal lengths (200mm) have less depth of field than shorter focal lengths (35mm).

EXTRA CREDIT

The link at the top has videos illustrating these concepts, as well as more information.


Please rate the helpfulness of this tip.

Click on a star to rate it!

… for Random Weirdness

Tip #706: 7 Rules for Better Composition

Larry Jordan – LarryJordan.com

Of all these rules, I like the Rule of Thirds the best.

The park bench is framed according to the Rule of Thirds.

Topic $TipTopic

This article first appeared in MotionArray.com. This is an excerpt.

As a film editor, one of the biggest limitations is the footage you have to work with. Framing and composition are essential concepts to understand if you want to get incredible footage in the first place.

Here are the seven rules:

  1. The Rule Of Thirds
  2. Symmetry
  3. Leading Lines
  4. Leading Room & Head Room
  5. Depth
  6. Size Equals Power
  7. Break the Rules

The article itself has excellent examples and more details on each rule.


Please rate the helpfulness of this tip.

Click on a star to rate it!

… for Random Weirdness

Tip #707: The Basics of Lenses

Larry Jordan – LarryJordan.com

The right lens makes a good shot great.

A typical zoom lens: Nikkor 18-55 mm.

Topic $TipTopic

This article first appeared in MotionArray.com. This is an excerpt.

The job of the lens is to focus the light, so that when it hits the sensor of your camera, there’s a discernible image. This is exactly what the lens of your eye does — focuses light, which hits the retina in the back of your eyeball, so that you can make out the shape of the expensive camera you just bought. 

There are three main things to consider in a lens:

  • Focal length. Focal length refers to how wide or how zoomed-in it makes your image look. Wider lenses make things look farther apart, whereas longer lenses compress the distance between objects, making them look closer together. 
  • Aperture. T-stop and F-stop are different terms for aperture and they mean slightly different things, but for our purposes, we’re going to use the term F-stop. Basically, the F-stop refers to the diameter of the opening of the lens. The lower the number, the wider the opening. The higher the F-stop number, the smaller the opening.
  • Zoom vs. Prime lenses. A prime lens just refers to a lens that’s fixed at only one focal length that you can’t zoom in and out with. The truth is that you’re not going to be doing a lot of zooming in your filming career. A cheaper, higher quality option is to actually use prime lenses and whenever you need to frame your subject differently, either move the camera or change the lens to a different focal length.

EXTRA CREDIT

The article has more details and illustrations that make it worth reading.


Please rate the helpfulness of this tip.

Click on a star to rate it!

… for Random Weirdness

Tip #708: How To Shoot Great Aerials

Larry Jordan – LarryJordan.com

Aerials are punctuation for your project, not the entire script.

A drone in action at sunset. (Image courtesy of Pexels.com.)

Topic $TipTopic

This article, written by Ryan McAfee, first appeared in Pond5.com. This is an excerpt.

Aerial footage is one of the most versatile types of footage you can use in your projects. In its most basic form, it establishes a location or gives a scope to the story; it can also heighten drama, help transition between locations or subjects, and can add physical and emotional depth to your productions.

The best aerial videographers maximize the utilitarian nature of aerial shots, but also try to push every creative boundary when it comes to dazzling viewers. Here’s how to shoot aerials and use them in storytelling.

In many cases, less is more, and it’s more about maximizing their impact. Show scale, heighten drama, and aerial dolly zooms, aerial hyperlapses, and aerial timelapses also increase the drama just like they would if they were “regular” shots.

Not only do aerials create new perspectives for and enhance the production value of your videos, they can also simply help ease transitions between shots or scenes.

You position the drone or helicopter so that the object or subject is obscured by an object in the foreground, and then reveal it by flying in a direction so it’s no longer obscured. These shots are great for giving importance to the item being revealed, and can also give more context to the scene as more and more is being revealed, like a waterfall being from above.

The article has excellent examples and more comparisons on when to use drones vs. helicopters, along with necessary permits.


Please rate the helpfulness of this tip.

Click on a star to rate it!

… for Random Weirdness

Tip #669: Add Subtitles to YouTube

Larry Jordan – LarryJordan.com

The best way to add captions to YouTube is to create the SRT caption file first.

The Upload captions button in YouTube Studio.

Topic $TipTopic

Adding subtitles to your clips on YouTube expands the number of people that can benefit from watching your projects. Here’s how to add subtitles and closed captions.

YouTube wants all subtitles in SRT format. The easiest way to do this is to use automatic speech-to-text transcription software. The highest quality is to get a human transcription service to do this for you. You can also do this yourself, but after you transcribe one project, you’ll want to find another way to do this. Transcription is slow, laborious and painstaking to get right.

NOTE: You don’t have to know every language to add subtitles. YouTube sends all subtitles out to Google Translate for other languages.

Here are the steps:

  • Go to YouTube Studio and select your video.
  • In the middle of the More Options page you’ll see a link to upload subtitles.

NOTE: Be sure to select the correct language for your subtitles.

Click the Download button.

NOTE: If you need to create or edit your subtitles, click the Edit on Classic Studio button.

Done. After a few minutes, ,your captions will appear for your video on YouTube.

EXTRA CREDIT

Here’s an article I wrote that covers process this in more detail for Adobe Premiere Pro.

Here’s an article I wrote that covers process this in more detail for Apple Final Cut Pro X.


Please rate the helpfulness of this tip.

Click on a star to rate it!