… for Random Weirdness

Tip #631: Get Freelance Work From Video Marketplaces

Larry Jordan – LarryJordan.com

Find work in tough times using a video marketplace.

Topic $TipTopic

This article first appeared in MotionArray.com. This is an excerpt.

We are living in an on-demand video economy during very challenging times. Here are four companies that can help you find work.

  • Veed.me. At Veed.me, clients set up project pages outlining their needs including a timeline, budget, description, and references. Budgets can range from hundreds to several thousand dollars. As a video producer, you set up an account and sort through the various project options. Once you find one you like, you can submit a pitch, add files, and discuss with the prospective client.
  • Videopixie. Videopixie is another marketplace arranging clients with producers, but they expand the offering to include animators, editors, and colorists.
  • Video Brewery. Another marketplace highlighting both live-action creators and animators is Video Brewery. Using a slick interface with lots of details for clients, Video Brewery helps walk potential customers through the project-building process. From the creator side, it’s important to note that Video Brewery isn’t an open marketplace where anyone can sign up. They are trying to moderate who is in their catalog, so you must submit an application with relevant work to be invited in. This makes it a little harder initially, but once chosen, you can rest assured knowing there will be less clutter for potential clients to sort through when choosing a partner.
  • Tongal. Tongal takes a slightly different approach to the above marketplaces by incorporating a contest model with their projects. With Tongal, all of the community has a chance to make money on any given project, but they are competing against the rest of the community.

These are just a few of the many video marketplaces popping up on the web for freelancers. It doesn’t hurt to create profiles on all of them as a way to expand your network and reach new potential clients. There is work to be had, you just have to be ready when the client wants your help!


Please rate the helpfulness of this tip.

Click on a star to rate it!

… for Random Weirdness

Tip #617: Benefits of a Tilt/ShiftLens

Larry Jordan – LarryJordan.com

Tilt/shift lenses modify depth of field, perspective and focus.

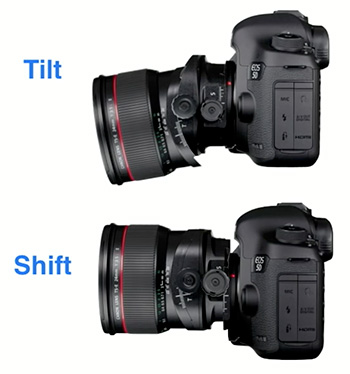
The two modes of a Tilt/Shift lens: tilting (top) and shifting.

Topic $TipTopic

Traditional lenses project a circular image onto a rectangular sensor to create an image. Normally, that circular image is fixed in its location to the sensor. However, a tilt-shift lens allows us to modify where that circular image lands in relation to the sensor.

By tilting the lens, you change the center of that imaging circle, which can straighten the lines that appear to converge in the distance. The camera body remains in the same position, but the tilt shift adjusts the lens’ perspective. That makes tilt shift lenses a big help for architectural photography. Walls that are straight may actually look crooked because of the lens’ perspective; tilt shift lenses can change that perspective, making those walls straight again.

Tilt shift lenses also allow for greater control over an image’s depth of field. Traditionally, anything the same distance from the camera as the subject will appear in focus—that’s because those objects lie on the same focal plane. On a normal lens, the focal plane is parallel to the camera. Tilt the lens, and the focal plane tilts as well, becoming a diagonal line, instead of one that’s parallel to the camera. This creates the appearance of a much deeper depth of field than shooting a traditional lens at the same aperture. With the focal plane as a diagonal, it’s possible to have two objects that are parallel to one another, with one item in focus and another not.

EXTRA CREDIT

These lenses are also great for shooting panoramic shots. Here’s an illustrated blog, plus a tutorial video from CreativeLive that showcases tilt-shift lenses.


Please rate the helpfulness of this tip.

Click on a star to rate it!

… for Random Weirdness

Tip #618: Five Free Script-writing Programs

Larry Jordan – LarryJordan.com

No better time than now to start writing your script.

Image courtesy of DramaQueen.com

Topic $TipTopic

This article, written by Robbie Janney, first appeared in PremiumBeat.com. This is an excerpt.

Need to write a script with little to no budget? Here are some great, free alternatives to the higher-priced Hollywood standards.

Final Draft is the darling of the film industry, used by almost every professional screenwriter in the industry. The program creates fast character and scene reports so your first AD and line producers can start building budgets and schedules. But, you might not be able to afford it with all its bells and whistles. You need something free!

Here are some options:

EXTRA CREDIT

The blog linked at the top has details on each program, plus illustrated tutorials.


Please rate the helpfulness of this tip.

Click on a star to rate it!

… for Random Weirdness

Tip #619: Five Tips to Better Stock Media

Larry Jordan – LarryJordan.com

The secret is in how you do your search.

Image courtesy of Pond5.com.

Topic $TipTopic

This article, written by Terin Izil, first appeared in Pond5.com. This is an excerpt.

Stock video sites have millions of clips. So why does it feel like you’re getting the same five clips over and over? Here’s a few tips to keep your results fresh and help you find exactly what you’re looking for.

Keywords Are Key

Start by writing down your main keyword and a list of secondary keywords. Keep your main keyword, but rotate in the secondary ones to see different results. Good words to include on that secondary list include: aerial, establishing shot, timelapse, hyperlapse, handheld, loop, and cinemagraph.

Follow Artists You Like

Like someone’s style? Check out the rest of their portfolio.

A Visually Similar Search is Worth 1,000 Words

This is especially helpful if you are trying to match shots or styles.

Filter, Filter, Filter

If you’re looking for a needle in a haystack (or even if you’re not), it helps to weed out the results that don’t belong. If you know the resolution, number of people, or if you want commercial or editorial, you can easily narrow down the results with a filter.

Then Filter Again by Budget

You might not know your exact budget, but you can probably figure out what your maximum is. Set a filter to that so you don’t see anything unrealistic for your project.


Please rate the helpfulness of this tip.

Click on a star to rate it!

… for Random Weirdness

Tip #584: 5 Tips When Picking an HDR Monitor

Larry Jordan – LarryJordan.com

Tips to keep in mind when picking a monitor.

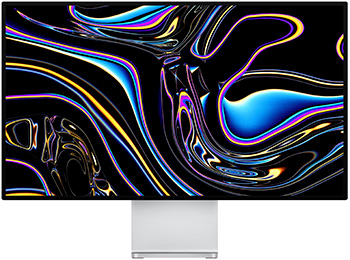
Apple Pro Display XDR, courtesy of Apple.

Topic $TipTopic

These tips, written by Scharon Harding, first appeared in Creative Planet Network. This is a summary.

When picking an HDR monitor, these should be your top considerations:

  • Brighter is better. HDR monitors can get much brighter than SDR ones. If you’re a general user, opt for a monitor that’s VESA-certified for at least DisplayHDR 500 (a minimum max brightness of 500 nits with HDR media), while gamers will probably want DisplayHDR 600 or greater. Creative professionals like video editors should get at least DisplayHDR 1000.
  • Backlight dimming type is crucial. If you go for DisplayHDR 500 or higher, you’ll know you have at least edge-lit dimming. And when it comes to FALD (full array local dimming) or edge-lit dimming, more zones are better
  • The more DCI-P3 coverage, the better, but be careful to check color accuracy.
  • As usual, higher contrast ratios are best. High contrast is an area where HDR displays shine over their SDR counterparts.
  • HDR10 is the only HDR format Windows users need (unless they plan to hook their display up to something like a Blu-ray player).

EXTRA CREDIT

Tom’s Hardware has developed a guide on how to choose the best HDR monitor. Here’s the link to learn more.


Please rate the helpfulness of this tip.

Click on a star to rate it!

… for Random Weirdness

Tip #598: How to Set Up a Live Streaming Studio

Larry Jordan – LarryJordan.com

The best first step is to get a good microphone.

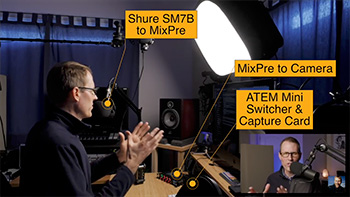
A screen shot from Curtis Judd’s streaming webinar.

Topic $TipTopic

As we look to move our studios to our homes and start live streaming, it is useful to get a guide on what gear to use and how to use it.

Curtis Judd has an interesting and informative YouTube video where he walks through all the equipment he uses to create live streams for YouTube.

Here’s the link.

EXTRA CREDIT

This is an article I wrote on the gear the Digital Production Buzz used to create our live streaming audio podcasts. Here’s the link.


Please rate the helpfulness of this tip.

Click on a star to rate it!

… for Random Weirdness

Tip #599: Some Inspired Exterior Photographs

Larry Jordan – LarryJordan.com

As cameras get faster lights can get smaller. Take a look at the results!

Image courtesy LumaCube & ShipWreck Photography

Topic $TipTopic

I’ve always been fascinated by beautiful lighting – from portraits to wide shots. Most of the time, the stuff I like takes a generator, a crew of 50 and three semi’s worth of gear. Which, these days, is out of the question. Sigh…

Recently, though, I’ve been amazed with the light output and creativity coming from small LumaCubes. These seem perfect for lighting small indoor home studios – especially for live streaming and close cameras.

However, that doesn’t mean they can’t be used outside. If you are looking for stunning photography created using microscopically small lights, take a look at the Gallery page of the LumaCube website.

Here’s the link to their image gallery.


Please rate the helpfulness of this tip.

Click on a star to rate it!

… for Random Weirdness

Tip #548: What Is ISO?

Larry Jordan – LarryJordan.com

ISO affects gain after the image is captured.

Topic $TipTopic

This tip, presenting by Chris Lee, first appeared in PetaPixel.com. This is a summary.

ISO is probably THE most misunderstood term as it relates to digital photography. Stemming in part from people equating ISO sensitivity directly with film speed, and in part from some useful-but-misleading simplifications that are shared quite frequently, people often share two bits of misinformation:

  • ISO is one way to increase your exposure without changing shutter speed or aperture
  • ISO “increases your sensor’s sensitivity to light.”

As Lee explains in the video above, neither of these things are technically true, though both ARE useful ways to think about ISO when you’re out shooting.

ISO is a gain knob. Electrical amplification that is done after your camera is done gathering light. It has no impact on how much light your camera sensor’s photosites can gather during a given exposure, and therefore has no direct connection to exposure itself, despite being part of “the exposure triangle.”

At the most basic level—and Lee plans to do a follow-up explaining more in-depth concepts like ISO invariance and how different cameras handle this setting—ISO is the level of electrical amplification done to the analog “signal” collected by your image sensor before it’s sent to the analog to digital converters (ADCs), eventually producing an image.

EXTRA CREDIT

Visit the link above and watch Chris Lee’s video. In 12 minutes you’ll understand what ISO is and how it affects exposure.


Please rate the helpfulness of this tip.

Click on a star to rate it!

… for Random Weirdness

Tip #569: Tips for Buying Used Lenses

Larry Jordan – LarryJordan.com

Used lens are affordable, but be careful.

Lens image courtesy of pexels.com

Topic $TipTopic

This article, written by Caleb Ward, first appeared in PremiumBeat.com. This is an excerpt.

Used lenses provide a cost-effective way to get quality equipment, but know what to look for before you buy.

1. Look at the Focal Length

Lenses are broken up into two categories, prime & zoom. Prime lenses don’t zoom ‘in and out’ but typically let in more light than zoom lenses. They have a fixed focal length.

2. Check the Aperture Number

A good rule of thumb is: the lower the f-stop number the ‘better’ the lens.

3. Check the General Condition

Are there visible signs of use? It isn’t a perfect way to tell if a lens shoots great but it will let you know if the previous owner took care of the lens.

4. Shake the lens

On any lens you will hear a little noise when you shake it, but do you hear anything that sounds extra loose? Listen for screws or broken plastic pieces on the inside as these might be indicators of an unseen problem.

5. Shine a Flashlight Through the Back

Can you see any dust or scratches? If so you will probably have to send in your lens to get repaired which can get really expensive.

6. Does the Focus and Zoom Wheel Turn Smoothly?

Difficulty zooming or focusing can mean the gears on the inside of your lens are messed up…and there isn’t a lot you can do about that.

7. Are the Aperture Blades Closing Correctly?

You will need to connect the lens to a camera to test the aperture blades. It is imperative that they are in good working order. Do they all form a perfectly symmetrical shape when closed? Do they open up all the way?

8. Try the Lens!

Most camera shops will allow you to test a lens on your own personal camera. Put the lens on and shoot some pictures. Zoom into the image and check for vignetting or chromatic aberrations.

9. Ask about a Warranty and Return Policy

Be careful when buying on an online auction site like eBay. Lenses sold “as-is” should signal a big red flag.

10. Know the Seller

Tried and true retailers are the best companies to purchase used lenses from. Not only will they likely have a great return policy but they probably won’t sell sketchy lenses.

EXTRA CREDIT

The source of these tips – Karl Taylor – has posted a video at the link at the top of this tip. Watch it to learn more.


Please rate the helpfulness of this tip.

Click on a star to rate it!

… for Random Weirdness

Tip #580: The History of Storyboards

Larry Jordan – LarryJordan.com

Storyboards are designed to help plan the story before production starts.

Image source: https://www.flickr.com/photos/tmray02/1440415101/
A storyboard for “The Radio Adventures of Dr. Floyd” episode #408 drawn by Tom Ray.

Topic $TipTopic

A storyboard is a graphic organizer that consists of illustrations or images displayed in sequence for the purpose of pre-visualizing a motion picture, animation, motion graphic or interactive media sequence. The storyboarding process, in the form it is known today, was developed at Walt Disney Productions during the early 1930s, after several years of similar processes being in use at Walt Disney and other animation studios.

The first storyboards at Disney evolved from comic book-like “story sketches” created in the 1920s to illustrate concepts for animated cartoon short subjects such as Plane Crazy and Steamboat Willie, and within a few years the idea spread to other studios.

Many large budget silent films were storyboarded, but most of this material has been lost during the reduction of the studio archives during the 1970s and 1980s. Special effects pioneer Georges Méliès is known to have been among the first filmmakers to use storyboards and pre-production art to visualize planned effects.

Disney credited animator Webb Smith with creating the idea of drawing scenes on separate sheets of paper and pinning them up on a bulletin board to tell a story in sequence, thus creating the first storyboard. Furthermore, it was Disney who first recognized the necessity for studios to maintain a separate “story department” with specialized storyboard artists (that is, a new occupation distinct from animators), as he had realized that audiences would not watch a film unless its story gave them a reason to care about the characters.

Gone with the Wind (1939) was one of the first live-action films to be completely storyboarded.

EXTRA CREDIT

Here’s a Wikipedia article to learn more.


Please rate the helpfulness of this tip.

Click on a star to rate it!