… for Random Weirdness

Tip #544: 7 Tips for Better Shooting

Larry Jordan – LarryJordan.com

7 Tips to improve your shooting, from Caleb Pike.

Image courtesy of Pexels.com.
Slate your shots. Labeling makes them easier to find in the edit.

Topic $TipTopic

This article, based on a video by Caleb Pike, first appeared in PremiumBeat.com. This is an excerpt.

Here are the tips that Caleb goes through in the video:

1. Transitional Shots

Utilizing transition shots gives the editor the ability to move from scene to scene without using harsh cuts. As Caleb points out you can find very creative ways to develop and film transition shots without the use of “artificial crossovers and fades”.
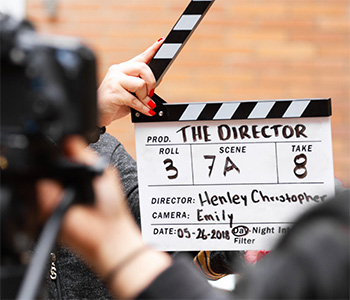
2. Slate Your Shots

Metadata is pretty important to an editor. It not only helps you, the director, to keep everything organized on set, but it also helps the editor in post. On any film shoot you’re going to go through several takes of multiple scenes, so by slating and cataloging each slate you’ve already begun the metadata collection and organizing for your editor.

3. Overlap Your Shots

Overlapping shots can make editing easier and its gives the editor more options to work with. To do this you want to film specific actions and tasks in several angles, and you want to be sure and film the action from beginning to end in each take. Total pro move.

4. Get It On Film

When shooting interviews or filming a narrative sequence begin rolling before you say “action”, this way you can gather auditory information about the scene or you can ask metadata questions to your interview subjects. Such questions for your subjects would include asking their name, spelling of their name and title. Having this information in audio form can greatly help your editor when setting up interview titles and or just labeling the metadata.

5. B-Roll

As Caleb says, “B-Roll, B-Roll, B-Roll, B-Roll. You can never have enough B-Roll….it doesn’t matter how important it is or whether you’ll actually use it. I’ve always been taught that, “It’s better to have it than not.”

6. Practice A Lot

You can go to school for years to learn the fundamentals of filmmaking, but if you don’t get out there and practice then you’ll never improve as a shooter or editor. So, use any open time you can and begin filming anything you can think of to practice shooting and editing.

7. Keep The Tone In Mind

Know your story. Know what it’s about and the tone you want to set through the visuals. This is extremely important as the tone will most often dictate how the transitions and b-roll will work.

EXTRA CREDIT

The link at the top takes you to a video where Caleb explains this tips in more detail.


Please rate the helpfulness of this tip.

Click on a star to rate it!

… for Random Weirdness

Tip #545: 10 Quick Tips to Spot Fake Gear

Larry Jordan – LarryJordan.com

If the quality is missing the gear is probably fake.

Topic $TipTopic

This article, written by Caleb Ward, first appeared in PremiumBeat.com. This is an excerpt.

Not sure if that equipment is legit? Does that deal feel too good to be true? Avoid getting scammed and learn to spot counterfeit camera gear with these ten quick tips, provided by Canon.

1. Look for Misspellings

Misspellings, whether intentional or unintentional, are an immediate sign that your equipment is fake. Give your equipment a quick look. If there’s something misspelled, it’s a fake.

2. Where Are You Buying It From?

Buying from a reputable seller is everything. Look for reviews and ratings regarding your seller. The following video posted by Fstoppers shows us that even items purchased on Amazon can be fake.

3. Instruction Manuals

Fake equipment almost always comes by itself in a box. So, if there’s a printed out manual included in the box, it’s a good sign that the product is real. This also applies to equipment purchased online. Sure… someone could probably fake a manual, but scammers likely won’t make the effort.

4. Look for a Warranty

Almost every piece of new equipment comes with a one year warranty included in its box. If a warranty isn’t in the box, you can bet your lens it’s a fake. It’s also important to note that boxes are easy to fake. Just because your equipment is in official-looking boxes doesn’t make it legit.

5. Serial Numbers

Most professional equipment comes with a serial number located somewhere on the exterior. If your piece of equipment doesn’t come with a serial number, then there is a good chance that it’s fake.

6. Does it Fit?

Official equipment such as lenses, adapters, and rigs will be incredibly snug. If you hear things moving around when you lightly shake your equipment, there’s a problem. This is especially true when buying camera lenses or adapters. Good adapters should fit lens mounts perfectly with no slippage.

7. “Too Good to Be True” Prices Usually Are

The online camera market is incredibly competitive, so it’s no surprise that online stores are always trying to undercut each other in terms of price. However, if you find a piece of equipment for half the normal retail cost, it’s probably a fake or, even worse, an empty box!

8. Holograms

Most of the popular camera manufacturing brands have “official” stickers that feature holograms. These stickers are hard to replicate, so they’re great indicators of official equipment.

9. Clear Printing

Printed information on genuine equipment is almost always incredibly sharp and easy-to-read. Counterfeit equipment, on the other hand, tends to be lower in quality – including written content. You won’t see illegible text on official equipment.

10. Test the Equipment

Test the gear! If you’re buying a piece of camera equipment in person, you should always test the gear before you buy. If the seller won’t let you test the camera – that should be a huge red flag. Even if you’re wanting to buy your equipment online, it’s good practice to go to your local camera store and test the camera to make sure it is a good fit for you.

EXTRA CREDIT

The link at the top of this tip includes a video from Canon on how to spot fake gear.


Please rate the helpfulness of this tip.

Click on a star to rate it!

… for Random Weirdness

Tip #547: 6 Tips to Better Foregrounds

Larry Jordan – LarryJordan.com

Shoot wide and stay low.

Image courtesy of Pexels.com.

Topic $TipTopic

This article, written by Nigel Danson, first appeared in PetaPixel.com. This is an excerpt.

I love shooting foregrounds in my big vista landscapes but it has taken quite a while to find out the things that work well and what doesn’t. I still don’t think I have mastered it but really enjoy the challenge of going out and finding a powerful foreground. In this article, I wanted to share the things that I believe have the biggest impact on creating great shots like this.

So, how do I go about finding and shooting foregrounds?

Point Your Camera Down

When using a wide-angle lens and shooting foregrounds it is really important to point the camera down. I like shooting vertically and getting right over the top of the subject like this image.

Consider the Height That You Shoot At

Shooting at different heights has a huge impact on the outcome of a scene. It also helps with connecting the foreground and distance.

Larry adds: The lower the height of the camera, the more you emphasize the foreground.

Start with Simple Foregrounds

Like most things in photography, simplicity is best. I think that is even more important in the foreground as you tend to read an image from the bottom up.

Think About Patterns

Patterns look great in foregrounds. Look for repeating patterns in the grass, rocks, sand or whatever you are shooting.

Find Something Special

My favorite type of foregrounds are the most powerful ones where you have something a little bit special. It may be some foliage or a rock that stands out. Be careful about the surroundings and make sure there are no distractions.

Midground Matters

Connect the foreground to the distance. As I have already mentioned the height you shoot at can make a big difference. Think about the foreground connection through the mid-ground to the distance.

EXTRA CREDIT

The link at the top of this tip has images and a video that illustrate these points.


Please rate the helpfulness of this tip.

Click on a star to rate it!

… for Random Weirdness

Tip #527: 5 Tips to Run a Smooth Set

Larry Jordan – LarryJordan.com

Planning and consideration of your crew go a LONG way to a smooth shoot.

Topic $TipTopic

This article, written by Jourdan Aldredge, first appeared in PremiumBeat.com. This is an excerpt.

We’ve all been there. Whether it’s in film school or just shooting short videos with our friends, those “I just got a DSLR, come over on Saturday to help me shoot my short film!” shoots where the director shows up with nothing planned and everything goes wrong happen all the time. It can be a horrifying experience to say the least.

Here are five tips to avoid catastrophe:

  1. Familiarize Yourself with Your Camera
  2. Scout the Location — Don’t Just Show Up!
  3. Compensate Your Actors and Crew
  4. Plenty of Storage and Extra Batteries
  5. You Can’t Fix Everything in Post!

Watch the video linked at the top of this article. There are some great example videos.


Please rate the helpfulness of this tip.

Click on a star to rate it!

… for Random Weirdness

Tip #528: A Look at YouTube’s NLE

Larry Jordan – LarryJordan.com

The YouTube logo.

Topic $TipTopic

This article, written by Jourdan Aldredge, first appeared in PremiumBeat.com. This is an excerpt.

In the short but storied history of digital video editing platforms, we’ve seen just a few familiar names reign king — Apple Final Cut Pro, Adobe Premiere Pro, and more recently, DaVinci Resolve. However, while the big giants may still dominate the marketplace, it hasn’t stopped many other third parties and platforms from launching editing applications of their own.

Some are doing it to capture the market. While others — like YouTube — are simply trying to provide a more full, robust service to their current offerings. If you’ve uploaded a video to YouTube in the past year or so, you may have noticed that the social video-sharing platform is working hard to add tons of different functionality, controls, and analytics as its creator space continues to grow.

To get started, all you need to do is upload a video — or choose one you’ve already uploaded — and find the “Editor” tab in the studio.

Overall, at this stage the YouTube Video Editor is best for first time vloggers, or those needing to quickly edit tons of videos or long-form streams. However, I wouldn’t rule out YouTube simply using this as a first step, as they may build out the app much more in the future.

EXTRA CREDIT

Read Jourdan’s detailed review by clicking the link at the top of this article.


Please rate the helpfulness of this tip.

Click on a star to rate it!

… for Random Weirdness

Tip #534: What is Shutter Angle?

Larry Jordan – LarryJordan.com

Motion blur increases as shutter angle increases.

Source: Red.com.
Greater shutter angles equal more motion blur.

Topic $TipTopic

This is an excerpt from RED.com. The advent of digital cinematography has opened up new creative possibilities for how motion is captured. This article explores the influence of shutter angle along with how it can be used as a creative tool for accomplishing one’s artistic goals.

CONCEPT

The “shutter angle” is a useful way of describing the shutter speed relative to the frame rate. This term is a conceptual relic of rotary shutters, where a disc with an angled opening would spin and let in light once per revolution to expose each frame. The larger the angle, the slower the shutter speed, all the way up to the limit of 360°, where the shutter speed could become as slow as the frame rate. At the other extreme, the shutter speed can be made arbitrarily fast by decreasing the angle.

APPEARANCE

By far the most common setting for cinema has been a shutter angle near 180°, which equates to a shutter speed near 1/48 of a second at 24 fps. Any larger, and motion appears more smeared since the end of blur in one frame extends closer to the start of blur in the next frame. Any smaller, and the motion appears more stuttered and disjointed since the blur gap increases, causing frames to become more like discrete images.

DISCUSSION

Although many film cameras were capable of only certain shutter angle ranges, digital cameras provide many exciting new possibilities. Just as focal length and aperture have been used as creative tools for controlling sense of scale and depth of field, shutter angle has the potential to do the same for motion.

The optimal setting will ultimately depend on other factors, such as the speed of subject movement within the frame, or the creative intent of the cinematographer. For example, one might wish to use a larger shutter angle to increase the exposure time and reduce image noise in low-light, or to give the impression of softer and more fluid motion. Alternatively, with fast action one might place more importance on depicting crisp details in each frame by using a smaller shutter angle.

Another consideration might be the film era one desires to emulate. Shutter angles much less than 180° more closely mimic the style of old 1950’s newsreels, for example, and a shutter angle of 180° will typically give footage a standard cinematic style.

EXTRA CREDIT

Here’s a link from Red.com to learn more.


Please rate the helpfulness of this tip.

Click on a star to rate it!

… for Random Weirdness

Tip #492: Creative Truths From Real Editors

Larry Jordan – LarryJordan.com

Topic $TipTopic

For several years, I ran the “Creative Truths Contest.” This invited readers to send in aphorisms that best represent the editing process. As you might imagine, editors took a pretty dim view of, well, just about everything.

Here are five of my favorites, along with the name of the editor that contributed it to the contest.

    • No one knows what you do but they always know that “it won’t take long.” (Jeff Fulton )


    • Every new technology opens a whole new world of things that can go wrong. (Will Schwarz)


    • As a dedicated production professional, I sit in dark places and wait for bad things to happen. (Mark Triplett)


    • Got a client you haven’t heard from in months or a year? Erase their old project files and media, and you are guaranteed a phone call or email from them within 24 hours, wanting a re-edit. (Mark Suszko)


  • Needed Lead EDITOR: Must have at least 5 years of experience. No out of college applicants will be excepted. Must be expert in Adobe Premier, Photoshop, and After Effects. We will ONLY look at candidates that are capable of shooting with a pro camera, setting up lighting, and recording live audio. You must have a deep understanding in DaVinci Resolve and Cinema 4D. This is an ENTRY LEVEL POSITION. (Hector Pina)

EXTRA CREDIT

Here’s a link to read more.


Please rate the helpfulness of this tip.

Click on a star to rate it!

… for Random Weirdness

Tip #520: Tips for Using Shotgun Mics

Larry Jordan – LarryJordan.com

Think of shotgun mics as “lenses for sound.”

This is the symbol of a low-cut filter.

Topic $TipTopic

These tips are taken from this Audio-Technica video. Link. There’s no “perfect” mic, but shotgun mics are ideally suited for video production. Here are some tips on how to use them.

  • The length of a shotgun mic is analogous to a lens: short shotguns are wide angle, long shotguns are for closeups.
  • Short dynamic shotguns sound best when placed 2-3 feet from the mouth of the speaker.
  • Placing the mic above or below the speaker’s mouth does not alter the sound, but pointing the mic down tends to minimize room noise.
  • Always use a foam windscreen indoors to guard against wind noise. Outdoors, invest in a soft, furry blimp to minimize wind noise.
  • If your mic has a low-frequency cut-off switch, use it. (The screen shot illustrates the low-frequency roll-off switch.) This minimizes traffic rumble, wind noise and some handling vibration by removing frequencies below human speech. A low-cut filter also improves the clarity of dialog.
  • Condenser shotguns tend to sound better with richer sound than dynamic shotguns. Condenser shotguns will also pickup good sound up to 6 feet away from the talent.
  • Long shotguns are the best choice for exterior shots. They can pick up clean sound up to nine feet away from the talent, but they are extremely directional and can only be pointed while wearing headsets.
  • While long shotguns are good outside, inside they tend to pickup excess reverberation.
  • With any shotgun indoors, noise from the side is generally less of a problem than echo. For this reason, short condenser shotguns tend to be preferred because their design minimizes echo.
  • Regardless of length, any shotgun will sound better as it gets closer to the talent, up to a limit of about 2-3 feet.

In short, there’s no one perfect mic. Understanding how shotguns work can help assure you record the best sound possible.


Please rate the helpfulness of this tip.

Click on a star to rate it!

… for Random Weirdness

Tip #521: What is Color Temperature?

From warm to cool, color temperature tells us where white light falls.

Image courtesy of Bhutajata - CC BY-SA 4.0, https://commons.wikimedia.org/w/index.php?curid=44144928
Color temperature in degrees Kelvin from 1000° K to 12,000° K.

Topic $TipTopic

Color temperature is the measure of the perceived color of white light on a scale from warm (gold) to cool (bluish). These lighting facts might interest you, ’cause I found them interesting.

  • What we would consider “white” light is around 6500° K. (“K” stands for “Kelvin” which is a measure of absolute temperature indicating how much you would need to heat a “black body” to get it to glow at this color.)
  • The effective color temperature of the sun is about 5780° K .
  • The changing color of the sun over the course of the day is mainly a result of the scattering of sunlight and is not due to changes in the sun itself.
  • The Earth’s atmosphere scatters blue color frequencies more than warmer colors, which is why the sky is blue. (It’s called Rayleigh scattering, named after the 19th-century British physicist: Lord Rayleigh.)
  • Color temperature is meaningful only for light sources that generate light in a range going from red to orange to yellow to white to blueish white. It does not make sense to speak of the color temperature of a green or purple light.
  • Color temperatures over 5000 K are called “cool colors” (bluish), while lower color temperatures (2700–3000 K) are called “warm colors” (yellowish).
  • Bizarre fact: The temperature of a “warm” light is cooler than the temperature of a “cool” light.
  • Most natural warm-colored light sources emit significant infrared radiation.
  • A warmer (i.e., a lower color temperature) light is often used in public areas to promote relaxation, while a cooler (higher color temperature) light is used to enhance concentration, for example in schools and offices.
  • Most digital cameras today have an automatic white balance function that attempts to determine the color of the light and correct accordingly. While these settings were once unreliable, they are much improved in today’s digital cameras and produce an accurate white balance in a wide variety of lighting situations.

Please rate the helpfulness of this tip.

Click on a star to rate it!

… for Random Weirdness

Tip #476: Better Content Aware Fills in Photoshop

Larry Jordan – LarryJordan.com

Color Adaptation modifies how replacement background colors and textures are handled.

The Color Adaptation menu, part of Content-Aware Fill, in Photoshop.

Topic $TipTopic

This trick was first reported in a YouTube video by PiXimperfect. This is an excerpt.

One of the new, and exceedingly powerful, image cleanup features in Photoshop is Content-Aware Fill. This removes a selected object and replaces it with the background behind it, as if the object never existed.

Most of the time, the default settings are fine. But, sometimes, the background colors are not quite perfect, or colors bleed in from the surrounding area. Either way, the replacement image isn’t ideal.

That’s where Color Adaptation comes into play. You’ll find it part of the menus that control Content-Aware Fill.

For solid-color backgrounds, you may get better results switching this to High. For edge bleed, you’ll get better results setting this to None.


Please rate the helpfulness of this tip.

Click on a star to rate it!