… for Random Weirdness

Tip #163: Measure GPU Performance on Your Mac

Larry Jordan – LarryJordan.com

Hidden in Activity Monitor is the ability to monitor GPU performance.

Topic $TipTopic

We’ve already seen (Tip 156) how to use Activity Monitor to measure the performance of the CPU. However, hidden in a menu is also the ability to display GPU (Graphics Processing Unit) performance in real-time!

  • Type Shift + Cmd + U to open the Utilities folder. Double-click Activity Monitor to start the app.
  • Choose Window > GPU History.

As you can see in this screen shot, this displays current GPU performance with a new column every 5 seconds.

NOTE: The higher the bar, the harder the GPU is working. Bars that fill the screen represent 100% of total GPU output.

Energy usage related to GPU activity is incorporated into the energy-impact measurements in the Energy tab of Activity Monitor.


Please rate the helpfulness of this tip.

Click on a star to rate it!

… for Random Weirdness

Tip #291: 12 Documentary Editing Tips

Larry Jordan – LarryJordan.com

These steps will help you organize and focus your work.

On location with a documentary crew.

Topic $TipTopic

Michael Maher first wrote about this for PremiumBeat. Perhaps the most difficult aspect of editing a documentary is the amount of unscripted responses during interviews. Here are twelve tips to help you focus.

  1. Organize Folder and Label Bins. There is SO MUCH content in a feature that organization is critical. Consider using Post Haste, from Digital Rebellion. This free program instantly creates folder structures from templates, such as video editing, motion graphics, visual effects and more.
  2. Create Sequences for Individual Interviews. Rather than build everything into one master sequence, divide the work. This allows you to quickly build selects from an interview and also simplified later transcription.
  3. Transcribe all footage. New automated speech-to-text transcriptions can often get you close enough for editing. And editing from a transcripts is MUCH faster.
  4. Backup everything. Always. All the time. Like every night.
  5. Edit for a Story Arc. Whether it’s a documentary or work of fiction, every film needs to tell a story. In doing so, you want to make sure you have a beginning, middle, and end. In that series of events, you want to take your audience on an emotional roller-coaster — or story arc. It doesn’t matter if your documentary is two minutes long or two hours, if the story doesn’t progress — don’t expect anyone to watch.
  6. Use Close-up and Medium Shots More Than Wide Shots. Wide shots are great for establishing a scene or as an introduction to a new speaker, but they aren’t enough. By cutting to medium shots and close-ups, you are making the speaker more relatable. The medium shot is most often used for conversational pieces, as the audience feels the subject is right there talking to them. However, documentary films frequently use close-ups of only a speaker’s head. This is common due to the varying sets and backgrounds that can be jarring when cutting between speakers.
  7. Cut on Action. Actions make perfect cutting points that seem natural.
  8. Cut on Dialogue. Cut to words with a strong pronunciation. Also, cut at the beginning of a new sentence/theme.
  9. Avoid Jump Cuts. Hide cuts by switching angles, or covering edits with B-roll.
  10. Use Photos When You Don’t Have Footage. Still photos can help you hide edits or break away from static shots.
  11. Keep Graphics and Lower-Thirds Easy to Read. You don’t need a ton of moving parts or motion graphics. In fact, text with a drop shadow is the most common lower third for a reason. It’s simple and legible. Be sure to also use a font that is easy to read, as well as a nice font color. Don’t go crazy.
  12. Build an Archive of Assets. Keep media you can use across projects in a handy folder.

Please rate the helpfulness of this tip.

Click on a star to rate it!

… for Random Weirdness

Tip #039: A Project Code System to Organize Media

Larry Jordan – LarryJordan.com

Here’s a system I borrowed from Hollywood

Topic $TipTopic

Years ago, when I was editing behind-the-scenes documentaries for Hollywood DVD releases, I noticed a consistent project and media naming system from one of the studios. While the studio version was more complex than necessary for independent or corporate work, I modified the system to share with my students.

If you have a system to help you track your media, great! If not, use mine until you can develop your own. ANY system is better than no system when it comes to tracking media. Because the worst thing for any editor is losing a shot that you were sure you had.

Here’s a sample folder name to explain how this system works:
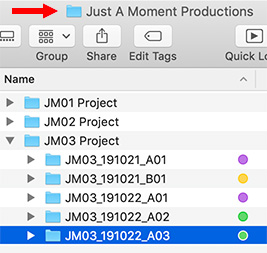
JM03_191022_A03

Translation:

  • JM. A two-letter code that represents the name of the client. (For example: “Just a Moment Productions”)
  • 03. A two-number code that represents the project number for this client. (For example, this is the third project we’ve done for Just a Moment.)
  • 191022. The shoot date, in YearMonthDay format. Most often, scripts and other production notes will indicate when a particular scene was shot. This date ties the folder back to the script. Using this date format means all folders will sort in the correct date order.
  • A. The camera on a multi-camera shoot. (For example, “A” or primary camera, “B” or “C” cameras)
  • 03. The number of the camera card or hard disk shot by that camera for that day. (For example, this is the third camera card we shot that day.)

To implement this, on my media storage system, I start by creating a master folder for that client (i.e. “Just a Moment Productions”). Then, inside that Master folder, I create folders for each project for that client. Next, inside the Project folder I create a Media folder. Then, finally, inside the Media folder, I create a folder for each camera card that I shoot.

Most of the time, we can’t rename individual clips on the camera card because renamed files will break on import. So, I use this system to name the folders that I store the camera card media into rather than individual shots.

The good news is that, just by reading the folder name, you know the client, project, shoot date and camera angle of the media it contains.


Please rate the helpfulness of this tip.

Click on a star to rate it!

… for Random Weirdness

Tip #158: Monitor Energy Usage

Larry Jordan – LarryJordan.com

Use this to conserve energy when running on battery.

Topic $TipTopic

Hidden in Applications > Utilities is a powerful measurement tool called: Activity Monitor. Type Shift + Cmd + U to open the Utilities folder. Double-click Activity Monitor to start the app.

Activity Monitor allows us to measure current activity in five key areas:

  • CPU
  • Memory (RAM)
  • Energy
  • Disk (local storage)
  • Network (both Internet and other network-connected devices)

Most of the time, I’m running on AC power. However, for users running their laptops on battery, energy conservation is critical. Activity Monitor makes monitoring energy usage easy. Here’s how.

Click the Energy tab at the top. The Energy pane shows overall energy use and the energy used by each app:

  • Energy Impact: A relative measure of the current energy consumption of the app. Lower numbers are better. A triangle to the left of an app’s name means that the app consists of multiple processes. Click the triangle to see details about each process.
  • Avg Energy Impact: The average energy impact for the past 8 hours or since the Mac started up, whichever is shorter. Average energy impact is also shown for apps that were running during that time, but have since been quit. The names of those apps are dimmed.

BONUS

NOTE: If you run Activity Monitor on a laptop, you’ll see additional battery statistics at the bottom.

As energy use increases, the length of time that a Mac can operate on battery power decreases. If the battery life of your portable Mac is shorter than usual, you can use the Avg Energy Impact column to find apps that have been using the most energy recently. Quit those apps if you don’t need them, or contact the developer of the app if you notice that the app’s energy use remains high even when the app doesn’t appear to be doing anything.


Please rate the helpfulness of this tip.

Click on a star to rate it!

… for Random Weirdness

Tip #159: Monitor Local Storage Performance

Larry Jordan – LarryJordan.com

Monitor storage bandwidth and bottlenecks.

Topic $TipTopic

Hidden in Applications > Utilities is a powerful measurement tool called: Activity Monitor. Type Shift + Cmd + U to open the Utilities folder. Double-click Activity Monitor to start the app.

Activity Monitor allows us to measure current activity in five key areas:

  • CPU
  • Memory (RAM)
  • Energy
  • Disk (local storage)
  • Network (both Internet and other network-connected devices)

Click the Disk tab at the top.

The Disk pane shows the amount of data that each process has read from your disk and written to your disk. It also shows “reads in” and “writes out” (I/O), which is the number of times that your Mac accesses the disk to read and write data.

The information at the bottom of the Disk pane shows total disk activity across all processes. The graph moves from right to left and updates at the intervals set in View > Update Frequency. While the graph includes a pop-up menu to switch between showing I/O or data as a unit of measurement, I always display Data, because it is more meaningful to media creators. (Database and small file operations often prefer monitoring I/O operations.)

Blue shows either the number of reads per second or the amount of data read per second. Red shows either the number of writes out per second or the amount of data written per second.

In this screen shot, local storage is reading 208 MB/second, and writing 14 MB/second.


Please rate the helpfulness of this tip.

Click on a star to rate it!

… for Random Weirdness

Tip #156: Measure CPU Performance on Your Mac

Larry Jordan – LarryJordan.com

Activity Monitor displays how hard your CPU is working.

Topic $TipTopic

Hidden in Applications > Utilities is a powerful measurement tool called: Activity Monitor.

  • Type Shift + Cmd + U to open the Utilities folder. Double-click Activity Monitor to start the app.

Activity Monitor allows us to measure current activity in five key areas:

  • CPU
  • Memory (RAM)
  • Energy
  • Disk (local storage)
  • Network (both Internet and other network-connected devices)

Click the CPU tab at the top to display all the software currently running on your system. You won’t recognize most of these, because many of the programs your Mac runs are background tasks.

The graph at the bottom (see the screen shot) shows total CPU effort called “CPU Load.” Red indicates tasks running under the control of the operating system. Blue shows tasks that you have started. The maximum CPU % is based on the number of cores in your computer times 100. So a four-core system has a maximum of 400% CPU activity.

I often look at this to see what my CPUs are doing and how hard they are working. This also allows me to cancel any non-critical tasks that are using up too much CPU time.

BONUS

You can also see CPU usage or history in a separate window or in the Dock:

  • To open a window showing current processor activity, choose Window > CPU Usage. To show a graph of this information in your Dock, choose View > Dock Icon > Show CPU Usage.
  • To open a window showing recent processor activity, choose Window > CPU History. To show a graph of this information in your Dock, choose View > Dock Icon > Show CPU History.

Energy usage related to CPU activity is incorporated into the energy-impact measurements in the Energy tab of Activity Monitor.


Please rate the helpfulness of this tip.

Click on a star to rate it!

… for Random Weirdness

Tip #157: See Which Apps Use More Memory

Larry Jordan – LarryJordan.com

How much RAM do you REALLY use – or need?

Topic $TipTopic

Hidden in Applications > Utilities is a powerful measurement tool called: Activity Monitor.

  • Type Shift + Cmd + U to open the Utilities folder. Double-click Activity Monitor to start the app.

Activity Monitor allows us to measure current activity in five key areas:

  • CPU
  • Memory (RAM)
  • Energy
  • Disk (local storage)
  • Network (both Internet and other network-connected devices)

Click the Memory tab at the top to display all the currently-running applications and the amount of memory each is using.

The key section is at the bottom.

The Memory Pressure graph helps illustrate the availability of memory resources. The graph moves from right to left and updates at the intervals set in View > Update Frequency. The current state of memory resources is indicated by the color at the right side of the graph:

  • Green: Memory resources are available.
  • Yellow: Memory resources are still available but are being tasked by memory-management processes, such as compression.
  • Red: Memory resources are depleted, and macOS is using your startup drive for memory. To make more RAM available, you can quit one or more apps or install more RAM. This is the most important indicator that your Mac may need more RAM.

Here are definitions of the other statistics:

  • Physical memory. The amount of RAM currently installed in your system.
  • Memory used. The amount of RAM currently in use.
  • Cached files. Memory that was recently used by apps and is now available for use by other apps. For example, if you’ve been using Mail and then quit Mail, the RAM that Mail was using becomes part of the memory used by cached files, which then becomes available to other apps. If you open Mail again before its cached-files memory is used (overwritten) by another app, Mail opens more quickly because that memory is quickly converted back to app memory without having to load its contents from your startup drive.
  • Swap Used. The space used on your startup drive by macOS memory management. It’s normal to see some activity here. As long as memory pressure is not in the red state, macOS has memory resources available.

Your goal is to have as little red in the graph or Swap as possible. Why? Because while RAM is very fast, swapping files to the hard disk (even an SSD) is very slow and degrades the performance of your system.

If Swap is always a large number, your performance may benefit from using a system with more RAM.

BONUS

Here’s what these three additional categories mean:

  • App Memory. The total amount of memory currently used by apps and their processes.
  • Wired Memory. Wired memory is the part where the OS Kernel and other low level components, as drivers and virtual memory objects are stored. Specifically, information in RAM that can’t be moved to the Mac’s drive. The amount of Wired memory depends on the applications you are using.
  • Compressed. The amount of memory in RAM that is compressed to make more RAM memory available to other processes. This is the last step before swapping RAM out to local storage.

Please rate the helpfulness of this tip.

Click on a star to rate it!

… for Random Weirdness

Tip #165: Turn Old Phones Into Wireless Mics

Larry Jordan – LarryJordan.com

A cool way to repurpose older technology.

Topic $TipTopic

Eric Escobar wrote about this in The Beat:

While old phones don’t work well as multifunctional smart phones anymore, they are capable of doing some amazing things. For example, recording high-quality, high bit-rate audio. With the right microphone attachment, an old iPhone becomes a wireless portable audio source with built-in power and storage.

For example, pair an inexpensive used Movo PM10 lavalier-style mics as a body mic for on camera talent. A setup that’s great for capturing on-set audio for very little money.

Keep in mind that using an older iPhone means that you give up real-time audio monitoring. For some, that’s a deal-breaker. For others, the savings in dollars makes the risk worthwhile. The basic trade-off is inexpensive gear vs. not knowing what you’ve got until after the recording stops.

For recording software, Eric recommends the free TASCAM PCM Recorder. It records 44.1khz audio at 16 bits right off the built-in mic or any external mic plugged into the headphone jack. It is a “two button” operation, meaning you have to click the red record button first, then the green play button to get it to “roll” just like an old DAT recorder. That may be anachronistic, which is fine. There are literally a dozen other free-to-cheap apps that will let you record audio on your phone at 48khz in 16-bit. Find the one that matches your style.

NOTE: Remember, video records audio at a 48k sample rate. It is best to match external audio recorders to that sample rate.

He has more recommendations. Click the link above to read the whole article.


Please rate the helpfulness of this tip.

Click on a star to rate it!

… for Random Weirdness

Tip #148: Which USB Version Does Your Mac Support?

Larry Jordan – https://LarryJordan.com

When in doubt, look it up.

Use System Preferences > Hardware > USB to determine your USB version.

Topic $TipTopic

Yes, the USB plugs on the back of your computer all look the same. However, here’s an easy way to find out what version of USB your computer supports.

Go to the Apple logo in the top left corner of your computer.

  • Choose About This Mac
  • At the bottom of this window, click System Report
  • In the display that follows, click Hardware > USB

This panel displays more than you will ever want to know about your USB ports and connected peripherals, including the version of USB your system supports.

Cool.


Please rate the helpfulness of this tip.

Click on a star to rate it!

… for Random Weirdness

Tip #149: The Five Types of USB Connectors

Larry Jordan – https://LarryJordan.com

Sigh… It’s no longer “one plug fits all.”

Five types of USB connectors.

Topic $TipTopic

Not only are their different versions of USB, there are also different versions of USB connectors. Ever wonder how many different USB connectors there are and what they are called?

Well, here’s the answer:

  • Type A
  • Type B
  • Type C
  • Micro USB
  • Mini USB

Most computers use Type A or C, depending upon their age.

Most large peripherals use Type B, while smaller devices use either the micro or mini connectors.

Now you know.


Please rate the helpfulness of this tip.

Click on a star to rate it!