… for Apple Final Cut Pro X

Tip #1552: Add Rain Drops to Your Video

Larry Jordan – LarryJordan.com

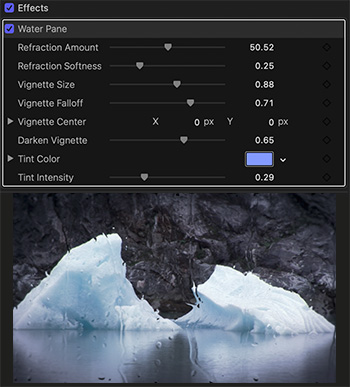
When adding rain, be sure not to show sky or ground unless they look appropriately rainy.

Water Pane settings (top) and the effect applied to a clip (bottom).

Topic $TipTopic

Shooting video in the rain is rarely a pleasant experience. Fortunately, Final Cut offers the ability to add rain later, in post, where things are warm and dry.

Select the clip you want to add rain drops to, then apply Effects > Distortion > Water Pane.

This creates the effect of looking at the scene through a window with rain pouring down.

Fast and very effective.


Please rate the helpfulness of this tip.

Click on a star to rate it!

… for Random Weirdness

Tip #1543: Use B-Roll More Effectively

Larry Jordan – LarryJordan.com

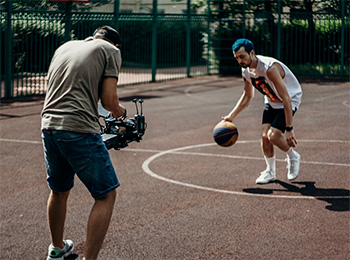
B-roll illustrates what your audio is talking about.

(Image courtesy of Pexels.com.)

Topic $TipTopic

This article, written by Anthony Najera, first appeared in PremiumBeat.com. This is a summary.

B-roll, in a straightforward definition, is supplementary footage or alternative shots used in a video, in contrast to your “A-roll,” which is your main footage or primary shot. By definition, B-roll is secondary to the main image, but that doesn’t mean it’s not important to the storytelling. I’d argue B-roll can be just as important—or even more impactful—than A-roll when used properly.

The importance of B-roll is multifaceted. There are quite a few reasons we use B-roll in video creation—in practical terms, for storytelling, and for aesthetics. But, if you boil B-roll down to one practical purpose, it would be its importance in editing. B-roll gives the editor options when cutting up a video and a way to mask cuts when just using main footage won’t work.

Not every cut and piece of information has to be rapid-fire, back-to-back. Let the visuals do some work and let the story breathe a bit. B-roll can be the perfect way to pace a story and give the information on screen a little time to settle in with the viewer. The video isn’t a sprint to the finish line, it should be an enjoyable experience.

[ Editor’s Note: AMEN! So many editors cut like they are being paid by the edit. Drives me nuts!!! ]

When used correctly, B-roll can supply the audience with information or context to the main subject of the video. B-roll can show the literal act of what’s being discussed on camera or show the location of where an event is taking place.

Types of B-roll:

  • Exteriors/Establishing Shot
  • Cutaways/Inserts
  • Reenactments
  • Stock Footage

Although its called “B” roll, that doesn’t mean it can’t be the main visuals doing most of the storytelling. B-roll isn’t inherently second string—give the B-roll footage an opportunity to do the heavy lifting within a project. An editor can create a sense of tone and environment through the use of B-roll that the main footage wouldn’t be able to accomplish. Lean into that.

EXTRA CREDIT

The article has lots more ideas on how to use B-roll effectively, along with several links on capturing and editing effective B-roll.


Please rate the helpfulness of this tip.

Click on a star to rate it!

… for Random Weirdness

Tip #1544: Pick the Best SloMo Frame Rate

Larry Jordan – LarryJordan.com

Not all frame rates are created equal.

(Image courtesy of Lisa Fotios, Pexels.com.)

Topic $TipTopic

This article, written by Lewis McGregor, first appeared in ShutterStock.com. This is a summary.

NOTE: The key feature of this article is a video tutorial illustrating all these frame rates.

It wasn’t too long ago that shooting in slow motion was reserved only for cinema cameras. Or, at the very least, high-definition slow motion was reserved for cinema cameras. Today’s cameras now provide higher frame rates as a matter of course. However, which slow motion frame rate should you use for your online content? Too slow and a simple footstep may take five seconds to complete. Too fast and you may not slow down your footage enough.

  • 48/50 fps. Double the frame rate is, in fact, perfectly adequate to capture several elements in slow motion. Because it doubles a single second, it’s not slow enough to become fully evident that slow motion is taking place. Still, contradictory to that, it’s slow enough to emphasize a moment in time.
  • 60 fps. So, 60fps are great for the dramatic character moments. It’s slow enough to be noticeable and put emphasis on the given moment. Whether that’s the hero shot, closing in on an emotional moment, or slowing downtime in an important scene. Essentially, where there’s a human character involved and bringing you into the character’s frame of mind in a human moment.
  • 120 fps. Typically, any time something is happening faster than we can humanly see, or at least any subject that becomes obscured with motion blur—like animals running, liquid, or fast-action sports—can benefit from 120fps.
  • 180 fps. The same principles apply as 120fps, as we’ve moved out of the region of reasonable purpose to film humans at this speed. So, it’ll be useful for elements that have many fast-moving subjects that need to be slowed even further. When we push past 180, we’re moving into special use frame rates typically used for advertising, wildlife, and sports.

IN SUMMARY

  • 48/50fps for emphasizing small moments to mean something bigger.
  • 60fps for character/scene importance and bringing the audience into the bubble of the character.
  • 120fps for fast-moving subjects, elements, and sports.
  • 180fps will pull from above, but with greater emphasis on slowing things down.

Please rate the helpfulness of this tip.

Click on a star to rate it!

… for Apple Motion

Tip #1538: Working with PDFs in Motion

Larry Jordan – LarryJordan.com

Motion handles PDFs, but not well. Convert them to PNG first.

Topic $TipTopic

Motion handles PDFs differently from both Final Cut and Premiere. But, it still doesn’t handle them well.

Unlike Premiere, Motion supports importing a PDF.

Unlike Final Cut, it only imports the first page of a multiple page PDF. Worse, any white background is imported as transparent, which makes reading black text impossible.

Like Final Cut, though, Motion creates, essentially, a PNG of that first page of a PDF file that matches the size of your project. This means that if you scale the PNG, image quality quickly deteriorates.

Here are two workarounds that make using PDFs in a Motion project easier and with higher quality.

TWO WORKAROUNDS

If all you need to do is import the entire PDF page and fill all empty areas with white, use this workaround.

Workaround #1: Open the PDF in Preview, choose File > Export and set the export format to PNG. This exports the PDF at the size it was created and with a white background.

NOTE: Ignore the Resolution setting on export, even if you choose a higher number, the size and resolution of the exported image won’t change. I consider this a bug.

If you need to zoom into elements on the page – for example to provide closeups of an embedded image – this workaround is a better option:

Workaround #2: Open the file in Photoshop, or another image editing program. In the Page Options dialog (see screen shot) that appears: Set the Resolution to at least 400 Pixels/inch. This enlarges the image – while retaining image quality – so that you can easily zoom in or out of the PDF in the timeline.

EXTRA CREDIT

There are two types of PDFs: those that originated as bitmaps and those that originated as vectors.

Photos, scans and Photoshop documents will not scale very well, if at all. Text, Illustrator files or images created using musical notation should scale perfectly.

Please rate the helpfulness of this tip.

Click on a star to rate it!

… for Apple Motion

Tip #1540: Create Movement with a Zoom Blur

Larry Jordan – LarryJordan.com

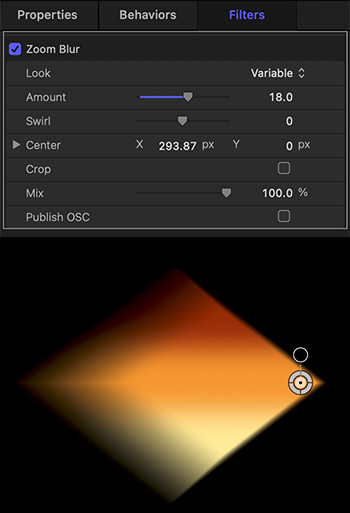
Zoom blurs create the illusion of movement from a point.

Zoom blur settings (top) and the results applied to a diamond (bottom).

Topic $TipTopic

Here’s a fast way to make a still image – or other element – look like it’s moving: a Zoom Blur.

Filters > Blur > Zoom Blur creates the illusion of movement from a specific point. By default, this blur is located at the center of the frame.

However, as you can see from the screen shot, moving the Center of the Zoom blur to the edge of an object makes it look like the image itself is moving.

Apply the blur to an element, then:

  • Drag the white circle (the Center setting) to the edge you want to remain in focus.
  • Adjust Amount to vary the amount of the blur.
  • Be sure Crop is unchecked to allow the blur to extend past the boundaries of the element.
  • Tweak other settings and watch what happens.

Especially for elements that are moving around the frame, this increases the illusion of the speed of  the movement.


Please rate the helpfulness of this tip.

Click on a star to rate it!

… for Visual Effects

Tip #1546: Autocad Resources for Educators

Larry Jordan – LarryJordan.com

Autocad Resources for Students & Educators

(Image courtesy of autocad.com.)

Topic $TipTopic

Autodesk created a webpage specifically for educators – from elementary school through to professional development – providing resources for students and teachers.

Some of these resources are free, most are subscription-based.

NOTE: I especially like the entry-level “Tinkercad” for grade-school students.

Here’s the link to learn more.


Please rate the helpfulness of this tip.

Click on a star to rate it!

… for Visual Effects

Tip #1547: Ask the Artist: Nemanja Sekulic

Larry Jordan – LarryJordan.com

Workflow thoughts from a world-class photo-manipulator.

(Image courtesy: Nemanja Sekulic, via BorisFX.com.)

Topic $TipTopic

Nemanja Sekulic is a pro photographer and digital artist, who has a passion for photomanipulation and compositing. In both his personal and commissioned projects, some of which you can see on his website, Sekulic weaves elements of science fiction, fantasy, and surrealism into realistic everyday vignettes.

BorisFX.com interviewed him about his though-process and workflow. (Here’s the link.)

Here are three questions from the article:

  • What type of photography or photographic genre do you work in? I like to do a bit of everything, which I think lets me have more fun creatively speaking. And since I do photo manipulations and composites, it allows me to take different kinds of photos — portraits, maybe a landscape for a background, and then small objects, food, etc. — and combine them into a new fun, and unique story.
  • How do you prep for a big project? I approach most projects in the same manner: First, I do research on the topic. I want to know as much as I can about my subject. But how long I have to do my research depends on the size of the project and its complexity. Next, I’ll do some sketching, which is an important step in compositing since it helps me understand what elements I need to include in the work to be able to create a final image. Then, after that, I take all the necessary photos for the project, which could also include other visual elements like stock photos or models of a 3D element.
  • What’s a keyboard shortcut you can’t live without? It’s hard to choose just one, but I’d pick Ctrl+Z, or UNDO.

EXTRA CREDIT

Here’s Nemanja’s website. He has some AMAZING images on his portfolio page!


Please rate the helpfulness of this tip.

Click on a star to rate it!

… for Visual Effects

Tip #1548: Training & Tutorials from Foundry

Larry Jordan – LarryJordan.com

Free training & student licenses from Foundry.

Topic $TipTopic

Foundry offers free licenses Nuke Studio, Mari, Modo and Katana to students at select universities, plus the ability to apply for a free license if your school isn’t listed. There’s also a wealth of other training materials on their website.

As well, this web page offers free tutorials, educator resources and other discounts.

Even if you aren’t a student or educator, this page is worth visiting for the tutorials alone.

NOTE: Here’s the link.


Please rate the helpfulness of this tip.

Click on a star to rate it!

… for Random Weirdness

Tip #1527: Directing Advice from Denis Villeneuve

Larry Jordan – LarryJordan.com

Fear of failure is far worse than failure itself.

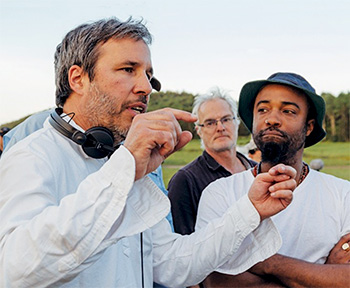
Behind the scenes of ‘Arrival’  CREDIT: Paramount.

Topic $TipTopic

This article first appeared in NoFilmSchool.com. This is a summary.

NOTE: The heart of this article is a video interview with Denis Villeneuve on how he directs.

Overcome failures by acceptance. In thinking about creating a sequel to Blade Runner, Denis said that you have to accept the fact that you can, and (likely will) fail, and that that’s okay. Accept that fate, and once you do, you become free. To get rid of the pressure of potential failure, you need to accept that it can happen, place less focus on it, and just put your mind toward creation. That is the only way you can create without boundaries.

Create tension with realism. Villeneuve says that one of the key elements for tension is that you need to make people relate to the narrative through the subconscious mind. Villeneuve says that you have to bring in something for your audience to relate to, and give them a clue to create suspense about something that will happen. Make the audience wonder.

Strive to create poetry. Villeneuve says that at the end of the day, the reason why everyone goes to see movies is to be moved by the poetry of the image. That, he says, is because those images had a profound meaning. That meaning is orchestrated by the movement of the camera, the light, the design, and the elements that create an invisible meaning. To Villeneuve, this is poetry.

The original article is linked at the top.


Please rate the helpfulness of this tip.

Click on a star to rate it!

… for Apple Motion

Tip #1531: Motion Titles for FCP are More Than Text

Larry Jordan – LarryJordan.com

Title templates can contain anything a Motion project can – including video!

Title templates can contain text, shapes, gadgets, animations, even video. These are full Motion projects.

Topic $TipTopic

When you create a title template in Motion for use in either Motion or Final Cut, you are not limited to only using text. You can actually do far more. Anything you can put into a “normal” Motion project, you can put into a title. It’s just that the title is saved in the Titles browser for use in Final Cut as a template.

The screen shot illustrates a title containing:

  • Text
  • Spinning gadget
  • Animated shape using Behaviors
  • Gradient colors
  • A zoomed-back background video
  • Lighting using Spot and Point lights

Don’t get creatively trapped into thinking titles are only text.


Please rate the helpfulness of this tip.

Click on a star to rate it!