… for Adobe Premiere Pro CC

Tip #1137: Set vs. Scale to Frame Size. Which to Pick?

Larry Jordan – LarryJordan.com

Set to Frame Size is the best overall option for scaling images.

Malahide Castle, near Dublin, Ireland. (Image courtesy of me.)

Topic $TipTopic

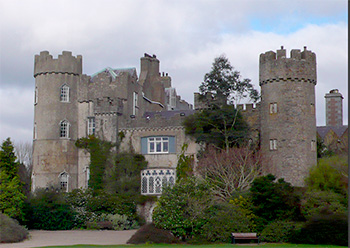
Malahide Castle is a magnificent medieval castle just outside Dublin, Ireland. After having visited it, I decided to create a short visual montage of my photos. Except… when I add still images to the timeline, I need to decide between using Set to Frame Size or Scale to Frame Size. What’s the difference?

Quite a lot, actually. When an image’s frame size is different from the sequence, Premiere resizes it to match. By default, it uses Scale to Frame Size.

You can adjust this behavior globally using Preferences > Media > Default Media Scaling – or – Control – click any clip and select either Scale to Frame Size or Set to Frame Size.

Here are the three scaling options:

  • None. (Only available in Preferences) This displays a clip at 100% size in the timeline, regardless of the frame size of the sequence.
  • Scale to Frame Size. This scales the clip to match the frame size of the sequence, then sets the Scale parameter in Effect Controls > Motion to 100%.
  • Set to Frame Size. This scales the clip to match the frame size of the sequence, then shows the amount the image was scaled in Effect Controls > Motion.

None is the best choice when creating multicam clips.

Set to Frame Size is the best choice for everything else.

While both Scale and Set resize the clip to match the sequence, only the Set option shows you exactly what was changed for the clip. Since image quality decreases as you scale images larger than 100%, with Scale, you have no idea whether an image is larger than 100% of not.

With Set to Frame Size, you always do.


Please rate the helpfulness of this tip.

Click on a star to rate it!

… for Random Weirdness

Tip #1119: Free Hand-Painted Animated Fonts

Larry Jordan – LarryJordan.com

Free for personal use, not to be resold.

A sample of these hand-drawn fonts.

Topic $TipTopic

This article, written by Todd Blankenship, first appeared in PremiumBeat.com. These free hand-painted animated fonts were painstakingly painted frame by frame to give your titles and design a fun, energetic feel.

The more real and textural you make your designs, the more tangible and authentic they feel. Making your title slate or other motion graphic feel as if it were hand-painted (when the style fits, of course) will always catch the viewer’s eye a bit more than a standard piece of clean, sharp text.

As a bit of behind-the-scenes, to create this freebie, we printed off large sheets of two different fonts, and painted 7-8 frames of each of them on similarly-sized sheets of poster board, then scanned each frame one by one. Then, inside of After Effects, we cleaned it all up and set them in a sequence, animating each scan in succession once every two frames.

Here’s the link to download these free, hand-painted, animated fonts.


Please rate the helpfulness of this tip.

Click on a star to rate it!

… for Random Weirdness

Tip #1123: Basic Camera Technique Tips

Larry Jordan – LarryJordan.com

The best camera operators know not just technique but understand performance.

Image courtesy of NoFilmSchool.com.

Topic $TipTopic

This article first appeared in NoFilmSchool.com. This is a summary.

If you’ve just started learning how to operate a camera, this is the video for you. Camera operator Oliver Cary, whose work includes Orange Is the New Black, John Wick: Chapter 3 – Parabellum, and Dark Waters breaks down different shooting methods and how they impact the story.

The best camera operators know not just technique but understand performance. They understand the emotional arc and subtleties of the story in each scene. And that’s key. In time, anyone can frame a shot on a tripod, but knowing why you are framing that particular shot and how it connects to the next shot and to the subtext of the story is what separates good operators from great ones.

As you progress from basic techniques and beyond, you’ll learn how to find those moments within a scene where you push the camera in or glide it through the room, because you’re connecting to the performance. That’s what’s going to make you stand out as an operator—reacting to those moments that were not rehearsed on set. Those instincts are hard to teach, so start discovering them now.

EXTRA CREDIT

The article, linked above, has a ten minute video illustrating these concepts.


Please rate the helpfulness of this tip.

Click on a star to rate it!

… for Apple Motion

Tip #1116: A Design Thought on Depth

Larry Jordan – LarryJordan.com

Sometimes a design element can help reinforce the illusion of depth.

Here, the darkened line emphasizes the depth created by rotating the text.

Topic $TipTopic

In other tips, I used Y-axis rotation to create the illusion of depth; especially for text. However, sometimes adding a design element can help sell that illusion even more.

In the screen shot, the text was rotated 50° on the Y-axis. While this clearly creates the illusion that the text is receding into the screen, we can do more to emphasize this.

For example, in the screen shot, I added a line to reinforce this illusion in three ways:

  1. The line is rotated at 50° on the Y-axis
  2. The near edge of the line is wider than the far edge, which was done by manually dragging the control points that define the boundaries of the line to make the near edge slightly wider.
  3. The line is darker than the text above it which makes the line seem like it is “going away” from the text.

No single technique will work the same for every effect, but using graphical elements to reinforce placement of text is often much better than just using the text by itself. And I thought this was a cool example to share with you.


Please rate the helpfulness of this tip.

Click on a star to rate it!

… for Apple Motion

Tip #1118: What is Ease In / Ease Out?

Larry Jordan – LarryJordan.com

To give movement a more “natural” look, experiment by adding “Ease Both.”

The Speed settings for Behaviors > Basic Motion > Motion Path.

Topic $TipTopic

Most Motion effects that involve movement have a Speed setting that determines if and how the speed of that movement changes over time.

For example, the screen shot illustrates the eight options for modifying the speed of the Motion Path behavior.

  • Constant. The object’s speed remains constant for the entire duration of the effect.
  • Ease In. The object’s speed decreases as it approaches a keyframe or end of the effect.
  • Ease Out. The object’s speed increases as it leaves a keyframe or the beginning of the effect, then maintains a steady speed thereafter.
  • Ease Both. The object speeds up leaving a keyframe or the start of the effect, maintains a steady speed in the middle, then slows down as it approaches a keyframe or the end of the effect.
  • Accelerate. The object’s speed continually increases over the duration of the effect.
  • Decelerate. The object’s speed continually decreases over the duration of the effect.
  • Natural. The speed at which the object moves over the path is determined by the shape of the path. For example, if the path is a U-shape curve, the object moves faster as it moves toward the low point of the U and slower as it moves up the edges.
  • Custom. This allows setting keyframes to adjust speed over the duration of the effect.

Please rate the helpfulness of this tip.

Click on a star to rate it!

… for Visual Effects

Tip #1124: Dozens of Free Cinema 4D Tutorials

Larry Jordan – LarryJordan.com

GreyScaleGorilla specializes in tutorials for Cinema4D and motion designers.

Image courtesy of GreyScaleGorilla.com.

Topic $TipTopic

GreyScaleGorilla.com is a website with dozens of free tutorials for Cinema4D artists.

Current titles include:

  • 5 Tips I Wish I Knew Before Learning Octane
  • Why Cinema 4D Artists Should Care About ACES Color
  • The Best New Features Inside Cinema 4D R21

They currently have 53 free tutorials posted to their website. Here’s the company description on their website:

For over 10 years we have made training and tools to help motion designers and 3D artists.

Our extensive library of free tutorials and Greyscalegorilla Plus subscription offering guides you through popular 3D programs like Cinema 4D, Redshift, X-Particles, and much more.

Greyscalegorilla plugins and tools are developed as must-use workflow solutions, used daily in real studio environments, on feature film titles, commercial animations, broadcast graphics, and experiential displays.

We want to give you the tools and training to help you create your best work. That’s the Greyscalegorilla way.


Please rate the helpfulness of this tip.

Click on a star to rate it!

… for Visual Effects

Tip #1125: Free Red Giant Tutorials

Larry Jordan – LarryJordan.com

Red Giant makes tools, films and training to enrich the community of filmmakers and motion designers.

A sample of current tutorials on the Red Giant website.

Topic $TipTopic

Red Giant, now a part of Maxon, is an industry leader in creating software for visual effects. To help new and existing users use their programs more effectively, they have a dedicated website for tutorials covering:

  • Trapcode Suites
  • Magic Bullet Suite
  • Universe
  • VFX Suite
  • PluralEyes

The company describes itself this way on their website:

At Red Giant, we make tools, films and training to enrich the community of filmmakers and motion designers. Red Giant develops tools that make the filmmaking process faster, more secure, more accurate and just more fun. For almost 17 years, we have built software for motion design, color correction, visual effects and photography that is used for everything from major motion pictures to worldwide television programming to web production.

Here’s the link to their tutorials.


Please rate the helpfulness of this tip.

Click on a star to rate it!

… for Visual Effects

Tip #1127: Re:Vision Effects Wins an Emmy

Larry Jordan – LarryJordan.com

Re:Vision joins six other companies winning an Engineering Emmy.

Television Academy logo.

Topic $TipTopic

Re:Vision Effects won a Engineering Emmy for exceptional engineering development which will be announced at the Oct. 29 Emmy Awards ceremony.

According to the announcement from the Academy:

Engineering Emmys are presented to an individual, company or organization for developments in engineering that are either so extensive an improvement on existing methods or so innovative in nature that they materially affect the production, recording, transmission or reception of television. This year the Academy is recognizing nine companies and five individuals with the prestigious award.

Re:Vision Effects was honored for all of their products, however, the Academy specifically mentioned:

RE:Vision Effects introduced the industry to optical flow-based postproduction video tools via the products Twixtor®, ReelSmart Motion Blur®, RE:Flex® and others. In addition, RE:Vision Effects supplies these technologies as plug-ins to a wide range of host applications and interfaces that are already familiar to the user.

Joining Re:Vision Effects for Engineering Awards this year are:

  • Apple – for the ProRes family of codecs
  • Codex – for high-speed data migration of RAW content
  • Dan Dugan – for gain sharing automatic microphone mixing
  • Epic Games – for the Unreal Engine
  • Sound Radix – for Auto-Align Post for audio phase/time corrections
  • Bill Spitzak, Jonathan Egstad, Peter Crossley and Jerry Huxtable – for Nuke.

Here’s the press release from Re:Vision Effects.


Please rate the helpfulness of this tip.

Click on a star to rate it!

… for Adobe Premiere Pro CC

Tip #1111: Adobe Sneak Peaks

Larry Jordan – LarryJordan.com

Here’s the full list of new tech premiered at Adobe Sneaks.

(Image courtesy of pexels.com.)

Topic $TipTopic

Last week, at Adobe MAX, comedian Chelsea Handler co-hosted Sneaks, a preview of the futuristic tech Adobe engineers and researchers are exploring.

These Sneaks preview cutting-edge technologies from Adobe’s labs —and some may even make their way into future Adobe products. From tapping AI to fix blurry videos to enabling collaboration in augmented reality (AR) experiences, these experimental Sneaks push the boundaries of creative innovation.

Here’s the full list.

Project Sharp Shots – powered by Adobe Sensei (Adobe’s AI and machine learning technology)

  • #SharpShotsSneak takes advantage of advancements in computer vision and deep learning to transform blurry videos into sharp, steady, action-packed footage.

Project Scantastic

  • #Scantastic offers an intuitive solution that leverages your smartphone and a photogrammetry pipeline to capture 3D models from the environment with minimal user intervention for immersive, 3D experiences.

Project Material World – powered by Adobe Sensei

  • #MaterialWorld is a tool for image-to-material reverse engineering. It provides an intuitive material identification process that works under natural lighting, avoiding the need for complex capture setup or user inputs. This results in a digital texture so real you can almost feel it.

Project Physics Whiz

  • #PhysicsWhiz introduces a physics-based layout tool that combines a user’s intuitive sense of physical manipulation with the precision of digital tools to simplify object manipulation in 3D digital tools.

Project On the Beat – powered by Adobe Sensei

  • #OnTheBeatSneak identifies out-of-rhythm body movements and aligns them to generate beat-synced videos for the perfect dance video.

Project Comic Blast – powered by Adobe Sensei

  • #ComicBlast disrupts the way comics are created and consumed through efficient, collaborative, and intelligent design and technology paradigms that make comic book creation fun and 100x faster.

Project In Sync

  • #InSyncSneak streamlines the disconnected path from an XD file to a production-ready application. It allows designers to share information about the design and implementation, create a bridge prototype from XD, and quickly push to a production site.

Project 2D Plus

  • #2DPlus enables users to take 2D objects in Illustrator and make them instantly appear 3D. It is a set of features – dynamic shadows, attached shadows, auto-arrange, and graphic lighting, that come together to create 2.5D’ish looking outputs that graphic designers will undoubtedly love, saving a huge learning curve of understanding 3D apps.

Project Typographic Brushes

  • #TypographicBrushes combines users’ drawn stroke inputs, the choice of brush, and the typographic properties of the text object to brings paint style brushes and new-type families to life in seconds.

Project AR Together

  • #ARTogether brings to life a multi-user experience where everyone shares the same view of the physical space and virtual objects, and can author and share AR scenes without compromising the quality of the experience.

EXTRA CREDIT

Here’s a link to see video demos of each of these.


Please rate the helpfulness of this tip.

Click on a star to rate it!

… for Apple Final Cut Pro X

Tip #1109: Oversize Your Compound Clips

Larry Jordan – LarryJordan.com

Compound clips do not need to match the frame size of your project

The text, in an overlarge compound clip, travels over the mountain shot in the project.

Topic $TipTopic

There’s no rule that says compound clips need to be the same frame size as your project. In fact, there’s a benefit when they aren’t.

In the screen shot, the 800-point Harrington text is contained in a large compound clip (2133 x 1200 pixels), which is edited into and stacked above the background clip in a 720p timeline.

NOTE: There’s no magic to these numbers, I’m just letting you know what I used.

By adding keyframes, it is easy to have the text travel through the frame.

NOTE: While this example uses text, a compound clip can contain text, clips, or a mixture of both.

The key idea here is to provide more animation options using a compound clip which is larger than the project frame size.


Please rate the helpfulness of this tip.

Click on a star to rate it!