Demo reels need to evolve with your career. Here’s how to keep them fresh.
(Image courtesy of MotionArray.com)
This article first appeared in MotionArray.com. This is a summary.
Chances are, most people reading this will have some experience in throwing together a demo reel. But as your body of work continues to evolve, so too should the 90-second video compilation you use to represent it.
Here are seven tips to add impact to your demo:
Cut the Fat
Brevity is Key
Play Up Your Niche
Don’t Be Afraid To Show Your Process
Reconsider Your Music
Chase Those Views!
Get a Second Opinion
EXTRA CREDIT
This article has more details and lots of links. And, for additional help, check out these tips which cover the basics of creating a demo reel.
Please rate the helpfulness of this tip.
Click on a star to rate it!
https://www.theinsidetips.com/wp-content/uploads/2019/09/Tips-Logo-700x150.jpg00Larry Jordanhttps://www.theinsidetips.com/wp-content/uploads/2019/09/Tips-Logo-700x150.jpgLarry Jordan2020-10-02 01:30:002020-10-02 01:30:00Tip #1050: 7 Tips to Spice Up a Demo Reel
Creative teams don’ t need to be together to be successful. If they communicate.
The Oxcart Assembly logo.
Recently, Frame.io published a blog detailing how a new team of creatives – Oxcart Assembly – collaborated to create the identity package for NASA’s Launch America. As Frame describes it: This “covers the creation of NASA’s new Launch America brand by a coast-to-coast team of visionaries who enjoy pushing the limits of what’s possible—and how they overcame the boundaries of time and space by using Frame.io.”
This detailed blog covers how the team met, how they pitched NASA and won the project, how they were able to winnow 60 years of NASA video to fit into 60 seconds, and their creative approach to the project.
This is a fun article to read, with plenty of illustrations and inside insight.
Please rate the helpfulness of this tip.
Click on a star to rate it!
https://www.theinsidetips.com/wp-content/uploads/2019/09/Tips-Logo-700x150.jpg00Larry Jordanhttps://www.theinsidetips.com/wp-content/uploads/2019/09/Tips-Logo-700x150.jpgLarry Jordan2020-09-30 01:30:002020-09-30 01:30:00Tip #1034: 60 Years of NASA – in 60 Seconds
Clamp scopes when doing creative work, unclamp when evaluating images technically.
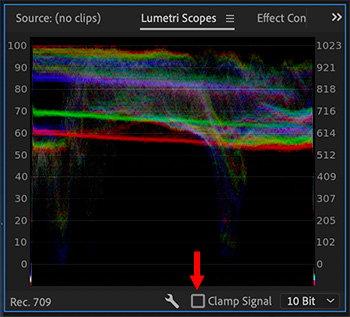
The Clamp Signal checkbox in the Lumetri Waveform Monitor.
The Lumetri video scopes have a “Clamp Signal” checkbox. As I was researching my recent webinar on “New Features in Adobe Premiere Pro,” I talked with Adobe about this.
What the Clamp Signal checkbox does, when turned on, is compress, or clamp, any grayscale levels over 100 IRE or below 0 IRE that are displayed in the scopes. This means all grayscale values fall between 0 – 100 IRE.
NOTE: These excess values are called “super-white” or “super-black.” Both are illegal values for broadcast, DVD or digital cinema.
This clamping does NOT affect any clips in the timeline or browser display; or media being exported.
In general, when doing creative work, turn clamping on. When evaluating your final project technically, turn clamping off, then make sure no values are above 100 or below 0.
EXTRA CREDIT
If your color grade is done, and you still have illegal levels, apply Video Effects > Color Correction > Video Limiter to clean them up.
Here’s an older tutorial that explains what the limiter does.
Please rate the helpfulness of this tip.
Click on a star to rate it!
https://www.theinsidetips.com/wp-content/uploads/2019/09/Tips-Logo-700x150.jpg00Larry Jordanhttps://www.theinsidetips.com/wp-content/uploads/2019/09/Tips-Logo-700x150.jpgLarry Jordan2020-09-29 01:30:002020-09-29 01:30:00Tip #1044: What Does “Clamp Signal” Do?
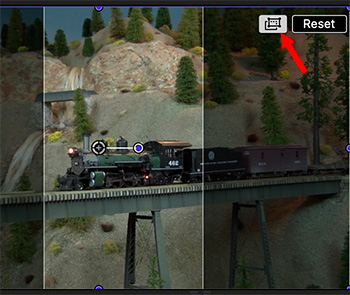
Smart Conform allows you to see the portion of an image being trimmed – and adjust it.
The white button displays the hidden portions of an image.
Smart Conform is new with the 10.4.9 update, which is a quick way to reframe existing clips for the different aspect ratios of social media.
NOTE: Here’s a tutorial that covers this in detail.
However, there’s a very cool button that makes Smart Conform much easier to use. (See screen shot.)
After you trim a clip using Smart Conform, look in the top right corner of the Viewer. When you click the white button indicated by the red arrow, Final Cut displays a dimmed version of the entire image which allows you to see what will be cut from the frame.
Using the Transform > Position settings in the Video Inspector, you can adjust the X position to move the image horizontally. Or keyframe the X position if you need framing to change during playback.
Please rate the helpfulness of this tip.
Click on a star to rate it!
https://www.theinsidetips.com/wp-content/uploads/2019/09/Tips-Logo-700x150.jpg00Larry Jordanhttps://www.theinsidetips.com/wp-content/uploads/2019/09/Tips-Logo-700x150.jpgLarry Jordan2020-09-28 01:30:002020-09-28 01:30:00Tip #1041: New! See What You Are Missing
Four webinars presenting how to create video during a pandemic.
Image courtesy of IPV.com.
The team at IPV, which makes media asset management software, just published four free webinars on “Creating Video Remotely in Lockdown.”
Featuring conversations with Sky, Sesame Workshop, Warner Media and Biola University, these discussions focus on how each company navigated lockdown to create “amazing content under extraordinary conditions.”
Sky. How one of the largest broadcasters in Europe kept on creating through the pandemic
Sesame Street. How one of the world’s most beloved brands continued to create content through Covid
Warner Media. How WarnerMedia became one of the world’s largest remote video production teams.
Biola University. How Lockdown affected video production workflows in Higher Education
https://www.theinsidetips.com/wp-content/uploads/2019/09/Tips-Logo-700x150.jpg00Larry Jordanhttps://www.theinsidetips.com/wp-content/uploads/2019/09/Tips-Logo-700x150.jpgLarry Jordan2020-09-25 01:30:002020-09-19 10:15:18Tip #1026: Creating Video in Lockdown
Minions tag line: “Uh oh.” (Image courtesy of Universal Pictures.)
This article, written by Darrin Bradley, first appeared in PremiumBeat.com. This is a summary.
A tagline is a short phrase marketers use to sell a product experience to a customer. They’re usually pithy or clever, often employing puns or other turns of phrase that can grab your attention and get you to start asking questions, like “What’s this . . . ?”
Some of the most famous include Nike’s short-and-sweet “Just do it” or Apple’s “Think different.” They condense the entire consumer experience with these two brands into a grand total of five words. It’s marketing witchcraft, and it works.
In this post, we differentiated the logline from the tagline — the two often get confused, but they’re doing very different jobs. The load-bearing logline works in isolation, usually according to a formula, to quickly summarize your script for potential producers. It’s the elevator pitch that identifies exactly what your movie is about and why it will be interesting — if done correctly.
The tagline, on the other hand, is one element of an overall marketing strategy to attract viewers for your movie. Loglines sell your film to producers; taglines sell it to audiences. They often capture one-liners from trailers in a joint effort to keep your movie front-and-center in a viewer’s mind. You’ll also see them on promotional posters, and they can appear in programming guides for film festivals. Now that marketing a movie is largely a digital affair, the tagline has taken on new roles, appearing as a social media post, as ad copy, or as a headline on a promotional website.
There’s no magic answer for how to write a tagline that accomplishes everything you want it to, but you can position yourself for success by following a couple of tips. First, write a lot of them. Bad ideas can yield good ones, so don’t be afraid to record every stupid thing that comes to mind until you nail it. Second, bring other brains into the process. You may have only your director’s or cinematographer’s view of the movie. Bring in other members from the crew — bring in outsiders you trust. Develop a hive-mind, and don’t be precious about your ideas. You never know who’s going to come up with the winner.
The article continues with examples and analysis from ten different popular films.
Please rate the helpfulness of this tip.
Click on a star to rate it!
https://www.theinsidetips.com/wp-content/uploads/2019/09/Tips-Logo-700x150.jpg00Larry Jordanhttps://www.theinsidetips.com/wp-content/uploads/2019/09/Tips-Logo-700x150.jpgLarry Jordan2020-09-25 01:30:002020-09-25 01:30:00Tip #1027: Writing Tag Lines that Work
Natural lighting does not mean “hands-off.” It just means “unplugged.”
(Image courtesy of pexels.com.)
This article first appeared in MotionArray.com. This is a summary.
The capabilities of digital cameras today make this style of shooting easier than ever because of their high sensitivity. ISO 800 has become a standard rating for most cinema cameras, and some are pushing even further, like the Panasonic Varicam which has dual native ISO’s of 800 and 5000. At 5000 ISO, you can likely get a proper exposure with simple street lamps.
But just because you can get a proper exposure doesn’t make it good lighting. Here are some things to keep in mind as you set up for your next scene using the sun as your primary light source.
Maximize the Natural Light with Tools. There are lots of tools that can help you harness or shape the light you have. Bounce boards, reflectors, and diffusion frames can all help soften a source or redirect it.
Location, Location, Location. A DP friend once said that 90% of his job is a good location. An interesting location can make simple, straightforward lighting look amazing, while the most interesting lighting in the world won’t save you from a drab or blasé set. When it comes to natural or available light, you should have three concerns: exposure, depth, and quality.
Time. Available light is ruled by the time of day. If you’re shooting outdoors, midday can be very difficult; the light is generally softer and more even in the “golden” hour after sunrise or before sunset. On the other hand, shooting indoors with window light can be a lot better in the middle of the day simply because the light coming through the window will be stronger, giving you a better exposure inside. This all means that shooting with available light is an exercise in patience and scheduling.
Use LED Fixtures. Okay, so this one is a bit of a cheat. But thanks to LED technology, it’s getting easier and easier to sneak relatively bright sources into a scene with just a small LED panel/strip and a battery. Even if you can’t set up a “regular” light, it might be a good idea to rig up a couple of battery-powered LED fixtures and use them to accent your available light.
EXTRA CREDIT
The article, linked above, has more details, examples and links.
The Circle filter converts any image – still or moving – into a series of circles.
Source image (left), then with the Stylize > Circle filter applied.
This week, I decided to explore some of the filters included with Apple Motion. This article looks at Filters > Stylize > Circle.
This converts an image – the more color variation the better – into a grid of circles. You can adjust the circle size, the amount of blur (falloff) and whether to invert them which shows the underlying grid.
For this image, I used:
Size: 147
Falloff: 0.22
Invert: Off
Mix: 100
EXTRA CREDIT
You can animate this effect by setting keyframes for Mix (part of all filter settings in the Inspector) from 0 to 100.
Please rate the helpfulness of this tip.
Click on a star to rate it!
https://www.theinsidetips.com/wp-content/uploads/2019/09/Tips-Logo-700x150.jpg00Larry Jordanhttps://www.theinsidetips.com/wp-content/uploads/2019/09/Tips-Logo-700x150.jpgLarry Jordan2020-09-24 01:30:002020-09-19 10:04:07Tip #1019: Effects Playground: Circle
Stencil Luma provides the illusion of texture mapping in 3D – provided nothing moves.
A flower image “mapped” to the Spiral 3D object using Stencil Luma.
While we can’t apply textures to 3D objects in Motion, then move with the object, we can create the illusion of texture mapping, The problem is that we can’t track how the surface of a 3D object moves in Motion. But… if we don’t need an object to move – or move much – we can easily fake it.
Add a 3D object to the Layers panel. (A solid white one will work best.)
Below it, in the same group, put the texture you want to “map” to the surface.
Select the 3D object and choose Inspector > Properties > Blend mode: Stencil Luma.
This blends the background image into the foreground shape based upon grayscale values. I found Stencil Luma preserves the 3D effect of the shape better than Stencil Alpha.
EXTRA CREDIT
Make this even more interesting:
Replace the lower image with a video or animated background and watch as it moves inside the shape.
SLOWLY rotate the group containing the 3D image. You can’t go far with this because you’ll lose the effect, but a small, slow spin – especially with moving video under it – should work fine.
We may request cookies to be set on your device. We use cookies to let us know when you visit our websites, how you interact with us, to enrich your user experience, and to customize your relationship with our website.
Click on the different category headings to find out more. You can also change some of your preferences. Note that blocking some types of cookies may impact your experience on our websites and the services we are able to offer.
Essential Website Cookies
These cookies are strictly necessary to provide you with services available through our website and to use some of its features.
Because these cookies are strictly necessary to deliver the website, refuseing them will have impact how our site functions. You always can block or delete cookies by changing your browser settings and force blocking all cookies on this website. But this will always prompt you to accept/refuse cookies when revisiting our site.
We fully respect if you want to refuse cookies but to avoid asking you again and again kindly allow us to store a cookie for that. You are free to opt out any time or opt in for other cookies to get a better experience. If you refuse cookies we will remove all set cookies in our domain.
We provide you with a list of stored cookies on your computer in our domain so you can check what we stored. Due to security reasons we are not able to show or modify cookies from other domains. You can check these in your browser security settings.
Google Analytics Cookies
These cookies collect information that is used either in aggregate form to help us understand how our website is being used or how effective our marketing campaigns are, or to help us customize our website and application for you in order to enhance your experience.
If you do not want that we track your visit to our site you can disable tracking in your browser here:
Other external services
We also use different external services like Google Webfonts, Google Maps, and external Video providers. Since these providers may collect personal data like your IP address we allow you to block them here. Please be aware that this might heavily reduce the functionality and appearance of our site. Changes will take effect once you reload the page.
Google Webfont Settings:
Google Map Settings:
Google reCaptcha Settings:
Vimeo and Youtube video embeds:
Other cookies
The following cookies are also needed - You can choose if you want to allow them:
Privacy Policy
You can read about our cookies and privacy settings in detail on our Privacy Policy Page.