The Slip tool in action, changing content without changing position or duration.
There’s a tool hidden in Final Cut that offers a faster way to select the best section of B-roll for your projects. We all know how to trim the edges of a clip. But, Final Cut also allows us to trim the content of a clip – using the Slip tool. Here’s how.
Select the Trim tool (Shortcut: T).
Click in the middle of a timeline clip and drag left or right.
As you do, the content of the clip changes, but not its duration or location in the timeline.
I use this technique constantly to quickly select the portion of a clip I want to use for B-roll and edit it to the timeline.
I then trim the edges of the clip to set its position and duration exactly the way I want.
Finally, I use the Slip tool (which is what we are doing when we drag the Trim tool in the middle of a clip – we are “slipping” the content) to select a different portion of the clip.
Slipping allows me to select the best portion of a clip after first setting its timing.
Please rate the helpfulness of this tip.
Click on a star to rate it!
https://www.theinsidetips.com/wp-content/uploads/2019/09/Tips-Logo-700x150.jpg00Larry Jordanhttps://www.theinsidetips.com/wp-content/uploads/2019/09/Tips-Logo-700x150.jpgLarry Jordan2020-09-14 01:30:002020-09-14 01:30:00Tip #998: Slip Your Way to Better B-roll
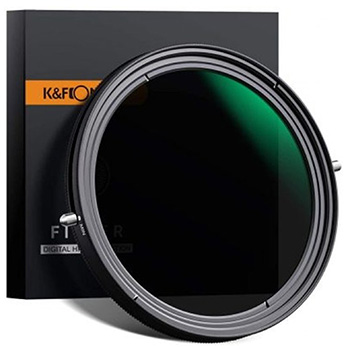
ND filters provide more control over the image by limiting the light hitting the lens.
A variable ND filter from K&F Concept.
This article, written by Alejandro Medellin, first appeared in Shutterstock.com. This is an excerpt.
ND (neutral-density) filters reduce the amount of light passing through a lens, making it easier to shoot in brightly-lit conditions. These are a lot like a pair of sunglasses in that it blocks out or darkens the image to negate the effects of harsh light.
Optical density on an ND filter measures the f-stop reduction of a particular filter, with higher-level filters blocking more light. Most manufacturers measure optical density by applying a number next to “ND,” such as ND2.
Starting from ND2, which is equivalent to one f-stop reduction and the lowest-level ND filter manufactured, each subsequent ND rating produces one more f-stop reduction. Using an ND2 filter with the aperture set to f/2.8 creates an image that appears as if it was shot with an aperture of f/4. Using an ND4 filter would be equivalent to two f-stop reductions. An ND8 filter would be comparable to three f-stop reductions, and so forth.
As a rule of thumb, each level lets in half as much as light as the one before — e.g., an ND64 filter lets in half as much light as an ND32 filter.
ND filters are useful for capturing images that require long exposure times. When photographing a body of water, for example, setting a long exposure time creates a smoothing effect that makes the water appear serene and glass-like.
Shooting video in broad daylight is challenging. You either have to adjust your aperture or shutter speed to get the shot you want, but that’s not always the best idea. Decreasing the aperture may let in less light, which is perfect when shooting in bright conditions, but it also eliminates the shallow depth of field, bringing everything into focus. If you need shallow depth of field in a shot, changing the aperture isn’t viable. That leaves changing the ISO or shutter speed instead.
You need to know three things before purchasing an ND filter:
The difference between fixed and variable ND filters,
what’s a combo ND and CPL filter,
and ND filter sizing.
The article goes to to describe different filters and has an excellent discussion of shutter speed vs. frame rate. The author also has suggestions on which ND filters to buy, depending upon your budget.
Click the link at the top to learn more.
Please rate the helpfulness of this tip.
Click on a star to rate it!
https://www.theinsidetips.com/wp-content/uploads/2019/09/Tips-Logo-700x150.jpg00Larry Jordanhttps://www.theinsidetips.com/wp-content/uploads/2019/09/Tips-Logo-700x150.jpgLarry Jordan2020-09-11 01:30:002020-09-11 01:30:00Tip #983: What Are ND Filters?
LUTs provide a fast way to create custom looks. Now, Motion supports them.
The LUT menu in Filters > Custom LUTs.
One of the key new features in the Motion 5.4.6 update is the ability to add custom LUTs to any imported video. A LUT (look-up table) is used to interpret the numbers stored on your hard disk into the visual image displayed on your monitor.
NOTE: Stylized LUT effects are available from a variety of third-party sources. Camera LUTs, used to convert “flat” or “log” footage from high-end cameras to standard color spaces, are available from many camera manufacturers and other sources.
With the 5.4.6 update, we can now apply custom LUTs to any imported video. To do so:
Select the clip you want to adjust in the Layers panel.
Choose Filters > Color > Custom LUTs
Go to Inspector > Filters > Custom LUT and choose the LUT you want from the LUT menu. (See screen shot.)
NOTE: Unlike Final Cut, Motion does not include camera LUTs, you will need to download the ones you need from the manufacturer of your camera.
Motion stores custom LUTs in the same location as Final Cut Pro X: /Users/username/Library/Application Support/ProApps/Custom LUTs/
EXTRA CREDIT
Because Motion stores third-party LUTs externally (outside of Motion projects), it’s inadvisable to use LUTs in templates created for Final Cut Pro X.
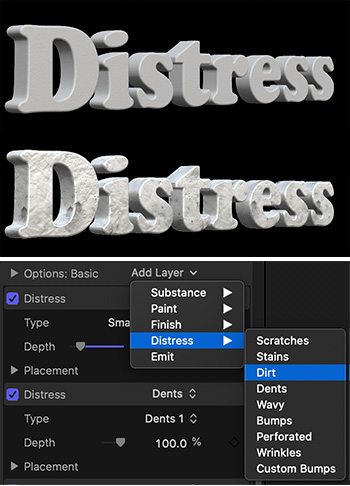
Text doesn’t have to be perfect. In fact, distressed text is often more compelling.
Plain 3D text (top), distressed text (middle) and the distress menu.
Nothing adds character to text like making it look worse. A lot worse. A hidden feature in Motion makes “distressing” your text simple and fun. Let me show you how this works.
NOTE: This option is only available for 3D text, but that doesn’t mean your text needs to look 3D.
To apply distress:
Create a 3D text clip.
Select Inspector > Text and scroll down until you see the Material section.
Below the Material section, select Options:Basic > Add Layer > Distress.
From the Distress menu, choose an effect (see screen shot).
In the settings for that option, select different looks from the Type menu. Drag sliders and watch what happens.
EXTRA CREDIT
You can apply as many different “distresses” as you want. The screen shot shows three applied to the text: Wrinkles, Dents and Stains.
Like many 3D text effects, you need to play with these to see what works best for your project. And, yes, these settings will travel to FCP X if you are creating templates.
Please rate the helpfulness of this tip.
Click on a star to rate it!
https://www.theinsidetips.com/wp-content/uploads/2019/09/Tips-Logo-700x150.jpg00Larry Jordanhttps://www.theinsidetips.com/wp-content/uploads/2019/09/Tips-Logo-700x150.jpgLarry Jordan2020-09-10 01:30:002020-09-05 10:30:26Tip #989: Add Character – Distress Your 3D Text
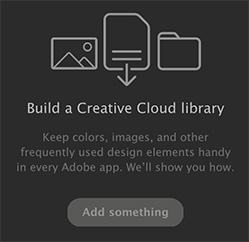
Libraries allow sharing assets between projects, computers or team members.
An empty library – waiting for you to add something in Premiere.
Creative Cloud libraries got a bad rap for Premiere users when they were first introduced because they were optimized for Photoshop and limited to still images. Since then, Adobe added new features and, now, they may be worth a second look.
Creative Cloud Libraries let you gather design elements for specific projects, clients, or teams for use within any of your Creative Cloud apps. Libraries help ensure you and your team access the same elements for a project throughout its life-cycle.
Creative Cloud Libraries are displayed in the Libraries panel in Premiere Pro.
Whatever you save in the Libraries panel becomes available for use across Premiere Pro projects that you are working on. You can also access libraries across projects in the following ways:
Across computers. Libraries are synced to Creative Cloud. Your Library becomes available on any computer that you are signed into using your Creative Cloud ID.
Across apps. Whatever you save in the Libraries panel becomes automatically available across desktop and mobile apps that support Creative Cloud Libraries. For example, you can access Libraries from desktop apps such as, After Effects, Photoshop, and mobile apps such as Adobe Hue.
Additionally:
You can create multiple libraries to separate elements from different projects.
You can add color grading looks to a library.
You can add assets from Adobe Stock
You can share libraries with other Creative Cloud users.
You can share motion graphics templates
EXTRA CREDIT
Here’s a link to learn more about what Libraries can do.
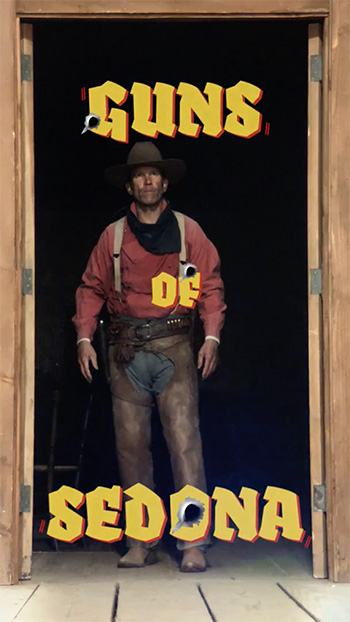
Vertical video works when you embrace it for what it is, not what you would like it to be.
One of the titles from “The Stunt Double.”
This article, written by Jourdan Aldredge, first appeared in PremiumBeat.com. This is a summary.
If you, like me, were skeptical about the value of “vertical video” (that is, with an aspect ratio of 9:16, rather than 16:9), Apple, in conjunction with director Damien Chazelle, has created a video that will change your mind.
In this article, Jourdan links to, then analyzes the nine-minute short film “The Stunt Double” starring Tom McComas and Preeti Desai. If you haven’t seen the movie, it is totally worth ten minutes of your time. It is rich at multiple levels, not just plot but production.
As Jourdan writes: “Chazelle’s vertical short can be appreciated in a couple of ways. On the surface, it’s a fun love letter to the classic genres of film history. Even better, and perhaps more importantly, it’s a master class in how to frame your cinematography in this new direction.”
Jourdan’s article looks at:
The impact of vertical titles to set a mood.
The use of establishing shots, even vertically, to set the geography.
How vertical video enhances close-ups.
The director’s effective use of 2-shots.
How rotating traditional framing – like shooting the slate – can still enhance the story.
As he concludes: “If you’re going vertical, remember to embrace and elevate the limitations. If something just doesn’t want to fit, change the definition of ‘fit’ by turning your classic horizontal instincts on their head. You’ve still got a frame to fill and a story to tell.”
Both the article and the video – which are linked above – are well worth your time.
Please rate the helpfulness of this tip.
Click on a star to rate it!
https://www.theinsidetips.com/wp-content/uploads/2019/09/Tips-Logo-700x150.jpg00Larry Jordanhttps://www.theinsidetips.com/wp-content/uploads/2019/09/Tips-Logo-700x150.jpgLarry Jordan2020-09-04 01:30:002020-08-29 13:43:27Tip #974: A Master Class in Vertical Video
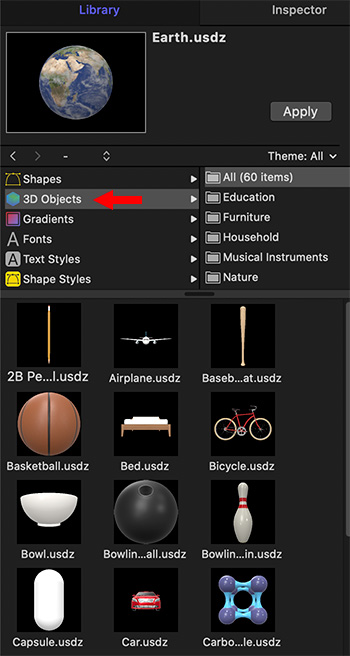
3D objects are ideally suited for 3D text and camera moves.
A portion of the 3D objects available in the latest release of Motion – 5.4.6.
A key group of new features in the 5.4.6 update to Motion are 60 new 3D objects in the Motion Library. Each of these elements can be rotated in any direction, unlike video, which is always 2D.
To access these go to Library > 3D Objects. (See screen shot.)
Add them to a project the same as any other object.
The easiest way to rotate or position them is using the 3D Transform tool (Shortcut: Q). If you want more precision, select the object, then go to Inspector > 3D Object and adjust the Orientation settings.
EXTRA CREDIT
These can be scaled over 300% and still retain texture, meaning that flying a camera through one of these objects won’t become pixelated until it gets very large in the frame.
Please rate the helpfulness of this tip.
Click on a star to rate it!
https://www.theinsidetips.com/wp-content/uploads/2019/09/Tips-Logo-700x150.jpg00Larry Jordanhttps://www.theinsidetips.com/wp-content/uploads/2019/09/Tips-Logo-700x150.jpgLarry Jordan2020-09-03 01:30:002020-09-03 01:30:00Tip #969: New! 3D Objects in Motion
Colors applied to a 3D object apply to the entire object, even as it moves or rotates.
Gradient Colorize (left) and Colorize (right) applied to a white 3D mug.
3D objects are new with the 5.4.6 update to Apple Motion. Tip #969 describes what these are. However, many of the these objects are pure white. Here’s how to change that.
While we can’t, at least yet, apply textures to 3D shapes (and have them retain their “3D-ness”), we can apply color.
In the screen shot, the white 3D mug has two different filters applied:
Filters > Color > Colorize. This is the green color.
Filters > Color > Gradient Colorize. This is the pink color.
NOTE: I created this effect by blending three different screen shots in Photoshop.
I tend to prefer the results of the Gradient Colorize because I can apply a slightly different shade of the color to emphasize shadows.
NOTE: Keep in mind that this color will “stick” even as you rotate the object.
Please rate the helpfulness of this tip.
Click on a star to rate it!
https://www.theinsidetips.com/wp-content/uploads/2019/09/Tips-Logo-700x150.jpg00Larry Jordanhttps://www.theinsidetips.com/wp-content/uploads/2019/09/Tips-Logo-700x150.jpgLarry Jordan2020-09-03 01:30:002020-08-29 13:35:09Tip #970: Colorizing 3D Objects
Adobe MAX – the world’s biggest creativity conference.
The Adobe MAX logo.
Adobe MAX, the world’s biggest creativity conference, will take place virtually October 20 – 22nd, and will feature notable creative luminaries and celebrity speakers such as Ava DuVernay, Keanu Reeves, Tyler the Creator, and Annie Leibovitz; keynotes, technology Sneaks and presentations on the latest innovations across Adobe Creative Cloud; collaborative art projects and challenges; virtual networking opportunities for creatives across the globe; and of course, hundreds of live and on-demand learning sessions for all skill levels.
MAX 2020 registration is open. This year’s creativity conference is virtual, completely free, and jam-packed with 56 hours of non-stop inspiration and learning. With live content demos, luminary speakers, Sneaks, celebrity appearances, and musical performances, this is an immersive experience you don’t want to miss.
https://www.theinsidetips.com/wp-content/uploads/2019/09/Tips-Logo-700x150.jpg00Larry Jordanhttps://www.theinsidetips.com/wp-content/uploads/2019/09/Tips-Logo-700x150.jpgLarry Jordan2020-09-01 01:30:002020-09-01 01:30:00Tip #952: Adobe MAX 2020 is Now Free!
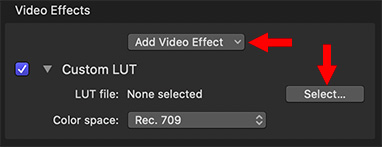
Compressor does not access FCP X LUT locations. Store LUTs where you can easily find them.
The Custom Lut menu in Apple Compressor 4.4.6.
One of the big new features in the Compressor 4.4.6 update is the ability to add camera and custom LUTs.
NOTE: A LUT is a lookup table that converts the data stored in your computer into something more pleasing for the eye to view.
We could add LUTs for a long time in FCP X, the news now is that LUTs can be added before editing even starts, as part of the DIT process.
NOTE: There is no reason to add a LUT after a project has been color graded.
Keep in mind that LUTs added during transcoding are baked into the video, unlike LUTs added during the editing process, which can always be changed.
To add a LUT:
Select the compression setting applied to a job.
Scroll to the bottom of the Video Inspector and add a new Video Effect.
Choose Custom LUT.
Click the Select button to determine which LUT you want add.
EXTRA CREDIT
Compressor does not default to the same LUT storage location that Final Cut uses. So be sure to store any custom LUTs somewhere you can easily find them.
Here’s an tutorial from my website that describes how to create custom LUTs using Photoshop.
We may request cookies to be set on your device. We use cookies to let us know when you visit our websites, how you interact with us, to enrich your user experience, and to customize your relationship with our website.
Click on the different category headings to find out more. You can also change some of your preferences. Note that blocking some types of cookies may impact your experience on our websites and the services we are able to offer.
Essential Website Cookies
These cookies are strictly necessary to provide you with services available through our website and to use some of its features.
Because these cookies are strictly necessary to deliver the website, refuseing them will have impact how our site functions. You always can block or delete cookies by changing your browser settings and force blocking all cookies on this website. But this will always prompt you to accept/refuse cookies when revisiting our site.
We fully respect if you want to refuse cookies but to avoid asking you again and again kindly allow us to store a cookie for that. You are free to opt out any time or opt in for other cookies to get a better experience. If you refuse cookies we will remove all set cookies in our domain.
We provide you with a list of stored cookies on your computer in our domain so you can check what we stored. Due to security reasons we are not able to show or modify cookies from other domains. You can check these in your browser security settings.
Google Analytics Cookies
These cookies collect information that is used either in aggregate form to help us understand how our website is being used or how effective our marketing campaigns are, or to help us customize our website and application for you in order to enhance your experience.
If you do not want that we track your visit to our site you can disable tracking in your browser here:
Other external services
We also use different external services like Google Webfonts, Google Maps, and external Video providers. Since these providers may collect personal data like your IP address we allow you to block them here. Please be aware that this might heavily reduce the functionality and appearance of our site. Changes will take effect once you reload the page.
Google Webfont Settings:
Google Map Settings:
Google reCaptcha Settings:
Vimeo and Youtube video embeds:
Other cookies
The following cookies are also needed - You can choose if you want to allow them:
Privacy Policy
You can read about our cookies and privacy settings in detail on our Privacy Policy Page.