… for Adobe Premiere Pro CC

Tip #875: The Slip Tool Simplifies B-roll

Larry Jordan – LarryJordan.com

The Slip tool makes selecting the best B-roll fast and easy.

The Program Monitor display when the Slip tool is in operation.

Topic $TipTopic

B-roll, which are images that reinforce what the speaker is talking about, are essential to most documentary and feature films. While the person on-camera describes a situation, B-roll shows what they are talking about.

Becasue each B-roll image needs to fit within the very specific time when the speaker is talking about it, our challenge is to quickly find the best possible section of each B-roll shot.

That’s where the Slip tool can help.

  • Select the Slip tool from the Tool palette (Shortcut: Y). The Slip tool allows you to change the content of a shot, without altering its duration or position.
  • Click in the middle of a B-roll clip in the timeline and drag.

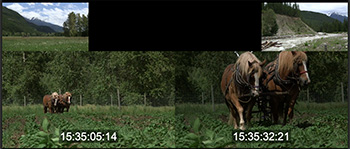
As you drag (see screen shot), the Program monitor shows:

  • Last frame of the preceding shot (top left)
  • First frame of the following shot (top right)
  • First frame, and timecode, of the slipped clip (left)
  • Last frame, and timecode, of the slipped clip (right)

I use this tool all the time to get the best possible section of my B-roll to fit in the time that I have.


Please rate the helpfulness of this tip.

Click on a star to rate it!

… for Apple Final Cut Pro X

Tip #870: Change the Look of a Dissolve

Larry Jordan – LarryJordan.com

Add looks to have dissolves contribute to the story you are telling.

The Look options for the default cross-dissolve transition in Final Cut.

Topic $TipTopic

I discovered this tip while researching a recent webinar covering the basics of editing in Final Cut Pro X. There are two hidden settings in every cross-dissolve that will change the look of a transition.

  • Apply the transition to an edit point.

NOTE: Since this is the default transition, the easiest way to add a dissolve is to select the edit point, then type Cmd + T.

  • Select the transition, then go the Inspector (see screen shot). There, you’ll find a dozen different settings in the Look menu that can be applied to any cross-dissolve. Experiment with these to see what they do.

NOTE: Inspector settings vary by transition.

The other option is Ease. This allows you to change the speed of entering and exiting a dissolve based upon the Ease Amount.

  • In. Affects the speed at the start of the transition.
  • Out. Affects the speed at the end of the transition
  • In & Out. Affects both the start and end of the transition.

NOTE: These speed changes are subtle and are only visible for longer transitions; say, two seconds or more.


Please rate the helpfulness of this tip.

Click on a star to rate it!

… for Apple Motion

Tip #859: What is a Clone Layer?

Larry Jordan – LarryJordan.com

Clones inherit filters and masks, but not position or behaviors.

A master file, top, and its clone. Filters are inherited, position and rotation are not.

Topic $TipTopic

Control-click any element in Motion’s Viewer and you’ll see the option to “Make a Clone Layer.” What is a clone layer?

Normally, when you duplicate a layer (Shortcut: Cmd + D), there is no relationship between the original and the duplicate.

However, with a clone layer (Shortcut: K), changes made to filters and masks in the source layer propagate to the clones. Creating clone layers improves project playback and rendering performance.

NOTE: Behaviors don’t propagate to clone layers unless the behavior affects a filter or mask in the source layer.

You can create a clone layer using the shortcut, or Control-clicking an element in the Layers or Viewer panels, or choose Object > Make Clone Layer.

A clone layer is created and appears in the canvas on top of the original layer. In the Layers list, the clone layer appears with the default name “Clone Layer.” A clone layer icon appears next to the name.

NOTE: With the exception of Frame Blending, you can modify clone layers independently of the source layer.


Please rate the helpfulness of this tip.

Click on a star to rate it!

… for Apple Motion

Tip #860: Transform vs. Transform 3D

Larry Jordan – LarryJordan.com

This menu option is faster than selecting a layer, selecting the tool, then modifying the image.

Control-click any image in Motion’s Viewer to display this menu.

Topic $TipTopic

Control-click an image displayed in Motion’s Viewer and an interesting menu presents itself. The top two choices are: Transform and Transform 3D. What do they do?

Select Transform and position dots appear around the edges of the image. As well, the Arrow (Select) tool is activated.

This option means you can position, scale and rotate an image… in 2D.

Select Transform 3D and not only do the position dots appear, but the 3D controls are displayed in the center of the image, and the 3D Transform tool is selected.

This option means you can position, scale and rotate an image in 3D.

This menu option is faster than selecting a layer, then selecting the tool, then modifying the image.


Please rate the helpfulness of this tip.

Click on a star to rate it!

… for Visual Effects

Tip #868: Lighting Effects for Better Backgrounds

Larry Jordan – LarryJordan.com

Lighting effects can add color, texture and control where the eye looks in an image.

The top is the source image. The bottom is the same image with lighting effects applied.

Topic $TipTopic

Built into Photoshop is a very capable lighting effect generator. This is particularly useful when you need to convert a stock footage image into a background plate for a green-screen key, then match it to the lighting needed for your story. Here are two tutorials on how this works.

NOTE: Background plates are still images, used behind green-screen keys, to give the actors an environment to act in. As long as the camera doesn’t more, these can be completely believable. Hollywood has used these for years.

Written by Colin Smith, for Photoshop Cafe, these two tutorials illustrate how to use Lighting Effects to simulate real lighting. The first adds colored gels in Photoshop and the second re-lights a scene and adds texture.

Here’s the link to the complete tutorial.


Please rate the helpfulness of this tip.

Click on a star to rate it!

… for Visual Effects

Tip #869: 5 DIY In-Camera Stylized Effects

Larry Jordan – LarryJordan.com

Not all effects require computers – these can all be created in-camera.

(Image courtesy DIYPhotography.net.)

Topic $TipTopic

There are plenty of ways to edit your videos and enhance them in post. But, there are also many tricks that help you do it in-camera. In this video, Jakob Owens of The Buff Nerds shares five simple ways that will let you add interesting effects to your videos as you film them.

Jakob uses these techniques for music videos, but you’ll find them handy for other types of video work as well.

  1. Split Diopter
  2. Prisms
  3. Hollywood Black Magic filter
  4. Kaleidoscope filter
  5. Wine Glass

Here’s the link to the full tutorial, along with videos and explanations, from DIYPhotography.net.


Please rate the helpfulness of this tip.

Click on a star to rate it!

… for Codecs & Media

Tip #866: A Better Way to Upscale Media

Larry Jordan – LarryJordan.com

I haven’t used this software, but the demos are stunning.

(Image courtesy of TopazLabs.com.)

Topic $TipTopic

Normally, up-rezing standard definition media to HD – or beyond – is an exercise in blurry pixels.

However, Topaz Labs has invented Video Enhance AI. This software is trained on thousands of videos and combining information from multiple input video frames, it will enlarge and enhance your footage up to 8K resolution with true details and motion consistency.

I have not used this software, which runs on both Windows and Mac, however the demos on their website are stunning.

Render speeds vary based upon your hardware and GPU, however Topaz Labs reports “On a PC with Nvidia GTX 1080, when converting a video from HD to 8K, it typically takes 2-3 seconds for each frame. If you upscale a video from SD to HD, it will take about 0.4 seconds for each frame.”

The software supports: .avi, .flv, .m1v, .mkv, .mov, .mp4, .mpg, .mpeg, .webm, and .wmv for video. As well as .png, .tif, and .tiff for still images.

Available for purchase at $199.99, which, personally, I prefer to a subscription, a free trial is also available.

Here’s the link to learn more.

Thanks to Jean Detheux for this tip.


Please rate the helpfulness of this tip.

Click on a star to rate it!

… for Random Weirdness

Tip #843: Free Guide to Music Licensing

Larry Jordan – LarryJordan.com

Licensing music requires thought. The law favors the creator, and penalties are high.

(Image courtesy of Pexels.com.)

Topic $TipTopic

The folks at Ritual Music have written a free Guide to “How Music Licensing Works.” (Ritual Music is a subscription-based music licensing firm.)

Their blurb reads:

Video content of all kinds is being made cheaper, faster and better every day. The music in it better keep up. By 2020, it’s expected that 30 million videos will be uploaded every single day, almost all requiring legally procured music to comply with strong digital copyright enforcement on every major platform from YouTube and Vimeo to Facebook and Instagram. This explosive growth will open up billions of new music licensing opportunities in music over the next decade.

Smaller budgets and shorter production timelines will freeze out traditional licensing models, but the demand for world-class music will still be paramount. Because of the speed, budgets and quality of digital video content creation, affordable instant-licensing solutions with world-class content will dominate this new market.

Here’s the link to their free Guide.


Please rate the helpfulness of this tip.

Click on a star to rate it!

… for Random Weirdness

Tip #846: 8 Reasons Why You’ll Fail in Media

Larry Jordan – LarryJordan.com

The road to success starts with lots of hard work.

Image courtesy of MotionArray.com.

Topic $TipTopic

As if life wasn’t stressful enough, the folks at MotionArray.com have compiled a list of eight reasons why you’ll fail as a filmmaker. See how many of these apply to you. (This is an excerpt of the original article.)

Becoming a filmmaker is a dream for many people. But… Here are some reasons why you might fail in the film industry and ways to overcome them so you can become the next big shot in Hollywood.

  1. You’ve got a cool camera. While it’s true that a good camera can “allow” you to get better shots, it doesn’t matter at all if you don’t know what you are doing with it.
  2. You memorized the shortcuts. Editing skills run much deeper than button mashing and speed. You have to learn about pacing, rhythm, and storytelling. Spend your energy focusing on the art of the edit.
  3. You saw the tutorial. Look, tutorials are great educational tools. We watch them all the time. Go ahead and watch those tutorials, but then take what you learned and expand on it. Experiment with new ideas.
  4. What does music have to do with filmmaking? You are a “visual” storyteller, not a musician. Think again on this one. Unless you are making a silent film, and we mean totally silent, the music and audio you use will be just as important as your visuals. Try thinking about music earlier in the process. Think about the emotions that you want to get.
  5. Your friends are great actors. Your friends might be great friends, but they probably aren’t great actors. If they are, lucky you, but let’s not kid ourselves. You aren’t going to ask your friend to mend your broken leg just because you don’t know any doctors off hand. Think about actors in the same way.
  6. You went to school for this stuff. Getting through film school will definitely give you a leg up over the competition, and education is never bad. But just remember that it’s a first step, not a straight shot to the top.
  7. Practice. What’s practice? Many of the best filmmakers of our time started with shorts. It’s a good way to get your feet wet before putting on your big boy pants. And remember, they give out Oscars for shorts too.
  8. You’ve got big dreams. Dreams are what lead us to create great things. Without big dreams, we run the risk of selling ourselves short. But… it’s not just about dreaming it into existence. Success comes from hard work.

Here’s the link to the full article.


Please rate the helpfulness of this tip.

Click on a star to rate it!

… for Apple Motion

Tip #840: Simple – But Eye-catching – Text

Larry Jordan – LarryJordan.com

The Stencil Alpha blend mode fills text with whatever is below it in the same group.

A text clip filled with an animated line from the Motion library.

Topic $TipTopic

I was playing in Motion the other day and discovered a fast way to add an eye-catching effect to text – in just a few steps.

In the screen shot, I placed an animated line (Library > Content > Lines > Bar 27) below some text in the same group.

NOTE: The text in this screen shot uses the Giza font.

To get the lines inside the text, select the text in the Layers panel. Then, apply Inspector > Properties > Blend mode > Stencil Alpha.

The Stencil Alpha blend mode fills text, or any object with an alpha channel, with whatever is below it in the same group.

Because many of the lines in Motion’s library are animated, this effect can create a variety of ways to fill text with animated lines and colors. Each more interesting than the next.

Simple to create, but eye-catching in the result.

EXTRA CREDIT

One you have the text filled, you can animate it further using text behaviors.


Please rate the helpfulness of this tip.

Click on a star to rate it!