… for Visual Effects

Tip #812: BorisFX: Tips to Improve Green Screen Keys

Larry Jordan – LarryJordan.com

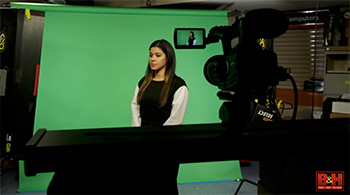
Creating the perfect key starts in production; not post.

Screen shot from the BorisFX Guide to Green-Screen Keys

Topic $TipTopic

The folks at BorisFX (Continuum, Mocha Pro and Sapphire) have published a guide covering production techniques that improve green-screen key results.

It starts:

Think of all the top movies from the past decade. What do they all have in common? Epic worlds that are so stunningly realistic you feel like you are really there. These films are created in no small part thanks to the power of the chroma key and a visual effect artist’s ability to “pull a perfect key,” i.e. removing a subject from green or blue screen footage.

In this guide, you’ll get a brief history of the chroma key, how to prepare your green screen set to avoid common shooting pitfalls, a glossary of terms, and discover why Primatte technology delivers the best solution to accomplish seamless composites fast whether a subject is placed over live-action or a CG background.

Here’s the link


Please rate the helpfulness of this tip.

Click on a star to rate it!

… for Visual Effects

Tip #792: Stunning Light Effects

Larry Jordan – LarryJordan.com

Fully-animated, colorful textures for multiple applications.

A lighting effect created by Spectrum, from Luca Visual Effects.

Topic $TipTopic

Recently, I was playing with the fascinating Spectrum plugin from Luca Visual FX. This generates fully-animated, full-screen light effects that can be used as backgrounds, illuminated text fills, or anywhere visually appealing, yet amorphous, backgrounds are required.

Spectrum is a bundle of two very customizable generators designed to create stylized light and color effects. Light Effect Generator can be used either to create unusual backgrounds or subtle overlays. Light Transition Generator allows the user to create freely interpreted quick light and color transitions over a given cut point.

Available from FX Factory, this generator supports:

  • Final Cut Pro X
  • Motion
  • Premiere Pro
  • After Effects

This plugin offers 1,400 (if I did my math right) different presets, plus tons of customization.

The plug-in costs $89 (US), however, a free trial is available to give you a chance to experiment. And, ah, giggle. This creates some very cool looks.

Here’s the link.


Please rate the helpfulness of this tip.

Click on a star to rate it!

… for Visual Effects

Tip #796: Particle Illusion – the App – Now FREE!

Larry Jordan – LarryJordan.com

Particle Illusion – the application – is now free.

A screen shot from a Particle Illusion demo by BorisFX.com.

Topic $TipTopic

Particle Illusion – the standalone application from BorisFX – is now available and FREE!

The new Particle Illusion application makes creating real-time motion graphics and particles a breeze.

  • Fun, fast, and easy-to-use
  • 2500+ professionally-designed, drag & drop presets
  • Unlimited hardware-accelerated particles
  • Unlimited particle emitters
  • Add forces and deflectors to create organic movement
  • Lightning-fast renders with ProRes export
  • Integrated motion blur
  • Supports up to 8K projects

See the video, learn more and download here.


Please rate the helpfulness of this tip.

Click on a star to rate it!

… for Visual Effects

Tip #798: The 3D Motion & Design Show Premieres

Larry Jordan – LarryJordan.com

Maxon redesigned and rebranded CineUniversity to 3DMotionShow.

Screen shot detail from first presentation at 3DMotionShow.com.

Topic $TipTopic

The team at Maxon – Cinema 4D, RedGiant & RedShift – have created a new online training and education website: 3DMotionShow.com.

It premiered June 18, with shows continuing until Dec. 9, 2020.

Current titles include:

  • Rigging and Animating Characters in Cinema 4D for the Hillarious Short: “Coffee Run”
  • Cinema 4D, Redshift and Red Giant Techniques Used to Create VFX for Talos
  • Time-Saving Compositing Tips in VFX Suite
  • Building a Crystal Cave with Cinema 4D/Redshift for the Short: “The Search”

Here’s the link to learn more and watch.


Please rate the helpfulness of this tip.

Click on a star to rate it!

… for Visual Effects

Tip #783: Red Giant Tutorials

Larry Jordan – LarryJordan.com

RedGiant Product Quick Tips are a fast way to see what’s possible.

A RedGiant Product Quick Tip: Quick & Awesome Titles

Topic $TipTopic

Wondering how to create a specific effect? Or hoping to find a faster and easier way to create the effect you see in your imagination?

The team at RedGiant has published a ton of tutorials covering their products, along with usage tips for nine different host applications (Avid, DaVinci, Final Cut, and Premiere, to name four).

What’s especially helpful is their series of Quick Tips – short video demos that illustrate cool effects you can create without a lot of extra work using their tools.

Here’s the link to learn more.


Please rate the helpfulness of this tip.

Click on a star to rate it!

… for Visual Effects

Tip #784: NewBlueFX Titling Tutorials

Larry Jordan – LarryJordan.com

NewBlueFX provides effects with an emphasis on titles

A sample title from NewBlueFX Titler Pro.

Topic $TipTopic

NewBlueFX is not well known on the Mac, but they’ve been creating effects for Windows systems for years.

They are best known for titling and effects, with both Titler Pro and Titler Live. They currently support Premiere, Avid, Edius, VEGAS and their own application: NewBlue Titler Pro 2+.

If you want to see what’s possible, and how to create it, check out their tutorials page. NewBlueFX has a wealth of plugins, templates and tutorials to bring your titles to the next level.

Here’s a link to learn more.


Please rate the helpfulness of this tip.

Click on a star to rate it!

… for Visual Effects

Tip #785: A Good Green-screen Tutorial

Larry Jordan – LarryJordan.com

Quality green screen keys focus on lighting, background and separation.

Image from B&H green-screen video.

Topic $TipTopic

As this video tutorial makes clear, the worst thing you can say on set about a green-screen effect is: “We’ll fix it in post.” As this video tutorial from B&H makes clear, by the time you get a green-screen to post, it is often too late.

This video tutorial illustrates key concepts to improve the quality of green-screen work on set; from lighting to background to staging. While the entire video is filled with tips – and only runs about three minutes – the most useful are examples to help you pay attention to your lighting.

Here’s the link to watch.


Please rate the helpfulness of this tip.

Click on a star to rate it!

… for Visual Effects

Tip #728: Improve Landscapes with Gradients

Larry Jordan – LarryJordan.com

Apply the Overlay blend mode to a B&W gradient to add magic to exteriors.

Clockwise from top left: Source, blend mode, gradient, finished image.

Topic $TipTopic

This trick was invented by Ansel Adams almost 100 years ago; when used with a lens, it’s called a “grad filter.” You can use it yourself to improve exterior shots. Here’s how.

  • Using Photoshop, or the NLE of your choice, create a smooth gradient the same frame size as your project, shading from black, at the top, to white, at the bottom.
  • Stack it on top of an image.
  • Apply the Overlay blend mode to the gradient.

Done.

NOTE: Vary the results by adjusting the width of the transition between the two colors, as well as rotating the angle of the transition.

Note how the darker portions of the gradient emphasize the texture and color of the clouds. While the lighter portions of the gradient highlight the foreground.

The overlay blend mode alters highlights and shadows, but not midtones, which is why the middle of the image looks the same in both shots.

This is a powerful effect that I use frequently.


Please rate the helpfulness of this tip.

Click on a star to rate it!

… for Visual Effects

Tip #723: 5 Highly Creative Edits

Larry Jordan – LarryJordan.com

Watch the video to see specific examples.

Topic $TipTopic

This article, written by Rubidium Wu, first appeared in PremiumBeat.com. This is an excerpt.

This video highlights some unusual and creative edits that can add value to your next video project.

Specifically:

  • The Punch Cut. By shooting a punch toward the camera, and then a reaction from the camera, you get a blow that appears to travel through the lens and into the audience.
  • Whip Pan Blur. As you pan, the image blurs. If you use this blur as a cut point between two shots, the effect is hidden in the pan. This can be great to hide a cut in a long take — or to make a stunt safer.
  • Shimmer Cut. By having ten or so interspaced single frames between your cuts, you can create a shimmer effect that has a lot of impact on the viewer. It’s best used for music videos when the beat kicks in.
  • Droop Cut. To enhance a regular “dip to black” fade between the cuts, I added a feathered vignette at the top and bottom of the frame. This looks more like the POV character is closing his eyes.
  • Dolly Behind Cut. If you ever have a scene where someone is interviewing multiple candidates, like a speed-dating environment or a police interrogation, it can be a nice transition to dolly behind the interviewer’s head, then cut at the moment the screen is black. This way you have an artful way of changing between characters in one shot.

The link at the top has videos that illustrate all these cuts.


Please rate the helpfulness of this tip.

Click on a star to rate it!

… for Visual Effects

Tip #727: Enhance images – Gradients & Blend Modes

Larry Jordan – LarryJordan.com

Gradients plus blend modes make images much more interesting.

The same shot with different gradients applied using the Overlay blend mode.

Topic $TipTopic

We can use gradients applied using blend modes to enhance our shots; especially exteriors.

An easy way to enhance almost any exterior is to apply a gradient shading from black at the top to white at the bottom. This enhances the sky while lightening the foreground.

But, you don’t need to stop with a simple black-and-white gradient. The screen shot illustrates that colors can also enhance your shots.

  • The top image is the source.
  • The middle image has a blue-to-green gradient applied using Overlay.
  • The bottom image has a blue-to-orange gradient also applied using Overlay.

These gradients can be created in Photoshop, or the NLE of your choice. Experiment with your own colors and watch what happens. I’ve had the best results using Overlay.


Please rate the helpfulness of this tip.

Click on a star to rate it!