… for Visual Effects

Tip #418: What is an Anchor Point?

Larry Jordan – LarryJordan.com

The anchor point determines rotation and scaling.

A repositioned anchor point in Adobe Premiere Pro CC.

Topic $TipTopic

When it comes to altering the position of an image, both Premiere and Final Cut allow us to adjust the “anchor point.” But what does it do?

The anchor point is that spot around which an image rotates or scales.

By default, it is in the center of the frame, allowing us to rotate or scale from the center. However, you can achieve some interesting effects by moving it.

In Premiere:

  • Select the clip you want to adjust. (Anchor points are adjusted on a clip-by-clip basis.)
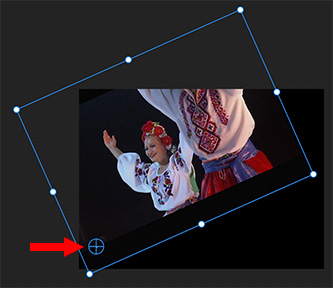
  • Click the word Motion in Effect Controls, then drag the plus sign in a circle in the Program Monitor to where you want to reposition the anchor point. (See the screen shot.)

In Final Cut Pro X:

  • Select the clip you want to adjust. (Like Premiere, anchor points are adjusted on a clip-by-clip basis.)
  • While you can’t adjust the anchor point by dragging, you can change its position in the Video inspector > Transform > Anchor.

Finally, adjust rotation or scale and watch what happens.


Please rate the helpfulness of this tip.

Click on a star to rate it!

… for Visual Effects

Tip #390: Super-slow Motion in DaVinci Resolve

Larry Jordan – LarryJordan.com

Super-slo-mo, without requiring a special camera.

Topic $TipTopic

This article, written by Rubidium Wu, first appeared in PremiumBeat. This is an excerpt.

Using some fancy new AI, DaVinci Resolve 16 can take your 60p footage and slow it down significantly by guessing what would be in-between the missing frames.

You need to first import for 60p footage into a 24p project. Before you drop it on the timeline, select Interpret Footage and tell Resolve to use it as 24p footage. Once you drop that part of your clip, you want to slow further. Select Change Speed from the contextual menu, and experiment with the settings. To get a 120 fps effect, reduce the speed by fifty percent.

The next step is to stay in the edit page and select the Speed and Timing tab. Instead of the default Project setting, set the retime process to Optical Flow and the Motion Estimation to Speed Warp.

You’ll need to reselect the part of the clip you want to slow down, since the retiming will tamper with the part that appears in the timeline. Once you’re happy with the selected area, render it out before doing any kind of color grade or editing. Unless you have a monster spec computer, it won’t play back in anything close to real time.

Once you’ve rendered the clip, import it back into Resolve, and you’ll have super-slow, smooth, 120p footage. This method works best when the movement itself isn’t too dramatic. If the object moves too fast, the optical flow will have a hard time guessing the missing pixels.


Please rate the helpfulness of this tip.

Click on a star to rate it!

… for Visual Effects

Tip #391: Simulate Poor Streaming Connections

Larry Jordan – LarryJordan.com

Glitches make pristine video look, ah, less so…

Image courtesy: Red Giant.

Topic $TipTopic

This is an excerpt from a recent YouTube video posted by Red Giant. This features an effect called: Glitch, which is part of Red Giant Universe. This plug-in runs on all major NLEs.

  • Search “RG Universe Stylize” in the effects panel/browser
  • Apply the “uni.glitch” effect onto the desired clip in the timeline
  • In the effects panel or Inspector, in the uni.glitch effect, click “select preset” to browse a variety of preset glitch effects, both for video and text
  • If you’d like the effect to begin at a certain point, turn the “glitch frequency” to 0, turn on keyframe recording, and then move to the desired beginning glitch point, and type 100 for glitch frequency.
  • The same can be done with the compression, small glitch, and large glitch parameters in the effects panel

Please rate the helpfulness of this tip.

Click on a star to rate it!

… for Visual Effects

Tip #396: Mask Your Microphone

Larry Jordan – LarryJordan.com

This is also called “clean-plate masking.”

Image courtesy of www.pexels.com.

Topic $TipTopic

This article first appeared in MotionArray. This is an excerpt.

You might know that one thing that’s essential to getting high-quality audio is to get your microphone as close to your subject as possible. This is one of the reasons that lavalier mics are such a great tool!

If you’ve only have a standard shotgun mic and you want to get it close to your subject, that can get tricky. What if you want a wide shot of your subject and you can’t get the mic close enough without it being in the picture? What do you do? Bring it into frame anyway and get it close to your subject.

Yes, really! As long as there’s distance at all times between the mic and the subject, and the background isn’t moving like crazy, you can mask out the mic in post-production. Make sure that at some point, you have the same shot minus the microphone to use as your clean plate. This will be important for editing the object out.

  1. Open your shot in your video editor.
  2. Take a sample of the clip without the microphone in it. Place it on the bottom layer of your timeline.
  3. Create a still frame from the clean background.
  4. Place your normal clip (the one with the mic visible) on the layer right above this one.
  5. Mask out your microphone on your main footage layer (this will allow the mic-less bottom layer to show through).
  6. Lastly, feather the edges just a tad.

Please rate the helpfulness of this tip.

Click on a star to rate it!

… for Visual Effects

Tip #370: 4 Steps to Better Skin Tones in Resolve

Larry Jordan – LarryJordan.com

Quick steps to improve skin without damaging the rest of your color grade.

Color wheels in DaVinci Resolve.

Topic $TipTopic

This article, written by Rubidium Wu, first appeared in PremiumBeat.

In this tip, we’re going to use DaVinci Resolve to improve skin tones, without affecting other color edits. Here’s how.

  • Make a Mask. In a new node, select the qualifying tool, and drag it across the most even and representative part of the face. Increasing the clean white also helps a lot.
  • Unify Tone. Once you have the skin isolated, increase the contrast and look for yellow, red, or green areas that don’t fit with the overall skin tone. In the Curves menu, select Hue vs. Hue, then select those colors using the curve up or down to shift the problem colors back to the central color.
  • Pare Imperfections. In the color tab, adjust the slider marked MD for Midtone Density. Turning this down gets rid of contrast in the skin, effectively hiding imperfections.
  • Separate. The last step is to add another node, then hit Option+L to turn this into a layer mixer node. Dragging the blue alpha arrow of the skin mask to the input on the lower of the two mixed nodes means that your skin grade will “pass around” anything done in the latter nodes. This lets you cool down the background — or desaturate it — without also affecting the skin.

Done.


Please rate the helpfulness of this tip.

Click on a star to rate it!

… for Visual Effects

Tip #371: Changing Clip Frame Rates in Resolve


The trick is to duplicate your clip first.

Topic $TipTopic

This article, by Lewis McGregor, first appeared in PremiumBeat. Do you need two clips from the same video file to play at different frame rates in your DaVinci Resolve timeline – say to create slow-motion? Here’s how.

To change a video clip recorded at a higher frame rate to a lower frame rate to achieve slow motion in Resolve:

  • Right-click a media clip in the media pool (or timeline) and open the clip attributes.
  • Change the frame rate to match your project settings.

However, the problem is that you are changing the base attributes of the clip that exist within the media pool. To fix this, either:

  • Adjust the speed percentage of the second clip.
  • Duplicate the clip in the media pool, then change the clip attributes. By duplicating the media in the media pool, we are creating a new clip from Resolve’s perspective, which allows us to change the frame rate of the second clip without affecting the first clip.

Please rate the helpfulness of this tip.

Click on a star to rate it!

… for Visual Effects

Tip #382: Stacking Order Makes a Difference

Larry Jordan – LarryJordan.com

Effects process from top to bottom

Two effects are applied to this clip: On the left, Sepia on top, Border under. On the right, the order is reversed.

Topic $TipTopic

Whether you use Adobe Premiere or Apple Final Cut, the stacking order of your effects makes a difference. Let me illustrate.

In this screen shot, the clip has two effects applied: Sepia and Border. On the left side, Sepia is above the border. So the image is first colorized, then the cyan border is added.

With the image on the right, the Border is on top. This means that the border is added, then both border and image are converted from full-color to Sepia.

If you apply more than one effect to a clip, remember that effects process from top to bottom. You can see the order of your effects in the Inspector (Final Cut) or Effect Controls panel (Premiere).


Please rate the helpfulness of this tip.

Click on a star to rate it!

… for Visual Effects

Tip #335: Remove Black Backgrounds & Blend Clips

Larry Jordan – LarryJordan.com

Blend modes are a great way to combine effects.

Smoke swirling over a fire. Both are effects and both use the Screen blend mode.

Topic $TipTopic

While many effects, such as those from HitFilm or Red Giant, include a transparent background, called the “Alpha Channel,” other effects don’t.

If you need to remove a black background when adding light-based effects, such as smoke, fire, gun flashes, and sparks, add the effect on top of the video as desired, and then apply the Screen blend mode.

This trick also works when applying light leaks from companies such as Light Leak Love and Rampant Design Tools.

NOTE: Be careful using the Add blend mode. While OK for web work, this creates white levels that exceed broadcast, cable and digital theater specs. I recommend against using it.


Please rate the helpfulness of this tip.

Click on a star to rate it!

… for Visual Effects

Tip #339: Inexpensive Green-screen Kits

Larry Jordan – LarryJordan.com

Do-It-Yourself is possible, but this kit is better.

This illustrates the contents of the Linco lighting kit.

Topic $TipTopic 
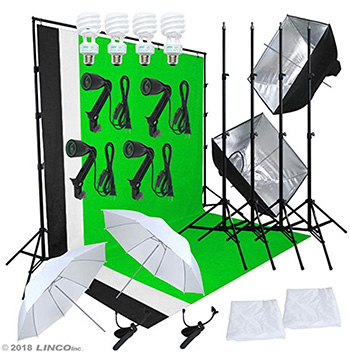
While there are tons of articles on the web about creating Do-It-Yourself green screen kits, what you save in money, you more than waste in post-production trying to pull a clean key from a cheap background. Instead, consider a green-screen background kit.

Here are three to look at.

There are many others to choose from. With these three, though, for less than $150, you get everything you need to create and light a background.

While the Emart kit is the least expensive, what I like about the other two kits is that they include softlights for the talent, as well.

The key to a successful key is an absolutely smooth and flat-lit background. Then, use separate lights to light the talent. Any of these kits can help.


Please rate the helpfulness of this tip.

Click on a star to rate it!

… for Visual Effects

Tip #345: Add Perspective

Larry Jordan – LarryJordan.com

Perspective makes your text stand-out.

This text perspective was created in Premiere using the Corner Pin effect.

Topic $TipTopic

If your NLE does not support adjusting text in 3D space, there’s an easy way to create the effect of text receding into the distance.

In Final Cut, its called Distort. In Premiere, you can use either Basic 3D or the Corner Pin effect. Older NLEs will probably only support corner pinning.

What corner pinning does is allow you to move each corner of a text or video clip and stretch it so that which is closest to the “camera” is wide, while that which falls into the distance is narrow.

3D rotation allows you to rotate a clip along its X (horizontal), Y (vertical) or Z (depth) axis. 3D is easier to use, but corner pinning provides far more bizarre effects, like a clip getting extruded through a bottle.

There’s no “magic number” on where to set values, use what looks good to your eyes. This screen shot, for instance, was created in Premiere using Corner Pin, the Stencil font and a bit of tweaking.

EXTRA CREDIT

You can animate this effect using keyframes.


Please rate the helpfulness of this tip.

Click on a star to rate it!