… for Visual Effects

Tip #327: Red Giant Universe: Create Chromatic Effects

Larry Jordan – LarryJordan.com

Some video looks better distorted.

All effects from Red Giant Universe.
RGB Separate and Chromatic Aberration effects applied to video of a crowd cheering.

Topic $TipTopic

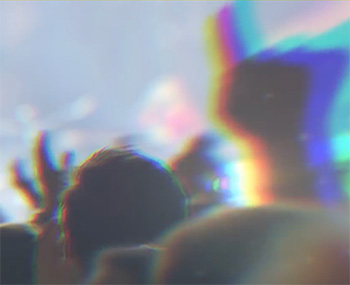
A “chromatic aberration” effect separates an image into it’s three main color components – red, green and blue – then shifts each one horizontally by different amounts. (This is easy to see in the screen shot.)

Most NLEs have some form of color shifting. Here’s how a version from Red Giant Universe works in Premiere.

  • While you can apply this to a single clip, you may want to create an adjustment layer and apply it to several clips at once.
  • Select the adjustment layer in the timeline.
  • In the effects panel, search for “uni.RGB separation” and apply it to the adjustment layer.
  • In the effects controls panel, edit the radius, distortion, angle, and linear to your liking.
  • To add a lens distortion effect, search for “uni.Chromatic Aberration” in the effects panel and apply to the adjustment layer.
  • Adjust the parameters in the effects controls.

EXTRA CREDIT

Here’s a video from Red Giant that show this in operation.


Please rate the helpfulness of this tip.

Click on a star to rate it!

… for Visual Effects

Tip #328: Track & Blur Faces

Larry Jordan – LarryJordan.com

Blurs are a great way to hide faces.

A Gaussian Blur applied to a portion of an image to blur a face.

Topic $TipTopic

When you need to hide a logo or face, a blur is a great way to do so. While no longer a safe way to protect identity (Tip #329), all NLEs provide a way to apply a blur to a portion of the image. Premiere also provides an easy way to motion track it. Here’s how.

  • Select the clip you want to blur in your Premiere timeline.
  • Apply Blur > Gaussian Blur from the Effects panel.
  • In Effect Controls, select the name of the mask – Mask (1) in my case – in the Gaussian Blur effect to make its controls visible in the Program Monitor.
  • Drag the blur in the Program Monitor to reposition it, then using either the on-screen controls or the mask settings in the Effect Controls panel, size and rotate it till it matches the same in your image.
  • Add Feathering to soften the edges. (In this screen shot, Feather = 22.0)
  • Increase the Blurriness till the face loses recognizability. (In this screen shot, Blurriness = 18.0)

EXTRA CREDIT

If the face moves, motion track the effect to automatically move the blur as the face moves. Here’s how:

  • Position the playhead at the start of the clip. (If the object you want to track is not visible, read Premiere’s help files for the best way to create a track.)
  • In the Effect Controls panel, click the right-pointing arrow in Mask Path for the mask you just created.
  • After a few seconds of analysis, Premiere will be able to track the mask as the subject moves.

NOTE: If the track fails to work, read Premiere’s help files for guidance. Explaining the intricacies of motion tracking is too large for a tip.


Please rate the helpfulness of this tip.

Click on a star to rate it!

… for Visual Effects

Tip #329: Blurs and Mosaics are No Longer Safe

Larry Jordan – LarryJordan.com

Blurs are no longer safeguards against protecting identity.

New graphics technology, combined with AI, recreates high-resolution images from blurry, low-res source files.

Topic $TipTopic

For years, editors have used mosaic and blur effects to hide the identity of on-screen talent. However, recent research has found a way to reverse-engineer a high-quality image of the speaker’s face from a low-resolution blur. Here’s what you need to know.

Research published in Sept. 2018, from universities in the US and China has revealed a technology that “learns to reconstruct realistic [image] results with clear structures and fine details.”

Using a low-resolution image (on the left), their technology creates a high-quality result using off-the-shelf computer hardware and nVidia GPUs. Using AI, the researchers discovered an algorithm “to directly restore a clear high- resolution image from a blurry low-resolution input.”

“Extensive experiments demonstrate that our method performs favorably against the state-of-the-art methods on both synthetic and real-world images at a lower computational cost.”

Here’s a link to their scientific paper. The text is highly technical, but the images are frightening, if you are a producer charged with protecting someone’s identity.

KEY TAKEAWAY

If you want to protect the identity of an on-camera speaker, don’t shoot their face. Today’s technology makes blurs, mosaics and low-res images completely ineffective.


Please rate the helpfulness of this tip.

Click on a star to rate it!

… for Visual Effects

Tip #121: Quickly Create Tracking Masks in Mocha

Larry Jordan – LarryJordan.com

Mocha Pro 2020 makes tracking masks easy.

Topic $TipTopic

A mask isolates something so we can place the masked object over a different background (or hide it altogether.)

A tracking mask does the same thing, but to a moving object; say a car or person. What makes tracking masks tricky is if the moving object changes position or shape during the move; for example, as people do as they walk.

Mocha Pro 2020 has a new feature that makes creating tracking masks easy:

  • Select the Area brush tool in the toolbar
  • Draw over the area you’d like to motion track
  • Scale the brush by selecting the open/close brackets
  • Press Option on Mac (Alt on Windows) to change the Area brush tool to erase

This is a much easier way to create masks to motion track objects, without having to create several shapes to isolate the desired tracking object.

Learn more about Mocha Pro here.


Please rate the helpfulness of this tip.

Click on a star to rate it!

… for Visual Effects

Tip #314: Faking a Stop Motion Effect in Premiere

Larry Jordan – LarryJordan.com

Stop Motion can be faked using Posterize Time.

Search for Posterize Time in the Effects panel.

Topic $TipTopic

A longer version of this article first appeared in RocketStock.com.

As you are probably aware, it takes a bit of time to set up, shoot, and edit a proper stop motion shot. But, what if the video is already shot? Can we create a similar effect in Premiere? Yes, and here’s how.

In Premiere, select the clip you want to work with, then:

  • Open the Effects panel and search for “Posterize Time.”
  • Apply this effect to your clips.
  • Adjust the frame rate to between 8 – 12 fps. Try 10 fps as a starting point.

Done.

EXTRA CREDIT

This effect can be used for much more. For example:

  • Emulate the look of very old film.
  • Apply it to existing motion graphics for a blockier, chunkier look.
  • Create flashbacks, dream sequences, even a “drunken sailor” look.

Please rate the helpfulness of this tip.

Click on a star to rate it!

… for Visual Effects

Tip #316: Working with Vertical Phone Footage

Larry Jordan – LarryJordan.com

Tips to coping with a 9:16 aspect ratio.

A vertical video example based on the settings in this Tip.

Topic $TipTopic

A longer version of this article first appeared in PremiumBeat.com.

Shooting vertical phone footage is a cardinal sin in film-making. However, that doesn’t mean we won’t be working with it in post. Here’s how.

The easiest thing to do is create two layers, zoom the bottom layer so it fills the screen, add some blur, and be done with it. The problem is that this doesn’t make the footage look very good.

Here’s a better technique:

  • Stack two copies of the same clip one above the other.
  • Using the Scale settings in your NLE, stretch the Y value, but leave the X (height) value alone.
  • Apply a Gaussian Blur and increase the amount a lot: say 70-100.
  • Lower the Opacity from 100% to 40-50%.

When you follow these steps, you end up with a more pleasing image, such as you see in this screen shot.


Please rate the helpfulness of this tip.

Click on a star to rate it!

… for Visual Effects

Tip #176: 3 Better Chroma Key Tips

Larry Jordan – LarryJordan.com

These tips improve how your actors look

A green-screen example.
As long as the background is evenly lit, you can light talent however you want.

Topic $TipTopic

This tip first appeared in Screencast-o-Matic.com.

It is impossible to over-state how important flat, even and well-exposed lighting is to creating a clean chroma-key. However, these three other tips also need to be considered.

  • Use separate lights for talent and background. The background needs to be bright and evenly lit top to bottom and side to side. The talent can be lit however your story requires. Never try to use the same light for both talent and background.
  • Avoid fly-away hair. Each strand catches green, which makes it flicker in the key. Bundle hair or put a hat on your talent.
  • Avoid wearing colors that match the background, unless you are looking for that “hollow body” look. Also, avoid clothing with closely arranged stripes or patterns. Herringbone and pinstripes are both no-nos.

Please rate the helpfulness of this tip.

Click on a star to rate it!

… for Visual Effects

Tip #181: The New Area Brush in Mocha Pro 2020

Larry Jordan – LarryJordan.com

Tracking is easy, selecting the shape is the really hard part.

The Area Brush in action, selecting multiple portions of a moving image.

Topic $TipTopic

New to Mocha Pro 2020 is the Area Brush with Quick Mask. Area Brush is designed to speed up and simplify Mocha shape creation for planar tracking and masking projects with simple paint strokes.

The power of the Area Brush is the ability to quickly create multiple add or subtract shapes on the same Mocha layer for advanced tracking. Here are some tips to use it effectively.

  • Select the Area Brush and paint on-screen If you have a Wacom tablet, the brush will scale based on pressure sensitivity.
  • Click on the Quick Mask button OR any other tool to convert your paint to spline and begin tracking.

Keystroke/Shortcuts

  • [ – scale brush radius down
  • ] – scale brush radius up

Subtract from the mask in Quick Mask Mode:

  • Alt + paint (Windows)
  • Option + paint (macOS)

Please rate the helpfulness of this tip.

Click on a star to rate it!

… for Visual Effects

Tip #211: 5 Creative Ways to Use Mirrors on a Video Shoot

Larry Jordan – LarryJordan.com

Mirror tricks to make your productions look bigger.

Image courtesy Shutterstock.com
Use a mirror to capture extreme low-angle shots. (Courtesy: Shutterstock.com)

Topic $TipTopic Jason Boone first wrote about this for Shutterstock.

Mirrors are surprisingly helpful on video shoots – and for far more than checking hair and makeup. As cameras get smaller, mirrors can help you get shots you’d otherwise miss.

Here are some examples:

  • Overhead rig. Put a mirror, rather than the camera, on a C-stand then shoot into it, using it for an overhead angle. A 45° angle tends to work best, because then the camera can shoot directly into it.

NOTE: Remember to flip the video in post to compensate for the reversed image in the mirror.

  • Low angle. Lean the mirror against a book placed on the ground for an extreme low angle.
  • Extra depth. Hang the mirror from a C-stand where the camera would normally be placed. Then, put the camera next to the talent and shoot into the mirror to get extra depth.
  • Fake background. Put the mirror near the talent and use it to create a fake background, if the actual background is uninteresting or objectionable.
  • Reaction shot. When using two or more actors position a mirror to show one actor reacting to another actor. This is a clever way to capture a reaction shot without using or cutaway – or wasting time in shooting a different angle.

EXTRA CREDIT

  • Remember to keep the mirror extra clean all the time.
  • Use a large mirror
  • Bring along an assistant to help with mirror wrangling.

Please rate the helpfulness of this tip.

Click on a star to rate it!

… for Visual Effects

Tip #101: What’s the Difference Between Color Grading and Color Correction?

Larry Jordan – LarryJordan.com

Both involve color, but in different ways.

Topic $TipTopic

The short answer is that color correction fixes problems, while color grading gives images a “look.”

Typical color correction involves:

  • Removing color casts
  • Setting proper highlight and shadow levels
  • Controlling any excessive highlights (speculars)

For example, the top image was color corrected to boost highlights and increase saturation.

Color grading, on the other hand, takes what we have done in color correction and tweaks the color and grayscale levels to match the story. For example:

  • Boosting saturation for a romantic comedy
  • Decreasing saturation for dystopian scifi
  • Removing color for a film noir

And so on.

Generally, you fix problems first, then create looks second.


Please rate the helpfulness of this tip.

Click on a star to rate it!